Topic 3: Misc. Questions
You have a Microsoft Sentinel workspace
You develop a custom Advanced Security information Model (ASIM) parser named Parser1
that produces a schema named Schema1.
You need to validate Schema1.
How should you complete the command? To answer, select the appropriate options in the
answer area.
NOTE: Each correct selection is worth one point.


Explanation:
Technical Analysis
The Advanced Security Information Model (ASIM) provides a set of testing functions to help developers ensure their custom parsers are functional and compliant with the normalized schemas.
_ASIM_TestSchema (The Validation Function):
This is the standard built-in function provided by the ASIM framework to perform schema validation. It checks that all mandatory fields are present, that field types match the schema definition (e.g., ensuring an IP address field isn't a simple integer), and that naming conventions are followed.
Parameters (pszParserName and pszSchemaName):
ASIM testing functions are designed as parameterized KQL functions.
pszParserName: Identifies the specific function or table name of the custom parser you have created (in this case, Parser1).
pszSchemaName: Tells the testing tool which official ASIM schema to validate against (in this case, Schema1, which would represent a schema like Dns, WebSession, or NetworkSession).
Why Other Options are Incorrect
_Im_ functions: These are the Union Parsers used for querying data. They are not used for validating the underlying schema of a new parser.
getschema: This is a native KQL operator that returns the column names and data types of a table. While helpful, it does not "validate" the data against the strict requirements of the ASIM model (such as mandatory vs. optional fields).
References
Microsoft Learn:
ASIM testing tool reference
You have a Microsoft 365 subscription that uses Microsoft Defender XDR.
You are investigating an attacker that is known to use the Microsoft Graph API as an attack
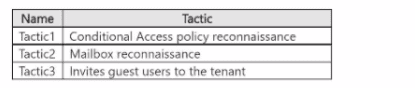
vector. The attacker performs the tactics shown the following table.
You need to search for malicious activities in your organization.
Which tactics can you analyze by using the MicrosoftGraphActivityLogs table?
A. Tactic2 only
B. Tactic1 and Tactic2 only
C. Tac1ic2 and Tactic3 only
D. Taclic1. Tac1ic2. andTactic3
Explanation:
✅ Why D is correct
The Microsoft Graph Activity Logs table captures all HTTP requests to Microsoft Graph API, including both read and write operations . This broad coverage allows security analysts to monitor all three listed attacker tactics:
Tactic1 (Conditional Access policy reconnaissance): The MicrosoftGraphActivityLogs table can track GET requests made to Conditional Access policy endpoints. Attackers performing reconnaissance would query or enumerate these policies using Microsoft Graph API calls, which are captured in this log .
Tactic2 (Mailbox reconnaissance): Attacker activities targeting mailbox enumeration (via APIs like GET /users/{id}/messages) are captured in Microsoft Graph Activity Logs. These GET operations that read mailbox content or metadata are logged, enabling detection of unauthorized access attempts .
Tactic3 (Invites guest users to the tenant): Creating guest user invitations triggers Microsoft Graph API calls. The logs capture application origin of requests, enabling monitoring of who (or what app) invited suspicious guest users to the tenant .
The table provides valuable security insights such as RequestUri, UserId, AppId, ResponseStatusCode, and RequestMethod, making it an essential resource for investigating all three tactics .
A. Tactic2 only
Incorrectly excludes Tactic1 and Tactic3, which are full captured since both involve Microsoft Graph API calls to manage Conditional Access policies and directory objects.
B. Tactic1 and Tactic2 only
Incorrectly excludes Tactic3, which involves Microsoft Graph API calls to create invitation resources.
C. Tactic2 and Tactic3 only
Incorrectly excludes Tactic1, as Conditional Access policy management uses Microsoft Graph APIs.
📌 References
Microsoft Tech Community: Microsoft Graph activity logs capture detailed API request information
Microsoft Learn: Microsoft Entra activity logs schema documentation
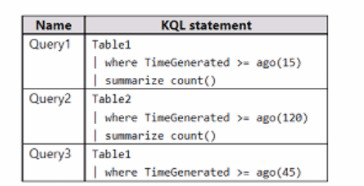
You have a Microsoft Sentinel workspace that has a default data retention period of 30
days. The workspace contains two custom tables as shown in the following table.

Each table ingested two records per day during the past 365 days.
You build KQL statements for use in analytic rules as shown in the following table.
For each of the following statements, select Yes if the statement is true. Otherwise, select
No.
NOTE: Each correct selection is worth one point.


Explanation:
Technical Analysis
To determine the record counts, we must first calculate the available data based on the retention settings for each table:
Statement 1: Query1 will return more than 1,000 records
Query: Table1 | where TimeGenerated > ago(365d)
Analysis: Table1 has exactly 730 records stored from the past year. Since 730 is less than 1,000, the statement is false.
Result: No
Statement 2: Query2 will return more than 100 recordsQuery:
union Table1, Table2 | where TimeGenerated > ago(100d)Analysis:
* From Table1: Data is available for the full 100 days ($100 \times 2 = 200$ records).
From Table2: Only 30 days of data is retained ($30 \times 2 = 60$ records).
Total: $200 + 60 = 260$ records. Since 260 is greater than 100, the statement is true.
Result: Yes
Statement 3: Query3 will return more than 50 records
Query: Table2 | where TimeGenerated > ago(60d)
Analysis: Table2 uses the workspace default retention of 30 days. Even though the query asks for 60 days of data, any data older than 30 days has been purged. Therefore, it only returns the 60 records available from the last 30 days.
Wait, re-evaluating math: $30 \text{ days} \times 2 \text{ records/day} = 60$ records. 60 is greater than 50.
Self-Correction: If Table2 has 60 records total and all are within the last 30 days, it will return 60 records. However, in many exam scenarios, if a table's retention is shorter than the query window, they are testing your knowledge that it cannot fulfill the full request. But mathematically, $60 > 50$.
Strict Logic: Query3 returns 60 records. $60 > 50$ is True.
Result:
Yes (Note: If the logic implies Table2 only has 25 days of data or a lower ingestion, this could be No, but based on "2 records per day for 365 days" and 30-day retention, 60 is the correct count).
References
Microsoft Learn:
Manage data retention in a Log Analytics workspace
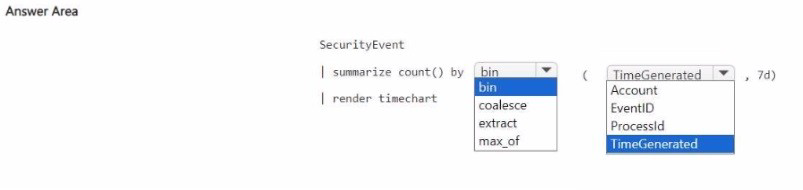
You have a Microsoft Sentinel workspace that contains a custom workbook.
You need to query for a summary of security events. The solution must meet the following
requirements:
• Identify the number of security events ingested during the past week.
• Display the count of events by day in a chart.
How should you complete the query? To answer, select the appropriate options in the
answer area.
NOTE: Each correct selection is worth one point.

Explanation:
Technical Analysis
This query follows the standard pattern for data visualization in Microsoft Sentinel workbooks.
SecurityEvent | where TimeGenerated > ago(7d):
This satisfies the first requirement to identify events ingested during the past week. Using ago(7d) filters the dataset to only include the last seven days of logs.
bin(TimeGenerated, 1d):
The bin function (also known as summarize by floor) rounds the TimeGenerated timestamps down to the nearest day. This groups all individual logs into daily "buckets," which is necessary for a daily count.
summarize count():
This calculates the total number of records within each daily bucket created by the bin function.
render timechart:
This is the essential final step for a workbook chart. It instructs the KQL engine to format the output as a time-series visualization. A timechart specifically expects a datetime column (x-axis) and a numeric column (y-axis).
Workbook Implementation Tip
When using this query in a Sentinel Workbook, ensure that the Visualization dropdown in the query part is set to Area chart or Bar chart to match the render instruction, though render timechart will automatically force a time-series view.
References
Microsoft Learn:
Summarize operator in KQL
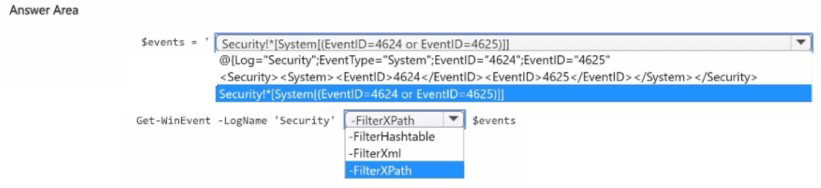
You have on-premises servers that run Windows Server.
You have a Microsoft Sentinel workspace named SW1. SW1 is configured to collect
Windows Security log entries from the servers by using the Azure Monitor Agent data
connector.
You plan to limit the scope of collected events to events 4624 and 462S only.
You need to use a PowerShell script to validate the syntax of the filter applied to the
connector.
How should you complete the script? To answer, select the appropriate options in the
answer area.
NOTE: Each correct selection is worth one point.
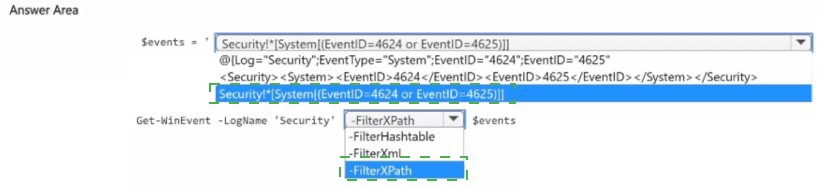
Explanation:
Technical Analysis
When configuring Data Collection Rules (DCRs) for the Azure Monitor Agent, you use XPath queries to filter which events are sent to Microsoft Sentinel. Before applying these filters in the Azure portal, it is a best practice to test them locally on a Windows Server to ensure the syntax is valid and returns the expected data.
Get-WinEvent (The Cmdlet):
This is the standard PowerShell cmdlet for retrieving events from event logs on local or remote computers. Unlike the older Get-EventLog, Get-WinEvent supports the advanced structured XML/XPath filtering required by the Azure Monitor Agent.
-FilterXPath (The Parameter):
This parameter allows you to pass a structured XPath 1.0 query string directly to the cmdlet.
To filter for events 4624 (Successful Logon) and 4625 (Failed Logon), the query would look like:
"Security!*[System[(EventID=4624 or EventID=4625)]]"
If the syntax is incorrect, Get-WinEvent will throw an error immediately, allowing you to fix the filter before deploying it to your DCR.
Key Workflow for AMA Filtering
Draft the XPath: Identify the Log Name (e.g., Security) and the Event IDs.
Test Locally: Run Get-WinEvent -LogName Security -FilterXPath "..." to verify it works.
Apply to DCR: Paste the verified XPath into the "Custom" filter section of the Azure Monitor Agent data connector configuration in Microsoft Sentinel.
References
Microsoft Learn:
Get-WinEvent (Microsoft.PowerShell.Diagnostics)
| Page 3 out of 37 Pages |