Topic 3: Misc. Questions
You have a Microsoft Sentinel workbook that contains the following KQL query.
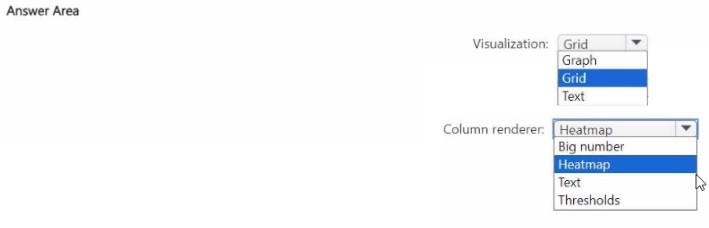
You need to create a visual that will change the color of the errCount column based on the
value returned. How should you configure the visual? To answer, select the appropriate
options in the answer area. NOTE: Each correct selection is worth one point.
Explanation
Workbooks use "Column Renderers" to transform raw KQL data into visual indicators.
Heatmap (Column renderer):
Why: The Heatmap renderer is specifically designed to apply background colors to cells based on their numerical value. It automatically calculates the distribution of values in the errCount column and applies a color gradient.
Alternative: The "Link" renderer is for navigation, "Text" is for plain data, and "Bar chart" renders a horizontal bar inside the cell rather than changing the background color of the whole cell.
Green to Red (Color palette):
Why: In security operations, "Green to Red" is the standard semantic palette for error counts or risk levels. Lower values (fewer errors) are rendered in green, while higher values (more errors) trend toward red. This provides an immediate "at-a-glance" status for the security analyst.
References
Microsoft Learn: Visualize data with Microsoft Sentinel workbooks - Column settings
Microsoft Learn: Workbooks heat map renderer
You have an on-premises datacenter that contains a custom web app named Appl. App1
uses Active Directory Domain Services (AD DS) authentication and is accessible by using
Microsoft Entra application proxy.
You have a Microsoft 365 E5 subscription that uses Microsoft Defender XDR.
You receive an alert that a user downloaded highly confidential documents.
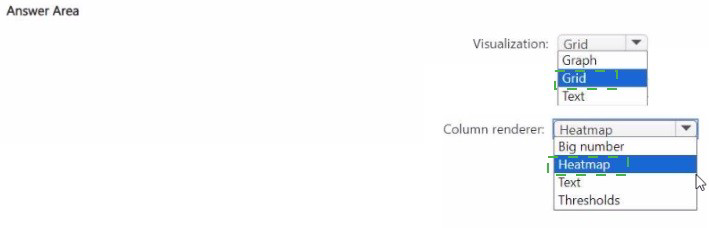
You need to remediate the risk associated with the alert by requiring multi-factor
authentication (MFA) when users use App1 to initiate the download of documents that have
a Highly Confidential sensitivity label applied.
What should you do? To answer, select the appropriate options in the answer area.
NOTE: Each correct selection is worth one point.
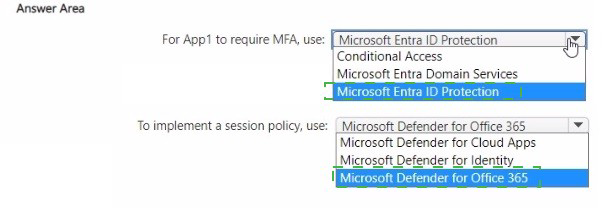
Explanation:
This solution uses Real-time Monitoring to apply granular controls based on content sensitivity, which goes beyond standard sign-in requirements.
Conditional Access App Control (The Control):
Microsoft Entra Application Proxy allows on-premises apps to be "surfaced" in Entra ID. By enabling Conditional Access App Control, you route the user's session through Microsoft Defender for Cloud Apps (a reverse proxy).
This allows the system to inspect the session in real-time, rather than just at the moment of login.
Microsoft Defender for Cloud Apps Session Policy (The Component):
Standard Conditional Access policies are "binary" (allow or block access). A Session Policy allows for "In-browser" controls.
You can specifically create a session policy with the control type "Control file download (with inspection)." * Within this policy, you set a filter for the Sensitivity Label "Highly Confidential." When a user attempts to download a file with that label, the policy action is set to "Require step-up authentication" (MFA), satisfying the requirement to trigger MFA specifically for that high-risk action.
Why Other Options Are Incorrect
Entra ID Conditional Access Policy alone: While you can require MFA for accessing App1, a standard CA policy cannot differentiate between downloading a regular file and a "Highly Confidential" file. It lacks "content awareness."
Authentication Strength: This is a feature within CA policies to define which MFA methods are allowed (e.g., FIDO2 vs. SMS), but it doesn't provide the session-level inspection needed here.
Sensitivity Label Policy: This governs where labels can be applied and who can see them, but it does not trigger MFA during a web app download process.
References
Microsoft Learn: Protect apps with Microsoft Defender for Cloud Apps Conditional Access App Control
Microsoft Learn: Create Defender for Cloud Apps session policies
You have an Azure DevOps organization that contains an Azure Repos respository named
Repo1 and is onboarded to Microsoft Defender for DevOps.
You create infrastructure as code (laC) files and store them in Repo1. The laC files are
formatted as Bicep files and Helm charts.
You need to configure Defender for DevOps to identify misconfigurations in the laC files.
Which scanning tool should you use for each type of files? To answer, select the
appropriate options in the answer area.
NOTE: Each correct selection is worth one point.

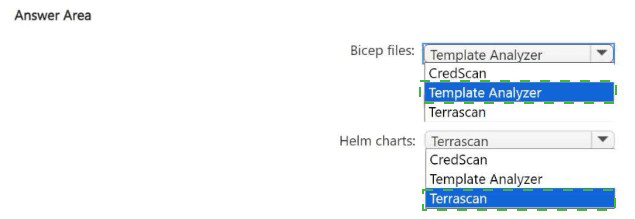
Explanation
Microsoft Defender for DevOps utilizes the Microsoft Security DevOps (MSDO) CLI, which acts as an orchestrator for various open-source security analysis tools within your CI/CD pipelines.
Bicep files (Terrascan):
Reasoning: Terrascan is a static code analyzer that specifically supports a wide range of IaC providers, including Azure Bicep and ARM templates. Within the MSDO toolkit, it is the primary engine used to detect security vulnerabilities and compliance violations in Azure-native infrastructure files.
Helm charts (Checkov):
Reasoning: Checkov is a policy-as-code tool that excels at scanning Kubernetes-related configurations. It provides deep inspection of Helm charts to identify misconfigurations such as unprivileged containers, missing resource limits, or insecure network policies.
References
Microsoft Learn:
Configure the Microsoft Security DevOps Azure DevOps extension
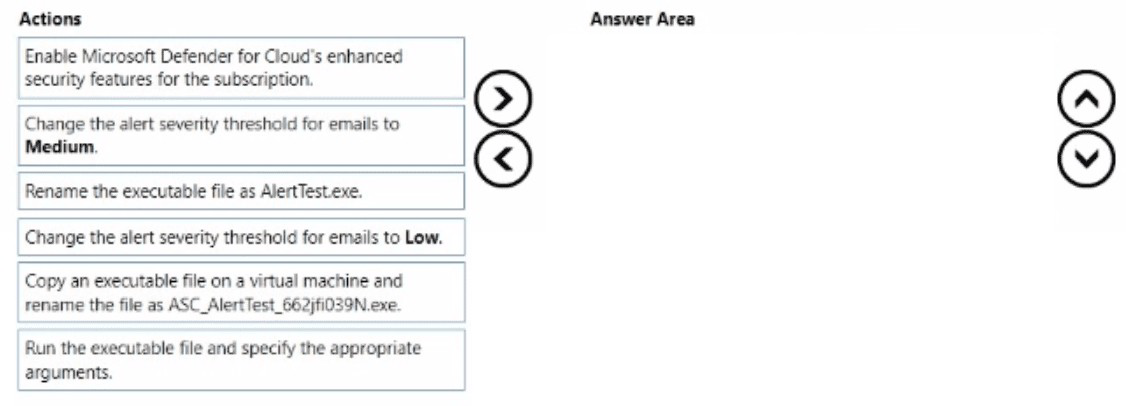
You create a new Azure subscription and start collecting logs for Azure Monitor.
You need to validate that Microsoft Defender for Cloud will trigger an alert when a
malicious file is present on an Azure virtual machine running Windows Server.
Which three actions should you perform in a sequence? To answer, move the appropriate
actions from the list of action to the answer area and arrange them in the correct order.
NOTE: More than one order of answer choices is correct. You will receive credit for any of
the correct orders you select.
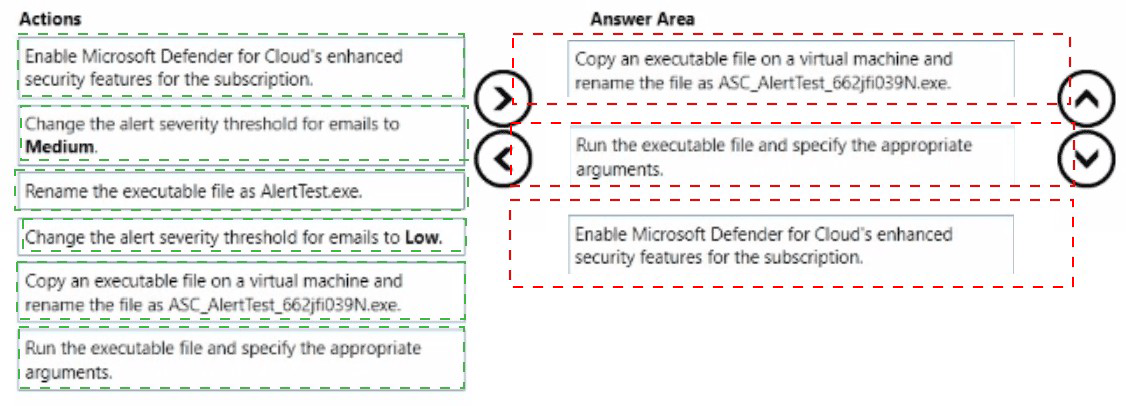
Explanation:
This workflow ensures the security stack is active, connected, and capable of responding to a non-malicious "safe" threat.
Step 1: Enable Microsoft Defender for Servers: Before any alerts can be triggered, the specific protection plan must be enabled at the subscription or resource group level. This activates the integration with Microsoft Defender for Endpoint (MDE), which provides the actual malware detection engine for the Windows Server.
Step 2: Log on to the VM: You must have an active session on the target machine to simulate the presence of a file.
Step 3: Run the EICAR test script: The EICAR (European Institute for Computer Antivirus Research) test file is a industry-standard string used to test antivirus software. It is not actual malware and is harmless to the system, but security vendors—including Microsoft—program their engines to treat it as a "Virus" to verify that detection and alerting pipelines are working from the endpoint up to the Defender for Cloud dashboard.
References
Microsoft Learn:
Alert validation in Microsoft Defender for Cloud
Microsoft Learn:
Microsoft Defender for Servers - Overview
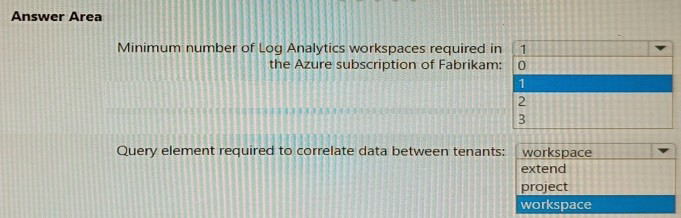
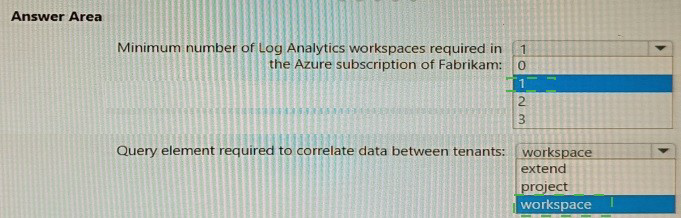
You need to implement Microsoft Sentinel queries for Contoso and Fabrikam to meet the
technical requirements.
What should you include in the solution? To answer, select the appropriate options in the
answer area.
NOTE: Each correct selection is worth one point.
Explanation:
Managing security operations across multiple tenants or business units requires specific KQL syntax to bridge disparate data sources efficiently.
workspace() expression:
Why: In a multi-workspace environment, you need a way to tell the KQL engine to look outside the "current" workspace. The workspace('NameOrID') expression allows you to reference tables in other Sentinel or Log Analytics workspaces. For example, workspace("ContosoWS").SecurityEvent | union workspace("FabrikamWS").SecurityEvent allows an analyst to hunt across both organizations from a single interface.
union operator:
Why:While union is used to combine multiple tables, it is also a performance-critical operator when dealing with large datasets. When used correctly with the workspace() expression, it allows the query engine to parallelize the search across the underlying clusters of each workspace.
Efficiency: To maximize performance, filters (like where clauses) should be applied before the union or as close to the source as possible to reduce the amount of data being shuffled between workspace instances.
References
Microsoft Learn: Perform cross-workspace queries in Microsoft Sentinel
Microsoft Learn: KQL union operator
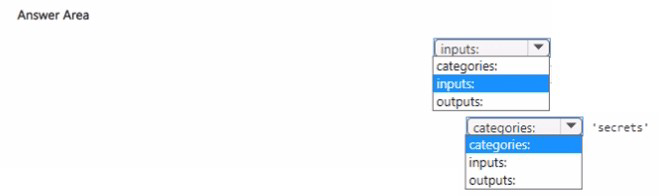
You have an Azure subscription named Sub1 and an Azure DevOps organization named
AzDO1. AzDO1 uses Defender for Cloud and contains a project that has a YAML pipeline
named Pipeline1.
Pipeline1 outputs the details of discovered open source software vulnerabilities to Defender
for Cloud.
You need to configure Pipeline1 to output the results of secret scanning to Defender for
Cloud,
What should you add to Pipeline1? To answer, select the appropriate options in the answer
area.
NOTE: Each correct selection is worth one point.

Explanation:
This configuration utilizes the Microsoft Defender for DevOps ecosystem to bridge the gap between your CI/CD pipeline and your security dashboard.
MicrosoftSecurityDevOps@1 (Task):
Why:This is the unified task provided by Microsoft to run a suite of open-source security tools (like Gitleaks for secrets, Terrascan for IaC, and others) within a pipeline. Since you already have vulnerability scanning, adding or configuring this task specifically for secrets scanning is the required step.
publishSecurityAnalysis (Variable):
Why: Even if the tools run, the results will remain local to the build agent unless they are explicitly published. Setting the publishSecurityAnalysis variable to true (or using the publish parameter within the task) instructs the pipeline to upload the analysis results (usually in SARIF format) to the security tab in Azure DevOps and, subsequently, to Microsoft Defender for Cloud.
References
Microsoft Learn:
Configure the Microsoft Security DevOps Azure DevOps extension
| Page 10 out of 37 Pages |