Topic 5: Misc, Questions
You have a Microsoft 365 E5 subscription that uses Teams.
You need to integrate Microsoft 365 Defender with Teams to prevent users from uploading
malicious files to a Teams channel.
What should you do first?
A. Turn on the Built-in protection (Microsoft) Safe Links policy.
B. From Safe Links, edit the Global settings.
C. From Safe Attachments, edit the Global settings.
D. Create a Sate Attachments policy.
Your company uses Teams.
Users often use Teams mobile apps to make and receive calls.
You change the display name for a user named User1.
User! reports that their previous name still appears when they receive incoming calls in the
Teams mobile app.
You need to ensure that the updated display name for User1 appears.
What should you do?
A. Run the Sync-CsOnlineApplicationlnstance Cmdlet.
B. Collect and review the Debug logs.
C. From the Microsoft 365 admin center, run self-help diagnostics
D. Clear the Microsoft Teams client cache on the mobile phone.
Task 10
You need to ensure that when users join meeting by using a phone, they are prompted to record their name.
Answer: See the solution in the explanation below:
Explanation:
To ensure that when users join a meeting by using a phone, they are prompted to record their name, you need to enable the meeting entry and exit notifications in the Teams admin center. Here are the steps to follow:
Sign in to the Teams admin center with your admin credentials.
Go to Meetings > Conference Bridges.
At the top of the Conference Bridges page, select Bridge settings. Enable the Meeting entry and exit notifications toggle.
Choose Names for the Entry/exit announcement type.
Turn on the toggle for Ask callers to record their name before joining a meeting. Click Save to apply the settings.
Task 12
you need to create a Microsoft 365 group named TeamsAdmin that can manage Teams Phone configurations without being able to manage teams and channels.
Answer: See the solution in the explanation below:
Explanation:
To create a Microsoft 365 group named TeamsAdmin that can manage Teams Phone configurations without being able to manage teams and channels, you need to use PowerShell to create the group and assign the Teams Communications Administrator role to it. Here are the steps to follow:
Install the Azure Active Directory PowerShell for Graph module by running the
following cmdlet: Install-Module -Name AzureAD
Connect to Azure Active Directory by running the following cmdlet and entering your Microsoft 365 username and password:
Connect-AzureACreate a new Microsoft 365 group named TeamsAdmin by running the following cmdlet:
New-AzureADMSGroup -DisplayName "TeamsAdmin" -Description "Group for managing Teams Phone configurations" -MailEnabled $false -MailNickName "TeamsAdmin" - SecurityEnabled $true -GroupTypes "Unified"
Get the object ID of the new group by running the following cmdlet: Get-AzureADMSGroup -Filter "DisplayName eq 'TeamsAdmin'"
Copy the object ID from the output and assign it to a variable, such as $groupID, by running the following cmdlet:
$groupID = "your-object-iInstall the Microsoft Teams PowerShell module by running the following cmdlet:
Install-Module -Name MicrosoftTeams
Connect to Microsoft Teams by running the following cmdlet and entering your Microsoft 365 username and password:
Connect-MicrosoftTeams
Get the role ID of the Teams Communications Administrator role by running the following cmdlet:
Get-CsOnlineRole -Identity "Teams Communications Administrator"
Copy the role ID from the output and assign it to a variable, such as $roleID, by running the following cmdlet:
$roleID = "your-role-id"
Assign the Teams Communications Administrator role to the TeamsAdmin group by running the following cmdlet:
New-CsOnlineRoleAssignment -SecurityGroupId $groupID -RoleDefinitionName $roleID Now, you have created a Microsoft 365 group named TeamsAdmin that can manage Teams Phone configurations without being able to manage teams and channels. You can add members to this group by using the Azure Active Directory admin center or PowerShell.
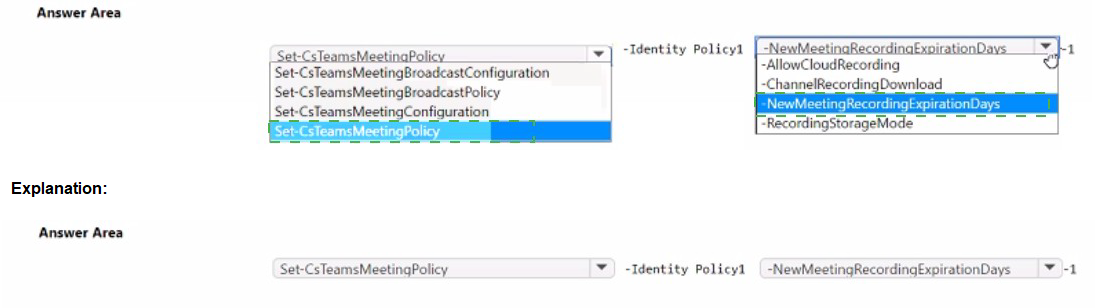
Your company uses Microsoft Teams.
You have a meeting policy named Policy1 that is assigned to a group named Sales.
You need to ensure that all the meetings recorded by the Sales group are stored
indefinitely.
How should you complete the PowerShell cmdlet? To answer, select the appropriate
options in the answer area.
NOTE: Each correct selection is worth one point.
Task 1
You need to ensure that all unused teams expire and are deleted automatically. The solution must meet the following requirements.
•The teams must expire 365 days from their creation date.
•Notifications for the expiration of orphaned teams must be sent to adminLODSe551723.onmicrosoft.com.
Answer: See the solution in the explanation below:
Explanation:
To ensure that all unused teams expire and are deleted automatically, you need to configure a Microsoft 365 group expiration policy. This policy applies to teams because they are backed by groups. Here are the steps to follow:
Sign in to the Microsoft 365 admin center with your admin credentials.
Go to Groups > Expiration.
Turn on the Enable expiration toggle.
In the Group lifetime box, enter 365 days or select it from the drop-down list. This means that the teams will expire 365 days from their creation date.
In the Select group types to apply the policy section, check the Teams box. You can also select other group types if you want.
In the Choose how to handle owners of groups without owners section,
enter adminLOD-Se551723.onmicrosoft.com as the email address to receive notifications for the expiration of orphaned teams. You can also add more email addresses if you want.
Click Save to apply the policy.
That’s it. You have successfully configured a group expiration policy for teams. This policy will automatically delete the teams that are not renewed by their owners before the expiration date. You can also view and restore the deleted teams within 30 days from the Deleted groups page in the admin center.
Task 5
You need to prevent incoming Teams call notifications when users are already on a Teams call or in a Teams meeting. The solution must NOT reject the call.
Answer: See the solution in the explanation below:
Explanation:
To prevent incoming Teams call notifications when users are already on a Teams call or in a Teams meeting, you can use the Teams admin center to enable the Mute notifications during meetings and calls option. This option will suppress the incoming call notifications without rejecting the call. The caller will still hear the ringing tone and the callee can still answer the call from the Teams app or the taskbar. Here are the steps to enable this option:
Sign in to the Teams admin center with your Microsoft 365 username and password1.
In the left navigation, go to Teams > Teams update policies.
Select an existing policy or create a new one by clicking Add.
In the Update policy pane, under Meetings and calls, turn on the toggle for Mute notifications during meetings and calls.
Click Save and then Close.
Note: You can assign different update policies to different users or groups of users. For more information, see Manage update policies in Microsoft Teams2.
Task 11
You need to ensure that users can perform the following actions:
•Record Teams calls and Teams meeting.
•Transcribe Teams calls and Teams meeting.
Answer: See the solution in the explanation below:
Explanation:
To ensure that users can perform the following actions: Record Teams calls and Teams meeting.
Transcribe Teams calls and Teams meeting.
You need to do the following:
Turn on the recording and transcription settings in the Teams admin center. This will allow users to start and stop recording and transcription during a meeting or call. The recording and transcription will be stored in OneDrive or SharePoint and available in the meeting chat or channel conversation. For more details,
see Record a meeting in Microsoft Teams.
Turn on the transcription and captions settings in the Teams admin center. This will enable automatic transcription and captions for meeting recordings. Users can play back the recordings with closed captions and review the transcript in the Recording & Transcripts tab in Teams. For more details, see Configure transcription and captions for Teams meetings.
Turn on the live transcription settings in the Teams admin center. This will allow users to view live transcription during a meeting or call. Users can also download the transcript after the meeting or call. For more details, see View live transcription in Microsoft Teams meetings.
You have a Microsoft 365 E3 subscription that uses Microsoft Teams.
You plan to deploy 20 conference phones that win support Direct Routing and one-touch
join for Teams calendar meetings.
Which type of license do you require for each phone?
A. Microsoft 365 Business Standard
B. Microsoft Teams Rooms Standard
C. Common Area Phone
D. Microsoft 365 E3
Task 12
A company named Contoso, Ltd, plans to deploy Teams Phone with location-based emergency dialing.
You need to ensure that when users dial emergency numbers, the call is routed based on the user's current location
You do NOT need to configure networks and locations at this time.
Explanation:
To ensure that when users dial emergency numbers, the call is routed based on the user’s current location, you need to enable the external location lookup mode in Teams. This mode allows Teams to use the location services of the device’s operating system to suggest an emergency address for the user. The user can then confirm, edit, or enter a new address, which will be used to route the emergency call to the appropriate Public Safety Answering Point (PSAP). Here are the steps to follow:
Sign in to the Teams admin center with your admin credentials.
Go to Voice > Emergency policies. Select Add.
Enter a name for the emergency calling policy, for example, “E911WFH”. Turn on External location lookup mode.
Select Apply to create the policy.
To assign the policy to the users who need it, go to Users on the left menu and select the users that you want to apply the policy to. You can use the filters or the search box to find them.
On the right pane, under Policies, select Edit next to Emergency calling policy. Choose the policy that you created from the drop-down list and click Apply.
| Page 4 out of 34 Pages |