Topic 2: Contoso, Ltd. Contoso, Ltd. Is a sales company in the manufacturing industry. It has subsidiaries in multiple countries/regions, each with its own localization. The subsidiaries must be data-independent from each other. Contoso. Ltd. uses an external business partner to manage the subcontracting of some manufacturing items. Contoso. Ltd. has different sectors with data security between sectors required.
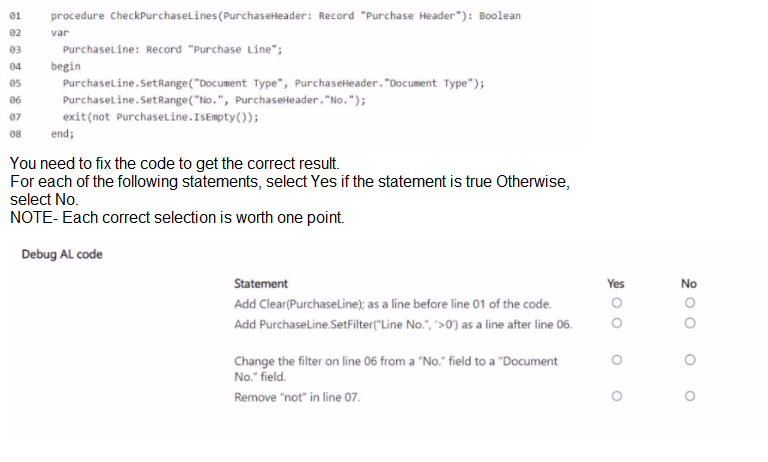
You create a procedure to check if a purchase order has lines.
The procedure returns false for purchase order PO-00001 even though it has purchase
lines.
Explanation:
The procedure returns false incorrectly because the filter is applied on the wrong field. Purchase lines are linked to the purchase header via "Document No.", not "No.". The "No." field on Purchase Line is the item or resource number, not the document number. This causes the filter to return no records, making IsEmpty() true, and not IsEmpty() false.
Correct Option:
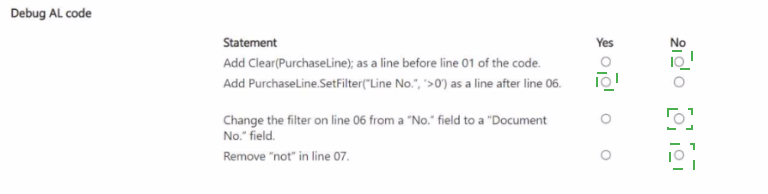
Change the filter on line 06 from a "No." field to a "Document No." field. – Yes
This is the primary fix. Purchase lines are linked to the purchase header using the "Document No." field, which stores the purchase order number (e.g., PO-00001). The "No." field stores the item number. Changing to SetRange("Document No.", PurchaseHeader."No.") correctly filters purchase lines belonging to that specific purchase order.
Remove "not" in line 07. – Yes
Currently, exit(not PurchaseLine.IsEmpty()) returns true when there are no lines and false when there are lines. Removing not changes the logic to return true when lines exist, which is the intended behavior. This fix combined with the correct field filter resolves the issue.
Incorrect Options:
Add Clear(PurchaseLine); as a line before line 01 of the procedure. – No
The PurchaseLine variable is declared locally within the procedure. It is automatically initialized when the procedure runs. Adding Clear is redundant and does not affect the filter issue. The problem is logical (wrong field), not related to variable state.
Add PurchaseLine.SetFilter("Line No.", '>0') as a line after line 06. – No
Adding a filter on "Line No." > 0 is unnecessary because purchase lines always have positive line numbers. This does not fix the core issue of filtering on the wrong document identifier field. It may also interfere with finding lines if zero-based numbering were possible.
Reference:
Microsoft Learn: Record.SetRange Method
A company is implementing Business Central.
In the per-tenant extension, TableA Header and TableA Line are document tables, and
TableB Header and TableB Line are document history tables.
The company requires that the resulting dataset of query objects contain the following
records:
• All records from TableA Header even if no matching record value exists in the linked
TableA Line
• Records from TableB Header where a match is found in the linked TableB Line field
You need to configure the linked data item to generate the required dataset.
Which SqlJoinType should you use? To answer, move the appropriate SqUoinTypes to the
correct dataset requirements. You may use each SqlJoinType once, more than once, or not
at all. You may need to move the split bar between panes or scroll to view content.


Explanation:
In Business Central query objects, SqlJoinType determines how records from linked data items are combined. For the first requirement, all records from TableA Header must be included even without matching lines—this requires a LeftOuterJoin. For the second requirement, only matched records from TableB Header with corresponding TableB Line records are needed—this requires an InnerJoin.
Correct Option:
Dataset requirement:
Include all records from TableA Header even if no matching record value exists in the linked TableA Line – LeftOuterJoin
A LeftOuterJoin returns all records from the primary (left) data item and only matching records from the secondary (right) data item. When no match exists, the secondary fields contain null values. This satisfies the requirement to include all TableA Header records regardless of whether corresponding TableA Line records exist.
Dataset requirement:
Include only matched records from TableB Header – InnerJoin
An InnerJoin returns only records where there is a match between the primary and secondary data items. Non-matching records from either side are excluded. This fulfills the requirement to include only TableB Header records that have a corresponding match in the linked TableB Line field.
Incorrect Options:
CrossJoin –
A CrossJoin returns the Cartesian product of both tables, pairing every record from the primary data item with every record from the secondary data item. This does not satisfy either requirement and would produce excessive, unrelated records.
RightOuterJoin –
A RightOuterJoin returns all records from the secondary (right) data item and only matching records from the primary (left) data item. The requirements specify including all records from the left table (TableA Header) and only matched records from the right (TableB Header), which is the opposite of RightOuterJoin.
Reference:
Microsoft Learn: Query Object Join Types
A company plans to customize its per tenant extension reports. The company has the
following requirements for the customization:
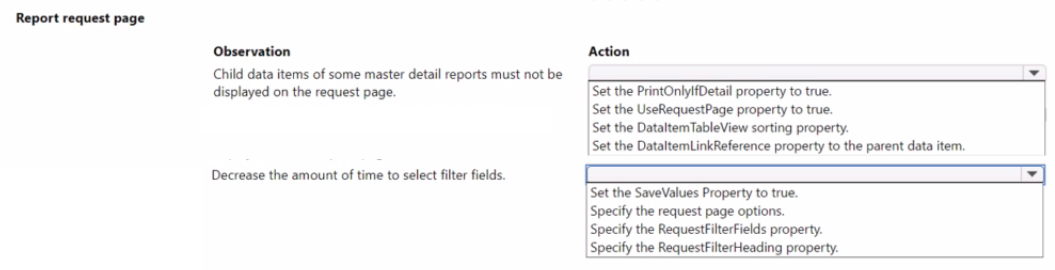
• Child data items must not be displayed on the request page for some master detail
reports.
• Selecting key filter fields takes users too much time. The customization must decrease
the amount of time to select the fields.
You need to optimize the report request page.
Which actions should you configure? To answer, select the appropriate options in the
answer area.
NOTE: Each correct selection is worth one point.
Explanation:
To hide child data items from the report request page, set the PrintOnlyIfDetail property to true. This prevents child data items from appearing as expandable sections on the request page. To reduce the time spent selecting filter fields, specify the RequestFilterFields property. This limits visible filters to only the most frequently used key fields, simplifying the user interface.
Correct Option:
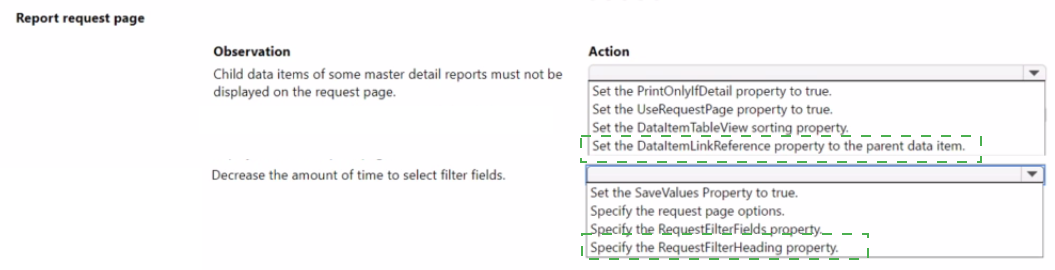
Child data items must not be displayed on the request page for some master detail reports. – Set the PrintOnlyIfDetail property to true.
The PrintOnlyIfDetail property controls whether a child data item appears as a separate filter section on the request page. When set to true, the child data item is hidden from the request page and only prints if the parent data item contains related records. This fulfills the requirement to hide child data items.
Selecting key filter fields takes users too much time. The customization must decrease the amount of time to select the fields. – Specify the RequestFilterFields property.
The RequestFilterFields property defines which fields of a data item appear as filter fields on the request page. By limiting this list to only essential, frequently used key fields, users are not overwhelmed by unnecessary filter options. This speeds up filter selection and improves usability.
Incorrect Options:
Set the UseRequestPage property to true. –
The request page is already displayed. This property enables or disables the entire request page, but does not hide child data items or reduce filter fields. Setting it to false would remove the request page entirely, which is not the requirement.
Set the DataItemTableView sorting property. –
This property defines the default sort order and key filters for the data item when the report runs. It does not affect which fields appear on the request page or hide child data item sections.
Set the DataItemLinkReference property to the parent data item. –
This property establishes the link between a child data item and its parent. It is required for master-detail reports but does not control visibility on the request page.
Set the SaveValues Property to true. –
This property saves the last used filter values for the user. While helpful for efficiency, it does not hide child data items or reduce the number of filter fields displayed.
Specify the request page options. –
Request page options refer to option-type fields or toggles added to the request page. This does not address hiding child data item sections or filtering the visible filter fields.
Specify the RequestFilterHeading property. –
This property customizes the heading text for the filter section. It improves labeling but does not hide the section or reduce the number of filter fields.
Reference:
Microsoft Learn: PrintOnlyIfDetail Property
You create a query that contains a procedure to display the top customers.
The procedure breaks at runtime.
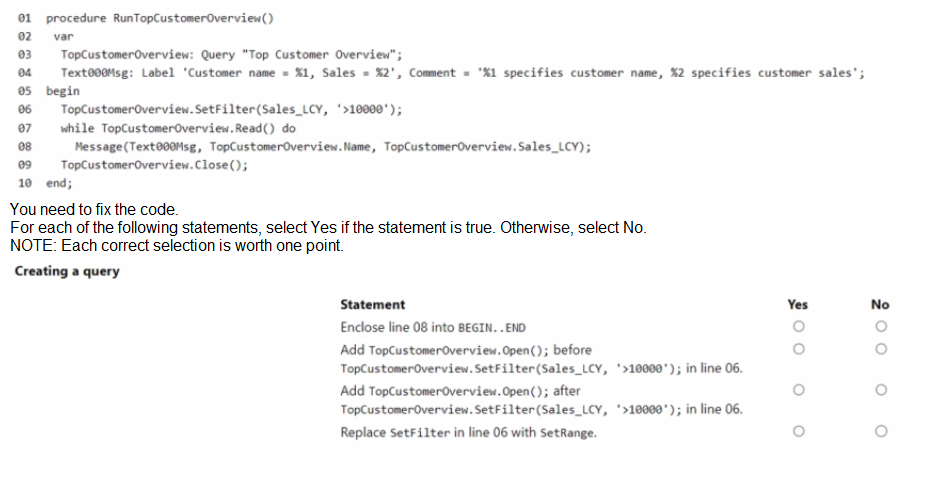
Explanation:
The code breaks because the Open method is not called before attempting to read from the query. In AL, a query object must be explicitly opened using the Open method before any filters are applied or records are read. The SetFilter method can be called either before or after Open, but Open must be called before Read.
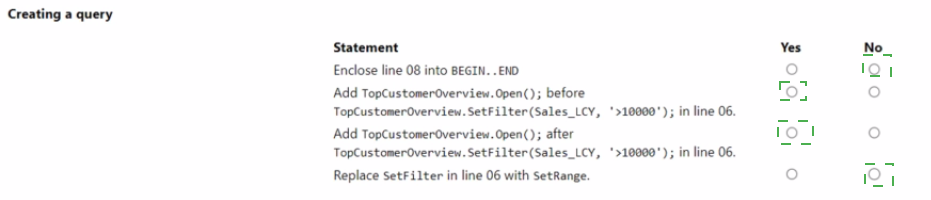
Correct Option:
Add TopCustomerOverview.Open(); after TopCustomerOverview.SetFilter(Sales_LCY, '>10000'); in line 06. – Yes
This is the correct fix. The Open method initializes the query and must be called before Read. Placing it after SetFilter and before the while loop ensures the query is properly opened with the filter applied. Both filter and open order are acceptable as long as open precedes read.
Incorrect Options:
Enclose line 08 into BEGIN..END – No
The while statement executes a single statement (the Message call). BEGIN..END is only required when multiple statements follow the while condition. This is not the cause of the runtime error and is syntactically optional here.
Add TopCustomerOverview.Open(); before TopCustomerOverview.SetFilter(Sales_LCY, '>10000'); in line 06. – No
While adding Open is necessary, this statement alone is not complete because it does not specify both the addition and the correct placement. However, the question presents two separate options regarding Open placement. Opening before SetFilter is also valid, but the statement as worded in the answer choice is incomplete. The more critical fix is ensuring Open is called before Read, regardless of filter order.
Replace SetFilter in line 06 with SetRange. – No
SetFilter is perfectly valid for filtering numeric fields with expressions like '>10000'. SetRange is used for exact matches or contiguous ranges. Replacing it is not required and does not fix the missing Open method issue.
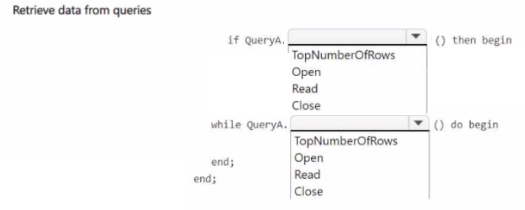
You need to use a query data type to retrieve requited data.
How should you complete the code' To answer, select the appropriate options in the
answer area.
NOTE: Each correct selection is worth one point.
Explanation:
This question tests your understanding of Query object methods in AL. The Open method initializes the query and must be called before reading. Read retrieves the next row and returns true if a row exists. TopNumberOfRows is a property, not a method. Close terminates the query session. The correct sequence for query data retrieval is Open, then Read in a loop, then Close.
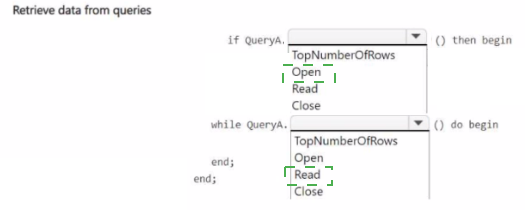
Correct Option:
First dropdown (after QueryA.): Open
The Open method must be called first to initialize the query and execute the SQL statement. Without opening the query, no data can be read. The if statement checks if Open was successful (returns true) before proceeding.
Second dropdown (while QueryA.): Read
The Read method retrieves the next row from the query result set and returns true as long as there are more rows. The while loop continues executing as long as Read returns true, processing each row sequentially.
Incorrect Options:
TopNumberOfRows –
This is a property of the Query object that specifies the maximum number of rows to return. It is set before opening the query using Query.TopNumberOfRows := n; It is not a method and cannot be called as shown in the code syntax.
Read (in first dropdown) –
Placing Read in the if statement would only read the first row and check if it exists. This does not initialize the query and would fail if Open was not called first. It also does not allow setting filters or top number of rows.
Close –
Close is used after all data is retrieved to release resources. Placing it in the if or while condition would close the query immediately, preventing any data from being read.
Reference:
Microsoft Learn: Query.Open Method
A company has an on-premises Business Central instance named TEST The instance
uses Windows authorization and a developer services port of 7149 Visual Studio Code is
installed on the same server.
You create a new AL project but cannot download the symbols.
The launch json file contains the following code:
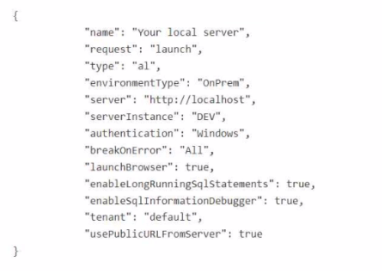
You need to download the symbols.
Which two actions should you perform? Each correct answer presents part of the solution.
NOTE: Each correct selection is worth one point.
A. Change the server Instance parameter to TEST
B. Add the port: 7149 parameter.
C. Change the name parameter to TEST.
D. Change the authentication parameter to UserPassword.
E. Check which server the instance is installed on and replace http//localhost with the correct IP address.
B. Add the port: 7149 parameter.
Explanation:
The launch.json file is misconfigured for the on-premises environment. The serverInstance parameter is empty, and the port parameter is missing. For an on-premises Business Central server with developer services enabled, the correct port is typically 7049 (not 7149, which is the client service port) or the explicitly configured developer port. The instance name must match the actual server instance (TEST).
Correct Option:
A. Change the serverInstance parameter to TEST
The serverInstance parameter in launch.json specifies the Business Central server instance name. The company's instance is named TEST, but the parameter is currently blank. Setting this to TEST allows the AL compiler to locate the correct server instance for symbol download.
B. Add the port: 7049 parameter.
For on-premises development, the port parameter must specify the Business Central Server instance's developer web service port. The default is 7049. The current configuration omits the port entirely. Adding "port": 7049 enables communication with the server for symbol download.
Incorrect Options:
C. Change the name parameter to TEST.
The name parameter in launch.json is simply a display name for the debug configuration in VS Code. It has no functional impact on server connections or symbol download. Changing it does not resolve the connection issue.
D. Change the authentication parameter to UserPassword.
The company uses Windows authentication for the on-premises instance. Changing to UserPassword would cause authentication failure unless the server is reconfigured. Windows authentication is correct for this environment.
E. Check which server the instance is installed on and replace http://localhost with the correct IP address.
Since Visual Studio Code is installed on the same server as the Business Central instance, localhost is correct. No IP address change is needed. This action is unnecessary and does not address the missing instance name and port.
Reference:
Microsoft Learn: JSON Launch File for On-Premises
You have a custom app.
A warning for the rule code named AAOXYZ appears in multiple app objects.
You need to change the severity of the rule from Warning to Info for only the current app.
Which three actions should you perform? Each correct answer presents part of the
solution. Choose three.
NOTE: Each correct selection is worth one point.
A. Add the following ruleset object to the ruleset.json file:
B. Open the Visual Studio Code user settings.json file.
C. Open the Visual Studio Code project settings.json file.
D. Add the following ruleset object to the ruleset.json file:
E. Change the "al.enableCodeAnalysis" property value to "false".
F. Add the "al.ruleSetPath" property with a path to the ruleset.json file.
C. Open the Visual Studio Code project settings.json file.
F. Add the "al.ruleSetPath" property with a path to the ruleset.json file.
Explanation:
To change the severity of a code analysis rule for only the current app, you must create a ruleset.json file that defines the rule ID and the desired action (Info). Then, you reference this ruleset in the Visual Studio Code project’s settings.json file using the al.ruleSetPath property. This scopes the rule change to the specific project, not globally.
Correct Option:
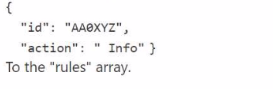
A. Add the following ruleset object to the ruleset.json file:
{ "id": "AA0XYZ", "action": "Info" } – This defines the rule ID and the new severity action. Adding this to the ruleset.json file instructs the code analyzer to treat rule AA0XYZ as Info instead of Warning for this project.
C. Open the Visual Studio Code project settings.json file.
The project-level settings.json file (located in the .vscode folder) is where you configure AL compiler options specific to the current project. This is the correct location to set al.ruleSetPath so the rule change applies only to this app, not all projects.
F. Add the "al.ruleSetPath" property with a path to the ruleset.json file.
The al.ruleSetPath setting tells the AL compiler which ruleset file to use for code analysis. Adding this property in the project’s settings.json with the path to your ruleset.json file activates the custom rule severity for the current app only.
Incorrect Options:
B. Open the Visual Studio Code user settings.json file. –
User settings apply globally to all AL projects. This would change the rule severity for every project opened on the machine, not just the current app. The requirement is to change it for only the current app.
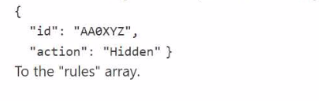
D. Add the following ruleset object to the ruleset.json file:
{ "id": "AA@XYZ", "action": "Info" } –
This rule ID is incorrect. The warning appears for rule AA0XYZ (with a zero), not AA@XYZ. Adding the wrong rule ID has no effect on the actual warning.
E. Change the "al.enableCodeAnalysis" property value to "false". –
Disabling code analysis entirely would suppress all warnings and info messages, not just change the severity of one specific rule. This does not meet the requirement.
Reference:
Microsoft Learn: Ruleset for the Code Analysis Tool
A company plans to change a field on the Resource Card page in a Base Application.
You need to hide the field "Unit Price" from the Resource Card page.
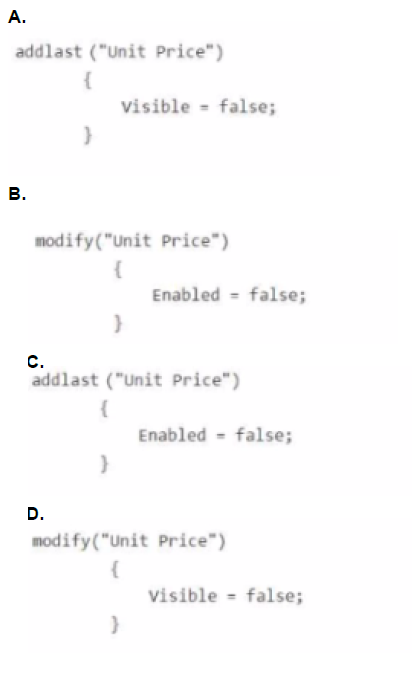
Which code snippet should you use?
A. Option A
B. Option B
C. Option C
D. Option D
Explanation:
To hide an existing field on a Base Application page, you must use a Page Extension and the modify keyword to change the properties of the existing control. The Visible property controls whether the field is displayed. Setting Visible = false hides the field. addlast is used to add new fields, not modify existing ones.
Correct Option:
D. modify("Unit Price") { Visible = false; }
This is the correct syntax for a Page Extension. The modify keyword targets an existing field on the page. Setting the Visible property to false hides the "Unit Price" field from the Resource Card page. This meets the requirement without altering the base object.
Incorrect Options:
A. addlast("Unit Price") { Visible = false; } –
addlast is used to append a new field to the page layout. It cannot modify an existing field. This would attempt to add a duplicate field named "Unit Price" and hide it, which is incorrect syntax and does not affect the original field.
B. modify("Unit Price") { Enabled = false; } –
While modify correctly targets the existing field, the Enabled property controls whether the field is editable, not whether it is visible. Setting Enabled = false makes the field read-only but still displays it on the page. This does not meet the requirement to hide the field.
C. addlast("Unit Price") { Enabled = false; } –
This combines two errors: using addlast instead of modify, and using Enabled instead of Visible. It would attempt to add a new read-only field without affecting the visibility of the original field.
Reference:
Microsoft Learn: Page Extension Object
A company plans to deploy Business Central.
The company has the following deployment requirements:
• Use the company hardware architecture to run the deployment.
• Use sandbox environments to develop extensions.
• Allow tenants to connect to Shopify with the standard connector.
• Use Microsoft Power Automate to create a workflow that calls a business event.
You need to identify the deployment type for each requirement.
Which deployment types should you use? To answer, move the appropriate deployment
types to the correct requirements. You may use each deployment type once, more than
once, or not at all.


Explanation:
Business Central offers two primary deployment types: On-premises (installed and run on company-owned hardware) and Online (Microsoft-managed cloud service). The requirements must be mapped to the deployment type that supports each capability. Sandbox environments, Shopify connectors, and Power Automate business events are available in Online. Running on company hardware is exclusive to On-premises.
Correct Option:
Requirement: Run on the company hardware. – On-premises
On-premises deployment installs Business Central on the company's own servers and infrastructure. The company controls the hardware, operating system, and SQL Server. This is the only deployment type that satisfies the requirement to use company hardware architecture.
Requirement: Use sandbox environments for extensions. – Online
Sandbox environments are a cloud-based feature in Business Central Online. They provide isolated, non-production environments for development and testing. On-premises deployments do not include managed sandbox environments; they require separate physical or virtual machines.
Requirement: Allow connection to Shopify. – Online
The standard Shopify connector is a Microsoft-managed extension available only in Business Central Online. On-premises deployments require custom integration development or third-party connectors to connect with Shopify.
Requirement: Create a workflow that calls a business event. – Online
Business events in Business Central Online can be exposed as custom connectors to trigger Power Automate workflows. On-premises deployments require additional configuration using the Power Platform gateway and do not natively support direct business event integration with Power Automate.
Incorrect Options:
On-premises for sandbox environments –
On-premises does not provide sandbox environments as a managed service. Companies must provision separate test instances manually.
On-premises for Shopify connector –
The standard Shopify connector is not available for on-premises. Custom development is required.
On-premises for Power Automate business events –
On-premises supports Power Automate only via the on-premises data gateway and does not natively expose business events to Power Automate as Online does.
Online for company hardware –
Online runs on Microsoft hardware, not company-owned infrastructure. This does not meet the requirement.
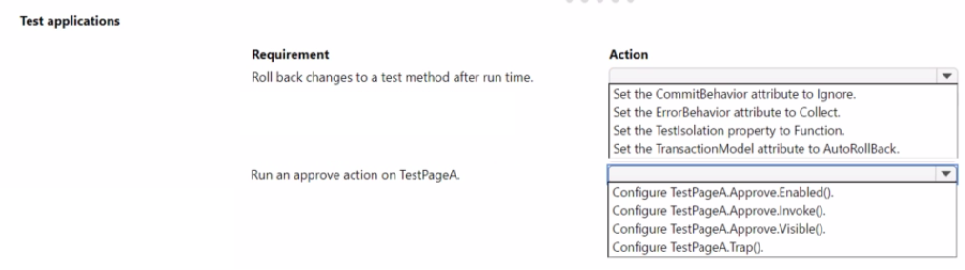
You develop a test application.
You must meet the following requirements:
• Roll back changes to a test method after run time.
• Run an approve action on a test page named TestPageA.
You need to implement the given requirements on the test codeunit
Which actions should you perform? To answer, select the appropriate options in the
answer area
NOTE: Each correct selection is worth one point.
Explanation:
In Business Central test codeunits, TestIsolation property and TransactionModel attribute control database transaction rollback behavior. To roll back all changes after a test method completes, set TestIsolation to Function or use TransactionModel::AutoRollBack. To invoke an action on a test page, use Invoke() on the action control.
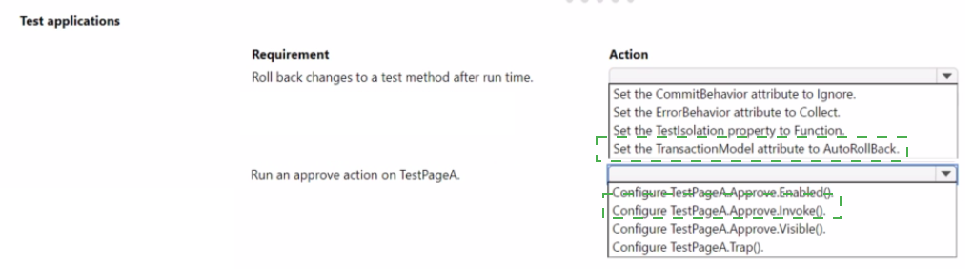
Correct Option:
Roll back changes to a test method after run time. – Set the TransactionModel attribute to AutoRollBack.
The TransactionModel attribute with AutoRollBack ensures that all database modifications made during the test method are automatically rolled back at the end of the test. This isolates test data and prevents side effects on subsequent tests or the underlying database.
Run an approve action on TestPageA. – Configure TestPageA.Approve.Invoke().
The Invoke() method executes the specified action on a test page control. In this case, TestPageA.Approve.Invoke() programmatically clicks or triggers the Approve action on the test page, allowing automated testing of the approval workflow.
Incorrect Options:
Set the CommitBehavior attribute to Ignore. – This attribute controls whether explicit COMMIT statements are ignored during test execution. It does not automatically roll back changes after the test method completes.
Set the ErrorBehavior attribute to Collect. – This attribute collects validation errors instead of throwing exceptions immediately. It helps test error handling but does not affect transaction rollback.
Set the TestIsolation property to Function. – This also rolls back changes, but TransactionModel attribute is the more precise and commonly used method for per-test method rollback in test codeunits.
Configure TestPageA.Approve.Enabled(). – This checks whether the Approve action is enabled. It does not execute the action.
Configure TestPageA.Approve.Visible(). – This checks the visibility state of the Approve action. It does not invoke the action.
Configure TestPageA.Trap(). – The Trap() method captures UI events or errors. It is not used to invoke page actions.
Reference:
Microsoft Learn: TransactionModel Attribute
| Page 3 out of 12 Pages |