Topic 5: Misc. Questions
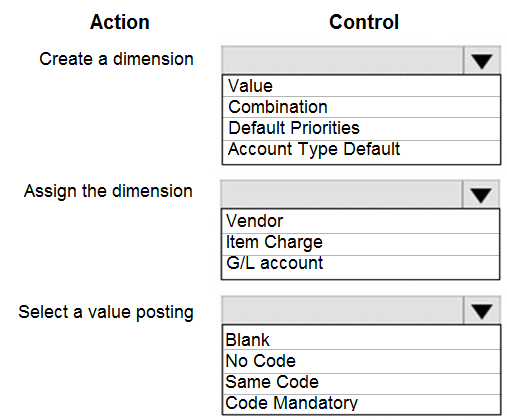
You need to report profitability by business line.
How should you configure the system? To answer, select the appropriate options in the
answer area.
NOTE: Each correct selection is worth one point.

Explanation:
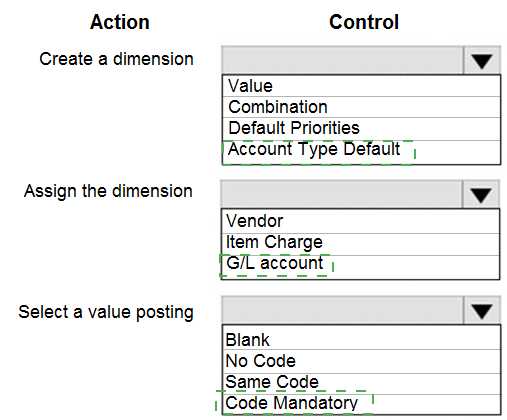
1. Create a dimension
Correct Selection: Dimension
Explanation:
To report profitability by business line, you must first create a dimension (e.g., BUSINESS_LINE). This dimension will be used to tag transactions with specific business lines (e.g., Retail, Wholesale, Services). The other options (Value, Combination, etc.) are dimension-related but not the first creation step.
Incorrect Options:
Value: This refers to dimension values (e.g., Retail, Wholesale). You create values after creating the dimension.
Combination: Refers to dimension combinations (allowing/disallowing specific value pairs).
Default Priorities: Used for default dimension priority when multiple defaults exist.
Account Type Default: Not a standard dimension action.
Reference: Microsoft Learn – "Create Dimensions" – Define dimension codes.
2. Assign the dimension
Correct Selection: G/L account
Explanation:
To enforce that all profit/loss transactions are tagged with a business line, you assign the dimension to G/L accounts (specifically income statement accounts). On each relevant G/L account (e.g., Sales Revenue, Cost of Goods Sold), you set the dimension to Code Mandatory so every posting requires a business line value.
Incorrect Options:
Vendor: Assigning dimensions to vendors affects purchase transactions only, not comprehensive profitability reporting.
Item Charge: Applies to item charges (freight, insurance), not general profitability reporting.
Reference: Microsoft Learn – "Assign Dimensions to G/L Accounts."
3. Select a value posting
Correct Selection: Code Mandatory
Explanation:
Setting Value Posting to Code Mandatory on the dimension for relevant G/L accounts ensures that users cannot post a transaction without selecting a business line dimension value. This guarantees all profitability transactions are properly categorized for reporting.
Incorrect Options:
Blank: No dimension checking; users can post without selecting a business line.
No Code: Dimension code is not required but may be suggested.
Same Code: Requires the dimension value to match another specified dimension's value (not applicable for basic business line reporting).
Reference: Microsoft Learn – "Dimension Value Posting – Code Mandatory."
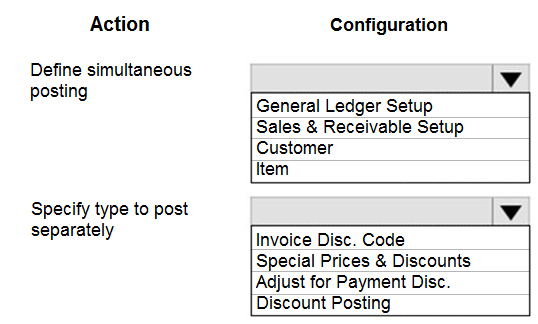
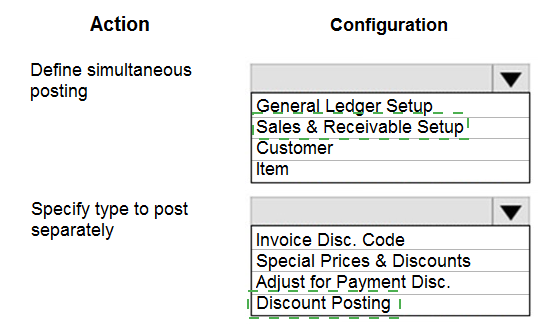
You need to configure the system to show the sales discounts.
How should you configure the system? To answer, select the appropriate options in the
answer area.
NOTE: Each correct selection is worth one point.
Explanation:
1. Define simultaneous posting
Correct Selection: Sales & Receivable Setup
Explanation:
The Sales & Receivables Setup page controls global sales posting behavior, including how discounts are handled. The Post Invoice Discounts setting (or similar) determines whether invoice discounts are posted simultaneously with the invoice or separately. This is where you define if discount amounts are combined with line amounts or posted as a separate G/L entry.
Incorrect Options:
General Ledger Setup: Controls general ledger parameters (e.g., rounding, dimensions), not sales discount posting behavior.
Customer Item: Relates to item defaults per customer, not discount posting configuration.
Reference:
Microsoft Learn – "Sales & Receivables Setup" – Post Invoice Discounts field.
2. Specify type to post separately
Correct Selection: Invoice Disc. Code
Explanation:
When discounts are posted separately (rather than combined with line amounts), you must specify a Invoice Disc. Code (or Invoice Discounts Code). This code links to an Invoice Discounts setup where you define discount percentages based on invoice amounts. The system uses this code to calculate and post discounts as separate lines/entries.
Incorrect Options:
Special Prices & Discounts: Used for line discounts and special prices per customer/item combination, not for invoice discounts posted separately.
Adjust for Payment Disc. Discount Posting: Relates to payment discounts (cash discounts for early payment), not sales invoice discounts.
Reference:
Microsoft Learn – "Invoice Discounts" – Setting up Invoice Disc. Code for separate discount posting.
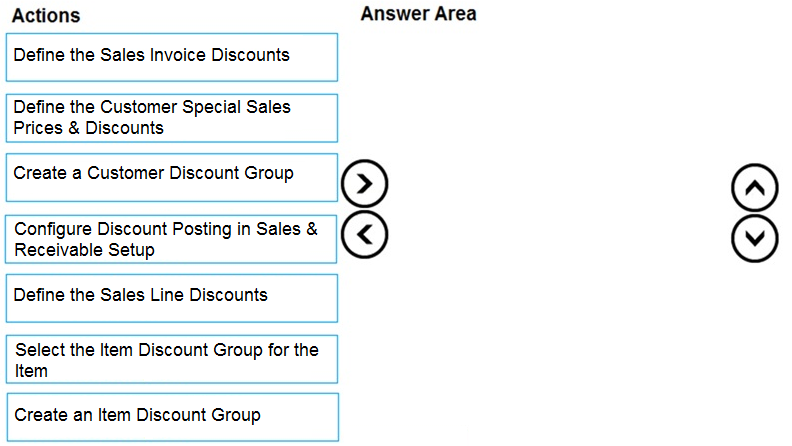
You need to configure discounting for sales.
Which three actions should you perform in sequence? To answer, move the appropriate
actions from the list of actions to the answer area.
Explanation of the Sequence:
Step 1 – Configure Discount Posting in Sales & Receivable Setup:
Before defining any discounts, you must configure the global discounting behavior in Sales & Receivables Setup. This includes enabling line discounts, invoice discounts, and specifying how discounts are calculated (e.g., best price, mandatory discount). This sets the foundation for all sales discounting.
Step 2 – Define the Sales Line Discounts:
After global setup is complete, you define the actual line discounts. This can be done via Sales Line Discounts page (or Customer Discount Groups). Here you specify which customer or customer group receives which discount percentage on specific items or item groups, including optional minimum quantities and date ranges.
Step 3 – Select the Item Discount Group for the Item:
To apply discounts efficiently, you assign an Item Discount Group to each item (on the Item Card under Pricing FastTab). The discount definitions from Step 2 reference these item discount groups. When a customer qualifies for a discount, the system matches the customer's discount group with the item's discount group to determine the correct discount percentage.
Why Other Actions Are Incorrect or Out of Sequence:
Define the Sales Invoice Discounts: Invoice discounts are based on total invoice amount (e.g., 5% off if invoice > $1000). This is a separate discount type and not part of the core three-step sequence for line discount configuration.
Define the Customer Special Sales Prices & Discounts: This is an alternative method (special prices per customer/item), but the sequence above focuses on the standard line discount setup using discount groups.
Create a Customer Discount Group: This is part of defining sales line discounts (Step 2) but is not a separate top-level action in the three-step sequence.
Create an Item Discount Group: This is implied before selecting it on the item (Step 3), but the question lists "Select the Item Discount Group for the Item" as the action, assuming the group already exists.
Reference:
Microsoft Learn – "Set Up Sales Line Discounts" – Steps: Configure global setup → Define discounts → Assign discount groups to items.
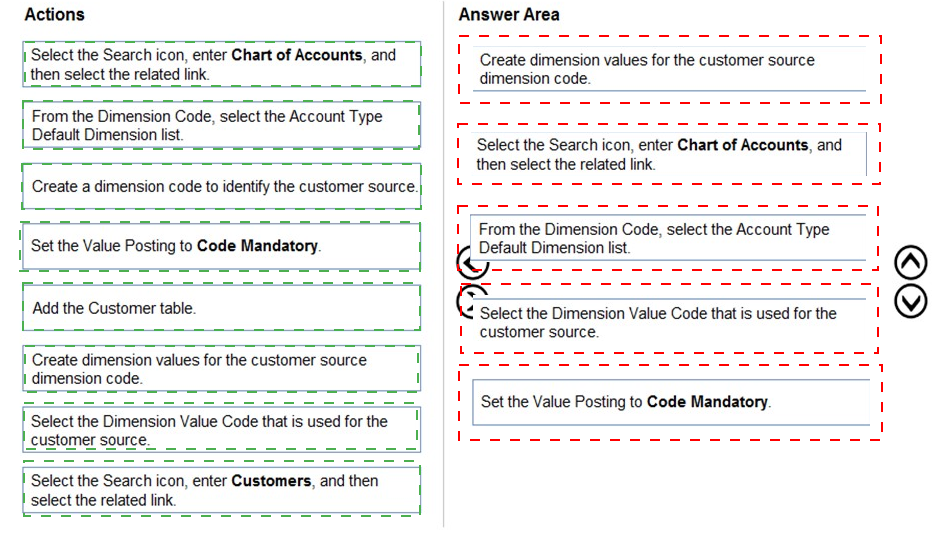
You need to ensure that any transaction that uses a customer account always includes the
customer source dimension.
Which five actions should you perform in sequence? To answer, move the appropriate
actions from the list of actions to the answer area and arrange them in the correct order.
Explanation of the Sequence:
Step 1 – Create a dimension code to identify the customer source:
First, create a new dimension (e.g., CUSTSOURCE) on the Dimensions page. This dimension will be used to track the source of each customer transaction (e.g., Website, Store, Call Center).
Step 2 – Create dimension values for the customer source dimension code:
For the newly created dimension, define dimension values (e.g., WEB, STORE, CALL) on the Dimension Values page. These are the specific options users will select when tagging customer transactions.
Step 3 – Select the Search icon, enter Chart of Accounts, and then select the related link:
Open the Chart of Accounts page. This is where you assign dimension requirements to G/L accounts that are linked to customer transactions (e.g., Sales Revenue, Accounts Receivable).
Step 4 – From the Dimension Code, select the Account Type Default Dimension list:
On the relevant G/L account card (or via the Dimensions action), locate the Account Type Default Dimension list (or simply the dimension assignment grid). Select the CUSTSOURCE dimension code from the list to associate it with the G/L account.
Step 5 – Set the Value Posting to Code Mandatory:
For the CUSTSOURCE dimension on that G/L account, change the Value Posting field to Code Mandatory. This ensures that any transaction posted to this account (including customer-related transactions) requires a customer source dimension value, preventing posting without it.
Why Other Actions Are Not Used in This Sequence:
Add the Customer table: This would be used for table-level dimension defaulting, but the requirement is to ensure the dimension is included on any transaction using a customer account—which is best enforced at the G/L account level (e.g., Accounts Receivable, Sales Revenue).
Select the Dimension Value Code that is used for the customer source: This action is redundant because dimension values are already created in Step 2. Selecting a specific default value is optional and not required to enforce mandatory posting.
Select the Search icon, enter Customers, and then select the related link: This navigates to the customer list, which is not the primary location for enforcing mandatory dimensions on transactions.
Reference:
Microsoft Learn – "Set Up Dimensions" – Creating dimensions and values; enforcing Code Mandatory on G/L accounts for customer-related transactions.
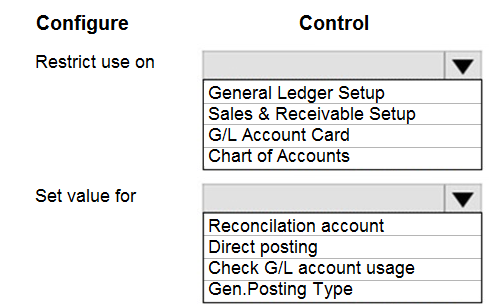
You need to resolve the reconciliation issues.
How should you complete the setup? To answer, select the appropriate options in the
answer area.
NOTE: Each correct selection is worth one point.
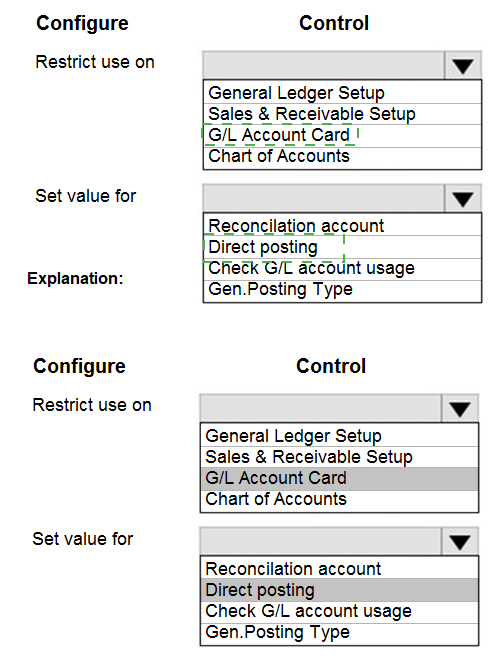
Explanation:
1. Restrict use on
Correct Selection: G/L Account Card
Explanation:
To resolve reconciliation issues (e.g., preventing certain G/L accounts from being used in journals or documents where they cause posting conflicts), you restrict usage directly on the G/L Account Card. The Account Type field (e.g., Posting, Heading, Total) and the Direct Posting field control whether the account can be used in manual journal entries or only via system posting.
Incorrect Options:
General Ledger Setup: Global system settings; not for restricting individual accounts.
Sales & Receivable Setup: Controls sales-specific parameters, not general G/L account usage restrictions.
Chart of Accounts: A list view of accounts; individual account restrictions are set on each G/L Account Card, not on the chart list.
Reference: Microsoft Learn – "G/L Account Card" – Restricting account usage for reconciliation.
2. Set value for
Correct Selection: Direct posting
Explanation:
The Direct Posting field on the G/L Account Card determines whether the account can be posted to directly via journals (e.g., General Journal) or only indirectly via system posting (e.g., from sales invoices, purchase invoices). Setting Direct Posting to No prevents manual journal entries to that account, forcing all postings to come from subledgers. This resolves reconciliation issues by ensuring subledgers (e.g., Accounts Receivable, Accounts Payable) always reconcile with the general ledger.
Incorrect Options:
Reconciliation account: Not a standard field name; typically "Reconcile to G/L Account" is on bank account cards, not here.
Check G/L account usage: Not a standard setup field.
Gen.Posting Type: Relates to posting setup groups (e.g., General Posting Setup), not direct posting restrictions.
Reference: Microsoft Learn – "Direct Posting Field" – Preventing manual postings to control accounts to resolve reconciliation issues.
A company adds a user to Microsoft 365.
Existing user groups do not have the required permission sets for newly added users.
You need to assign a Dynamics 365 Business Central user group and permissions to the
user and the company.
Which five actions should you perform in sequence? To answer, move the appropriate
actions from the list of actions to the answer area and arrange them in the correct order.
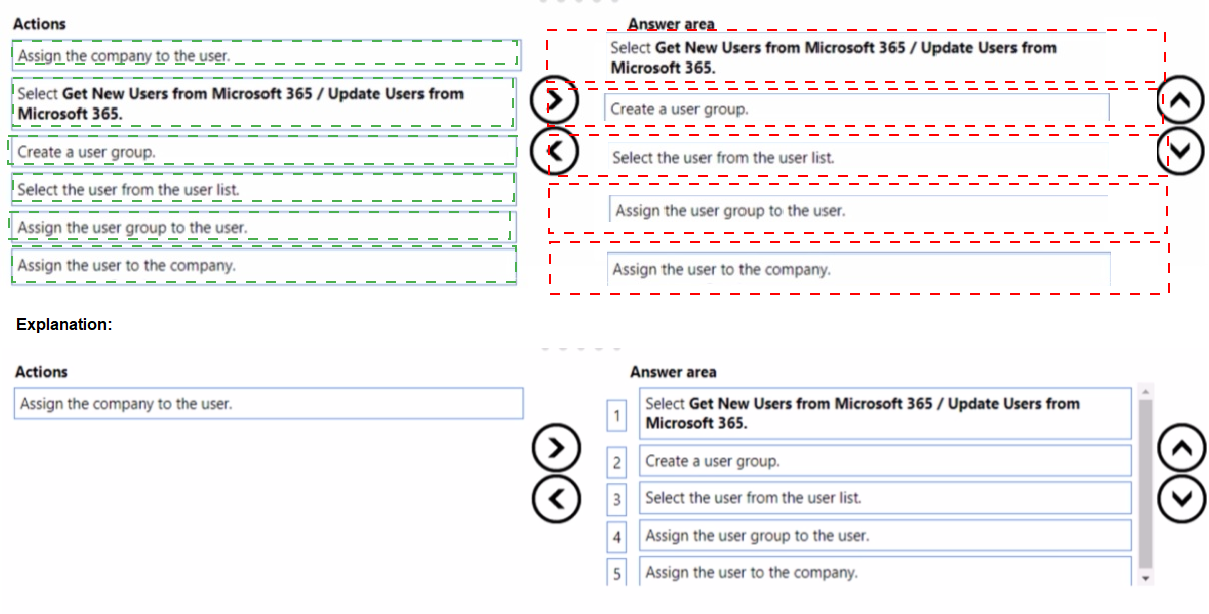
Explanation of the Sequence:
Step 1 – Select Get New Users from Microsoft 365 / Update Users from Microsoft 365:
On the Users page, you must first synchronize with Microsoft 365 to import the newly added user. This action pulls the user's information (name, email, etc.) from Azure AD / Microsoft 365 into Business Central, making them available for assignment.
Step 2 – Select the user from the user list:
After synchronization, locate and select the newly added user from the Users list. This identifies which user will receive the user group, permissions, and company access.
Step 3 – Create a user group:
Because existing user groups do not have the required permission sets, you must create a new user group on the User Groups page. Define the required permission sets for this group to meet the user's job responsibilities.
Step 4 – Assign the user group to the user:
On the User Card (or via User Group Members), assign the newly created user group to the selected user. This grants the user all permission sets associated with that user group.
Step 5 – Assign the user to the company:
Finally, assign the user to the appropriate company (if multiple companies exist). On the User Card under Company Access, add the company and assign the relevant permission sets or user groups. This ensures the user can access and work within the correct company context.
Why Other Actions Are Not Used or Out of Order:
Assign the company to the user is similar to Step 5, but the exact wording in the list is "Assign the user to the company" (used in Step 5). The action "Assign the company to the user" is not present; the correct phrasing is in the answer area.
Assign the user group to the user must come after creating the user group (Step 3 → Step 4).
Assign the user to the company should be the final step after user group assignment, as company access can be tied to permission sets.
Reference:
Microsoft Learn – "Add Users to Business Central" – Synchronizing from Microsoft 365, creating user groups, assigning permissions, and managing company access.
The accounts payable department of a company processes purchase invoices throughout
the month. A vendor sends an invoice at the end of each week that combines all deliveries.
The company wants to know how to process this invoice.
You need to explain the steps involved in purchase invoicing.
In which order should the steps be performed? To answer, move all actions from the list of
actions to the answer area and arrange them in the correct order.
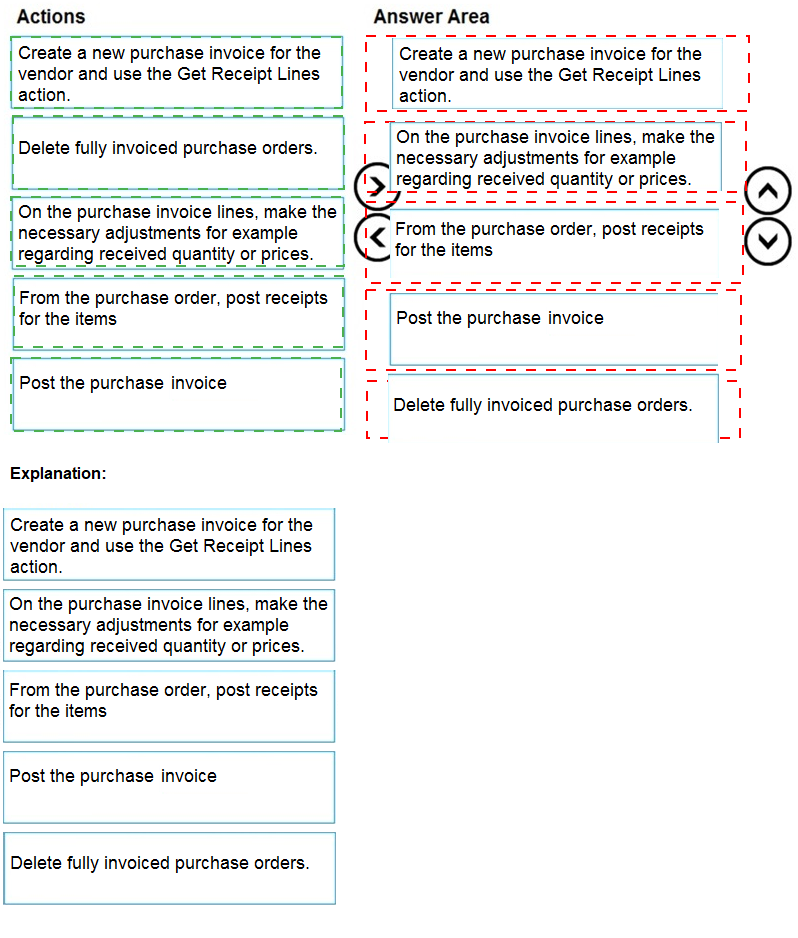
Explanation of the Sequence:
Step 1 – From the purchase order, post receipts for the items:
First, for each delivery received during the week, post a purchase receipt from the corresponding purchase order(s). This registers the physical receipt of goods into inventory, updating item ledger entries.
Step 2 – Create a new purchase invoice for the vendor and use the Get Receipt Lines action:
When the combined weekly invoice arrives from the vendor, create a new purchase invoice (not a purchase order). Use the Get Receipt Lines action to pull in the lines from the already-posted receipts. This matches the invoice to the previously received quantities.
Step 3 – On the purchase invoice lines, make the necessary adjustments (for example, regarding received quantity or prices):
Compare the vendor's invoice with the posted receipts. Adjust quantities or unit prices if discrepancies exist (e.g., partial receipts, price differences). This ensures the invoice matches the vendor's billing before posting.
Step 4 – Post the purchase invoice:
After adjustments are complete, post the purchase invoice. This creates vendor ledger entries (accounts payable) and updates the general ledger. The system will apply the invoice to the previously posted receipts if quantities and amounts match.
Step 5 – Delete fully invoiced purchase orders:
Once the purchase invoice is posted and all quantities are fully received and invoiced, the associated purchase orders are no longer needed. You can delete them (or use the Delete Invoiced Purchase Orders batch job) to keep the system clean.
Reference:
Microsoft Learn – "Process Purchase Invoices Using Get Receipt Lines" – Steps: Post receipts → Create invoice → Get receipt lines → Adjust → Post → Delete invoiced orders.
| Page 8 out of 24 Pages |