Topic 5: Misc. Questions
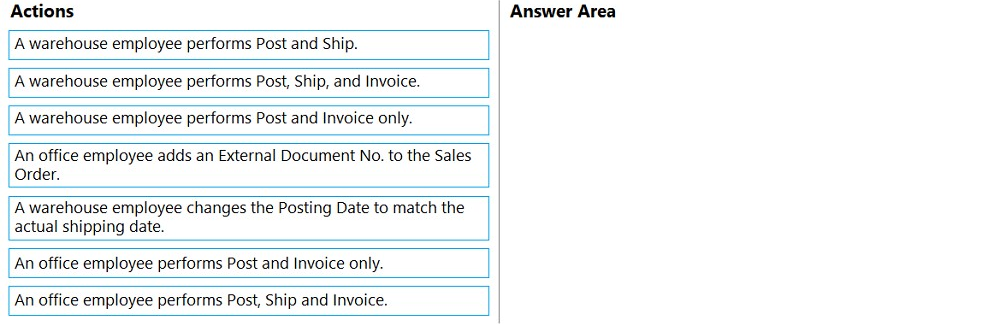
You need to advise the company on how to process existing sales orders.
Which three actions should you recommend be performed in sequence? To answer, move
the appropriate actions from the list of actions to the answer area and arrange them in the
correct order.

Explanation:
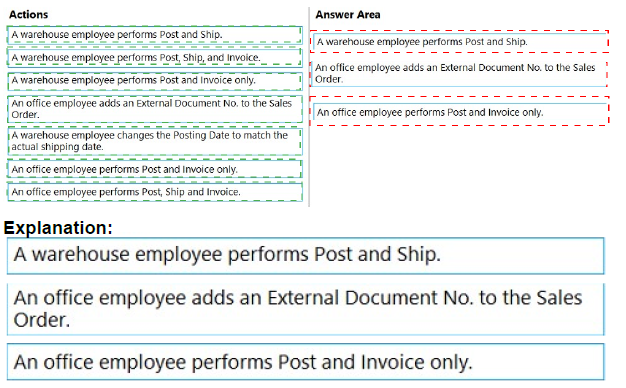
The question advises a company on processing existing sales orders with separation of duties between warehouse and office employees (common for internal controls, audit compliance, or role-based workflows). Warehouse staff handles physical shipping (Post and Ship to record shipment and reduce inventory), while office/accounting staff handles financial invoicing (Post and Invoice only, after shipment confirmation). An intermediate step often involves office staff adding/verifying the External Document No. (e.g., customer PO or reference) on the sales order before invoicing for accurate tracking and matching.
Correct Options (in sequence):
A warehouse employee performs Post and Ship.
Warehouse employees are responsible for physical fulfillment. Performing Post and Ship posts the shipment document, updates item ledger entries (reduces inventory), creates posted shipment records, and allows tracking of shipped quantities. This step separates physical handling from financial posting, aligning with segregation of duties.
An office employee adds an External Document No. to the Sales Order.
After shipment confirmation, office staff adds the External Document No. (e.g., customer's purchase order number or reference) to the sales order. This ensures accurate invoice matching, audit trail, and customer reference on the posted invoice—critical before final invoicing.
An office employee performs Post and Invoice only.
Office/accounting employees perform Post and Invoice only on the sales order (now with shipment posted). This creates the posted sales invoice, updates customer ledger, G/L accounts (revenue recognition), and completes the transaction without re-shipping. It maintains separation—warehouse cannot invoice, preventing unauthorized financial entries.
Incorrect Options:
A warehouse employee performs Post, Ship, and Invoice. — Combines shipping and invoicing in one action by warehouse staff, violating separation of duties (warehouse should not handle financial invoicing).
A warehouse employee performs Post and Invoice only. — Warehouse staff invoicing without shipping first is incorrect; invoicing requires prior shipment in standard setups, and it breaches role separation.
A warehouse employee changes the Posting Date to match the actual shipping date. — While posting date adjustment may occur, it's not a core sequential step; warehouse typically posts ship on actual date, and this is not required in the advised flow.
An office employee performs Post and Invoice only. (duplicate or variant) — Similar issue if listed separately; correct only in sequence after ship.
An office employee performs Post, Ship and Invoice. — Office performing full post/ship/invoice combines roles improperly; shipping is warehouse responsibility.
A warehouse employee performs Post, Ship, and Invoice. (variants) — Repeatedly violates separation by allowing warehouse to invoice.
Reference:
Microsoft Learn – Ship items
Microsoft Learn – Invoice sales
Microsoft Learn – Posting sales documents
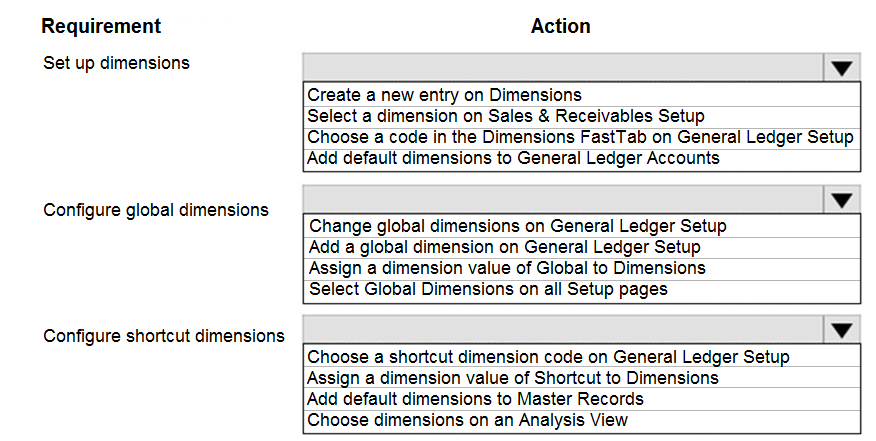
You need to configure reporting.
What should you do? To answer, select the appropriate options in the answer area.
NOTE: Each correct selection is worth one point.

Explanation:
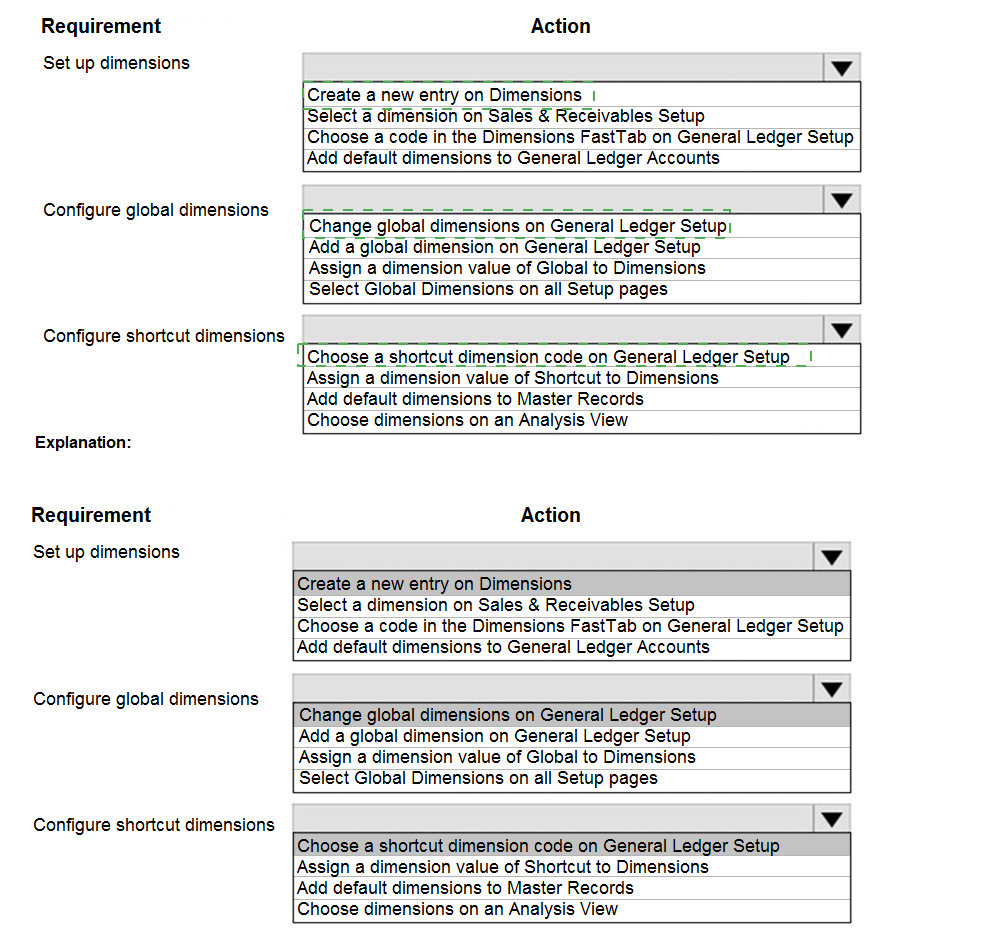
To configure effective reporting in Dynamics 365 Business Central, dimensions enable grouping and filtering of entries for analysis (e.g., by department, project, or market). First, create the dimensions themselves. Then, designate up to two as global dimensions (for fast filtering on reports, batch jobs) and up to eight as shortcut dimensions (quick access as fields on journals/documents). Both global and shortcut setups occur on the General Ledger Setup page. Default dimensions can be assigned separately, but the core configuration for reporting relies on these global/shortcut definitions.
Correct Options:
Create a new entry on Dimensions (for Set up dimensions)
This is the foundational step. Navigate to the Dimensions list page and create new dimension codes (e.g., DEPARTMENT, PROJECT). Each dimension requires a code and can have values added via Dimension Values. Without creating dimensions first, no further configuration (global, shortcut, defaults) is possible.
Change global dimensions on General Ledger Setup (for Configure global dimensions)
Global dimensions (max two) are set on the General Ledger Setup page under the Dimensions FastTab or via the Change Global Dimensions action. This assigns specific dimensions as global, storing their values directly in transaction tables for efficient filtering on reports, analysis views, and batch jobs—essential for high-performance reporting.
Choose a code in the Dimensions FastTab on General Ledger Setup (for Configure shortcut dimensions)
Shortcut dimensions (up to eight) are selected directly in the Shortcut Dimensions fields on the General Ledger Setup page (Dimensions FastTab). Choosing codes here makes them appear as fields on journals, document lines, and ledger entries, enabling quick entry and detailed analysis without opening extra pages—key for user-friendly reporting workflows.
Incorrect Options:
Select a dimension on Sales & Receivables Setup — This page allows default dimensions for sales documents, but it does not set up or configure global/shortcut dimensions, which are defined centrally on General Ledger Setup for system-wide reporting.
Add default dimensions to General Ledger Accounts — This assigns defaults to G/L accounts for automatic tagging, useful for consistent posting but not for defining global or shortcut dimensions themselves (which control visibility and filtering).
Add a global dimension on General Ledger Setup — Global dimensions are not "added" anew; existing dimensions are assigned/selected as global via the Change Global Dimensions function or fields—direct addition isn't the action.
Assign a dimension value of Global to Dimensions — Dimension values are codes like 100, SALES; there is no "Global" value type. This misrepresents how global designation works (it's on setup pages, not value assignment).
Select Global Dimensions on all Setup pages — Global dimensions are defined once centrally on General Ledger Setup, not selected individually on every setup page.
Assign a dimension value of Master to Shortcut Records / Choose dimensions on an Analysis View — These relate to defaults or analysis views (post-setup reporting tools), not the core configuration of shortcut dimensions.
Add default dimension dimensions value of Shortcut to Dimensions — Shortcut designation is via selection on General Ledger Setup, not by assigning a "Shortcut" value to dimension records.
Reference:
Microsoft Learn – Work with dimensions to track and analyze data
Microsoft Learn – Set up dimensions in Dynamics 365 Business Central (training module)
Microsoft Learn – Study guide for Exam MB-800: Set up dimensions and dimension values / Set up global dimensions and shortcut dimensions
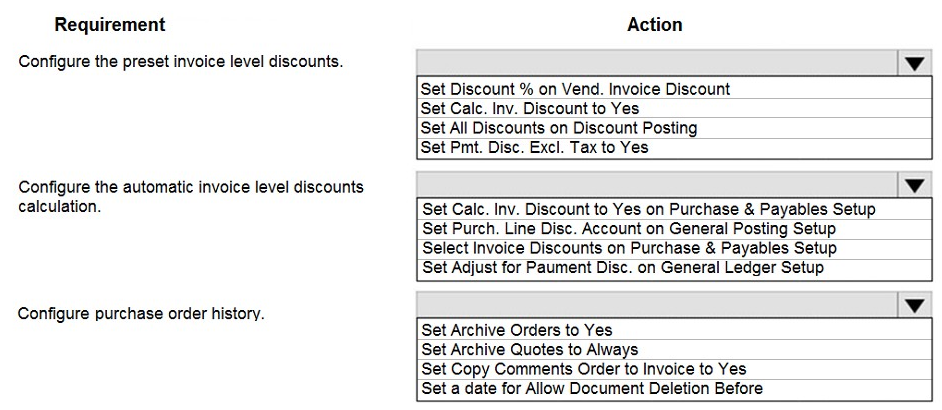
You need to configure purchase order discounting and history.
What should you do? To answer, select the appropriate options in the answer area.
NOTE: Each correct selection is worth one point.

Explanation:
To configure purchase order discounting and history in Dynamics 365 Business Central, set up preset invoice-level discounts by defining terms on vendor cards (e.g., via Vendor Invoice Discounts action, setting Discount %). Enable automatic calculation of these invoice discounts system-wide. For purchase order history, enable archiving to automatically create archived versions of orders upon posting or changes, preserving audit trails and prior versions without manual intervention.
Correct Options:
Set Discount % on Vend. Invoice Discount (for Configure the preset invoice level discounts)
On the Vendor Card, select or create an Invoice Disc. Code, then open Invoice Discounts action to define preset terms. Enter the Discount % for the invoice level (based on minimum amount thresholds). This presets the invoice discount structure per vendor or code, applied when conditions (e.g., invoice total) are met on purchase documents.
Set Calc. Inv. Discount to Yes on Purchase & Payables Setup (for Configure the automatic invoice level discounts calculation)
On the Purchases & Payables Setup page, enable Calc. Inv. Discount to Yes. This triggers automatic calculation of preset invoice discounts on purchase documents (orders/invoices) based on vendor setup, line allowances, and totals—without manual Calculate Invoice Discount action. It ensures discounts apply reliably during document creation/posting.
Set Archive Orders to Yes (for Configure purchase order history)
On the Purchases & Payables Setup page, set Archive Orders to Yes (or Always for every version). This automatically archives purchase orders (and changes) upon release, posting, or manual archive action, creating historical versions in the Archived Purchase Orders list for tracking changes, audit, compliance, and recovery of prior states.
Incorrect Options:
Set All Discounts on Discount Posting — This field (on Purchases & Payables Setup) controls G/L posting of discounts (No Discounts, Invoice Discounts, Line Discounts, All Discounts), not preset configuration or automatic calculation of invoice discounts themselves.
Set Pmt. Disc. Excl. Tax to Yes — This excludes tax from payment discount base (for payment terms discounts), unrelated to invoice-level discounts or purchase order archiving.
Set Purch. Line Disc. Account on General Posting Setup — This assigns G/L account for line discount posting, not for setting up preset invoice discounts or enabling auto-calculation.
Select Invoice Discounts on Purchase & Payables Setup — No such direct field; invoice discounts are configured per vendor, not globally selected here.
Set Adjust for Payment Disc. on General Ledger Setup — Relates to payment discount adjustments in G/L, not invoice discounts or order history.
Set Archive Quotes to Always — Archives sales/purchase quotes, not purchase orders (separate field).
Set Copy Comments Order to Invoice to Yes — Copies comments from order to posted invoice, useful but not for archiving/history of orders.
Set a date for Allow Document Deletion Before — Controls deletion cutoff for documents, not archiving or history preservation.
Reference:
Microsoft Learn – Record special purchase prices and discounts
Microsoft Learn – Set up prices and discounts
Microsoft Learn – Archive sales, purchase, project, and service documents
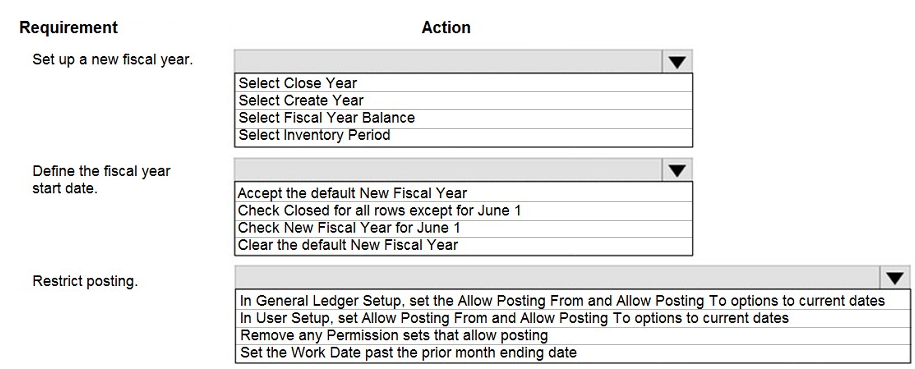
You need to set up a new fiscal year and restrict posting.
Which options should you use? To answer, select the appropriate options in the answer
area.
NOTE: Each correct selection is worth one point.

Explanation:
To set up a new fiscal year in Dynamics 365 Business Central, use the Accounting Periods page to create periods and mark the start of a new year. The Create Fiscal Year action (or Create Year) generates accounting periods automatically, inserting a row with New Fiscal Year checked for the starting period (often defaulting to the next year after the last period). To restrict posting (e.g., prevent back-posting to closed periods or limit to current open periods), set date ranges in General Ledger Setup (company-wide) and/or User Setup (per-user overrides) using Allow Posting From and Allow Posting To fields.
Correct Options:
Select Create Fiscal Year (or Select Create Year) (for Set up a new fiscal year)
On the Accounting Periods page, choose Process > Create Year (or Create Fiscal Year action). This batch job creates multiple periods (e.g., 12 months) based on starting date, number of periods, and length, automatically adding a period with New Fiscal Year checked to indicate the new year's start—essential for opening the new fiscal structure before posting.
Check New Fiscal Year for June 1 (or equivalent for the start date) (for Define the fiscal year start date)
After creating periods (or manually), ensure the first period of the new year has the New Fiscal Year check box selected on the row matching the fiscal year start date (e.g., June 1 if non-calendar year). This flags the beginning of the new fiscal year for reporting and closing purposes.
In General Ledger Setup, set the Allow Posting From and Allow Posting To options to current dates (for Restrict posting)
On the General Ledger Setup page, enter dates in Allow Posting From and Allow Posting To to define the allowed posting range (e.g., current open period or fiscal year). This company-wide restriction prevents posting outside the range, enforcing controls during year-end or to lock prior periods—overridable per user if needed.
Incorrect Options:
Select Close Year — This closes the earliest open fiscal year (locking periods with Closed and Date Locked), used at year-end after creating the next year, not for setting up a new one.
Select Create Year Balance — No such standard action; related to year-end closing entries or balance carry-forward, not fiscal year creation.
Select Fiscal Year — Not an action; Fiscal Year is a check box field on periods, not a selection for setup.
Select Inventory Period — Relates to inventory closing periods (separate from G/L fiscal years), not fiscal year setup.
Accept the default New Fiscal Year — While the system may default it, the requirement is to define/ensure it for the start date, not just accept without action.
Check Closed for all rows except for June 1 — Incorrect; closed periods are for prior years; new setup keeps future periods open.
Clear the default New Fiscal Year — Clearing it would misrepresent the year start; it should be checked on the starting period.
Remove any Permission sets that allow posting / In User Setup, set Allow Posting From and Allow Posting To options to current dates — User Setup overrides company settings for exceptions (e.g., allowing specific users broader ranges); company restriction is via General Ledger Setup. Removing permissions is overkill/not standard for date-based restriction.
Set the Work Date past the prior month ending date — Work Date is user-specific for default posting date; not a restriction method.
Reference:
Microsoft Learn – Work with accounting periods and fiscal years
Microsoft Learn – Specify posting periods
Microsoft Learn – Close accounting periods for a fiscal year
You need to enforce restrictions for salespeople and regions to meet the requirements for
Commission.
What should you do?
A. Set Salesperson and Region dimensions to Limited.
B. Assign Default Dimension Priorities to list Salesperson first.
C. Set the dimension combination between the Salesperson and the Region to Blocked.
D. Add Default Dimensions for Salesperson on Customer Cards.
Explanation:
To enforce commission restrictions based on salespeople and regions in Dynamics 365 Business Central, dimension combinations must be controlled to prevent invalid pairings (e.g., a salesperson assigned to one region posting to another region’s sales). The Dimension Combination setup page allows defining rules between two dimensions. Setting the combination of Salesperson and Region to Limited restricts postings to only predefined valid combinations (maintained in the Dimension Combination Access table), ensuring salespeople can only record revenue in their authorized regions for accurate and compliant commission calculation.
Correct Option:
A. Set Salesperson and Region dimensions to Limited.
Selecting Limited on the Dimension Combination page for the Salesperson ↔ Region pair activates access control. You then maintain allowed combinations (e.g., Salesperson SP01 only with Region NORTH) in the related Dimension Combination Access list. Any attempt to post a transaction with an unauthorized combination is blocked, enforcing region-specific salesperson restrictions directly tied to commission eligibility and preventing errors or fraud in commission reporting.
Incorrect Options:
B. Assign Default Dimension Priorities to list Salesperson first.
Dimension priorities determine the order in which default dimension values are applied or overridden (e.g., from customer → item → salesperson). While useful for consistent defaulting, it does not enforce restrictions or block invalid combinations between Salesperson and Region dimensions—priorities have no impact on combination validation or commission restrictions.
C. Set the dimension combination between the Salesperson and the Region to Blocked.
Blocked completely prohibits any posting where both Salesperson and Region are used together on the same transaction line/header. This is too restrictive—it would prevent all valid commission-related postings (even correct salesperson-region pairs), making it unsuitable when the goal is to allow only authorized combinations, not ban the pair entirely.
D. Add Default Dimensions for Salesperson on Customer Cards.
Adding Salesperson as a default dimension on customer cards automatically populates the salesperson code on sales documents for that customer. This helps with consistent assignment and commission routing but does not enforce any restrictions between Salesperson and Region dimensions or prevent salespeople from posting to unauthorized regions.
Reference:
Microsoft Learn – Work with dimension combinations
Microsoft Learn – Set up dimension combination rules
Microsoft Learn – Dimensions and dimension values for financial analysis
You need to configure the system to meet the requirements for received items.
What should you do?
A. Set the default costing method to Standard
B. Turn on Automatic Cost Posting
C. Turn on Expected Cost Posting
D. Set the value of the Automatic Cost Adjustment option to Always
Explanation:
This question focuses on how to handle received items in Business Central before they are invoiced. When items are received but the invoice has not yet been processed, the system needs to record an expected value in inventory to maintain accurate financial reporting. Expected Cost Posting is the feature designed specifically for this scenario.
Correct Option: C. Turn on Expected Cost Posting
Explanation:
Expected Cost Posting is a setup option that, when enabled, posts the estimated value of received items to the general ledger at the time of receipt. This ensures that the company's financial statements reflect the value of inventory that has been physically received, even if the supplier invoice has not yet arrived or been processed. This provides a more accurate picture of inventory value and accounts payable at any given time.
Incorrect Options:
A. Set the default costing method to Standard
The costing method (Standard, FIFO, Average, Specific) determines how the cost of an item is calculated. While Standard costing uses a predetermined cost, it does not control whether expected costs are posted to the general ledger upon receipt. Costing methods are about valuation logic, not the timing of when costs appear in financial accounts.
B. Turn on Automatic Cost Posting
Automatic Cost Posting controls whether inventory costs are automatically posted to the general ledger after they are adjusted. This affects the timing of when actual (invoiced) costs are updated, but it does not enable the posting of expected values for items that have only been received but not yet invoiced.
D. Set the value of the Automatic Cost Adjustment option to Always
The Automatic Cost Adjustment option determines when the system adjusts item costs based on changes (like a new purchase price). Setting it to "Always" ensures cost adjustments are applied immediately, but this still applies to actual costs, not the initial expected cost posting at the time of receipt.
Reference:
Microsoft Learn: Post Expected Costs
Microsoft Learn: Design Details - Expected Cost Posting
Microsoft Official MB-800 Study Guide: Inventory Costing Setup
You need to configure the system for receiving produce from the vendors.
What should you do?
A. Configure an Over-Receipt code with Tolerance percentage.
B. Set up a Payment Tolerance percentage.
C. Apply a Default Deferral template.
D. Set the Dampener Quantity to a value greater than zero.
Explanation:
When receiving produce from vendors, quantities often vary slightly due to weight, packaging, or natural product variations. Business Central needs to accommodate these minor differences without disrupting the receiving process. Over-receipt configuration allows the system to accept quantities that exceed the ordered amount within a defined tolerance.
Correct Option: A. Configure an Over-Receipt code with Tolerance percentage
Explanation:
An Over-Receipt code with Tolerance percentage enables warehouse staff to receive quantities that exceed the purchase order quantity by a specified percentage. For produce vendors where slight overages are common and acceptable, this setting prevents system errors or blocks during receiving. The tolerance percentage defines how much variance is allowed, streamlining the receiving process while maintaining inventory accuracy and vendor relationship efficiency.
Incorrect Options:
B. Set up a Payment Tolerance percentage.
Payment tolerance applies to accounts receivable, allowing minor differences between what a customer pays and what they owe. This setting is for customer payments, not for receiving inventory. It has no impact on purchase receipts or quantity variances from vendors.
C. Apply a Default Deferral template.
Deferral templates are used to recognize revenue or expenses over multiple accounting periods. This is relevant for prepaid items or subscription billing, not for physical inventory receipt. It does not address quantity variances on purchase orders.
D. Set the Dampener Quantity to a value greater than zero.
Dampener Quantity is not a standard configuration option in Business Central for inventory receiving. This may be confused with safety stock or reorder point settings, which manage inventory replenishment levels. It does not control over-receipt tolerances on purchase orders.
Reference:
Microsoft Learn: Receive Items
Microsoft Learn: Handle Over-Receipts on Purchase Orders
Microsoft Official MB-800 Study Guide: Purchase Order Processing
You need to set up units of measure for an item to meet the requirements.
What are two possible ways to achieve the goal? Each correct answer presents a complete
solution.
NOTE: Each correct selection is worth one point.
A. Set a Unit of Measure for case to a Qty. of 10.
B. Set a Qty. per Unit of Measure to 1 in the Item Units of Measure table.
C. Set a Unit of Measure for case to a Qty. of 1.
D. Add a Code and Description to the Units of Measure table.
Explanation:
This question tests your knowledge of how units of measure are configured in Business Central for items. Units of measure must be properly defined in the system to handle purchasing, stocking, and selling items in different quantities or packages, such as selling items individually while purchasing them in cases.
Correct Options:
A. Set a Unit of Measure for case to a Qty. of 10.
This is a correct way to set up item units of measure. By defining a "Case" unit with a quantity of 10, you establish that one case contains 10 individual units. This allows the system to automatically convert between units when purchasing in cases but selling in pieces, ensuring accurate inventory tracking and pricing across different transaction types.
D. Add a Code and Description to the Units of Measure table.
This is a correct foundational step. Before units of measure can be assigned to items, they must first exist in the system. Adding a Code (like "CASE" or "PAL") and Description to the Units of Measure table creates the unit definition that can later be used on item cards and in item units of measure configurations.
Incorrect Options:
B. Set a Qty. per Unit of Measure to 1 in the Item Units of Measure table.
Setting a quantity per unit of measure to 1 would mean the unit represents a single piece. While this is appropriate for a base unit like "Piece" or "Each," it does not help meet requirements for multiple units like cases or pallets. This option provides no conversion capability between different units of measure.
C. Set a Unit of Measure for case to a Qty. of 1.
Setting a case unit to a quantity of 1 would mean one case equals one piece, which defeats the purpose of having multiple units of measure. This configuration would not accurately represent inventory where cases contain multiple individual items, leading to incorrect stock levels and pricing.
Reference:
Microsoft Learn: Set Up Units of Measure
Microsoft Learn: Item Units of Measure
Microsoft Official MB-800 Study Guide: Item Configuration
You need to configure the system to meet the requirements for sending invoices.
Which three actions should you perform? Each correct answer presents part of the
solution.
NOTE: Each correct selection is worth one point.
A. Set Email to Yes (Use Default Settings).
B. Allow Sender Substitution for SMTP Mail Setup.
C. Set Email to Yes (Prompt for Settings).
D. Assign a Document Sending Profile to the Customer where Email is set to No.
E. Apply Office Server Settings to the SMTP Mail Setup.
F. Assign a Document Sending Profile to the Customer where Email is set to Yes.
E. Apply Office Server Settings to the SMTP Mail Setup.
F. Assign a Document Sending Profile to the Customer where Email is set to Yes.
Explanation:
This question addresses the configuration needed to send invoices electronically from Business Central. Proper email setup involves configuring SMTP settings, enabling email on documents, and assigning sending profiles to customers to automate the delivery process. These three components work together to ensure invoices are sent correctly.
Correct Options:
A. Set Email to Yes (Use Default Settings).
This configuration on the customer card or document sending profile tells Business Central to automatically use the default email settings when sending documents to that customer. Selecting "Yes (Use Default Settings)" ensures invoices are sent without requiring manual email configuration for each transaction, streamlining the billing process.
E. Apply Office Server Settings to the SMTP Mail Setup.
SMTP (Simple Mail Transfer Protocol) settings are essential for sending emails from Business Central. Applying Office Server Settings (such as Microsoft 365 or Exchange Online) configures the system to use these servers for outgoing email. This ensures reliable email delivery with proper authentication and security for sending invoices to customers.
F. Assign a Document Sending Profile to the Customer where Email is set to Yes.
Document Sending Profiles define how documents (like invoices) are sent—via email, print, or electronic format. Assigning a profile where Email is set to Yes ensures that when invoices are posted for that customer, they are automatically sent according to the profile settings, reducing manual steps and ensuring consistent delivery.
Incorrect Options:
B. Allow Sender Substitution for SMTP Mail Setup.
Sender substitution allows emails to appear from a different address than the actual sending account. While this may be useful in some scenarios, it is not a core requirement for sending invoices and relates more to email authentication and deliverability concerns.
C. Set Email to Yes (Prompt for Settings).
Setting email to "Yes (Prompt for Settings)" would require users to manually enter email details each time a document is sent. This defeats automation and efficiency goals, making it unsuitable for streamlined invoice processing where consistency and speed are important.
D. Assign a Document Sending Profile to the Customer where Email is set to No.
Assigning a profile where Email is set to No would prevent invoices from being sent electronically. This contradicts the requirement to send invoices and would require manual intervention for each invoice, reducing efficiency.
Reference:
Microsoft Learn: Set Up Email
Microsoft Learn: Document Sending Profiles
Microsoft Learn: SMTP Mail Setup
Microsoft Official MB-800 Study Guide: Email Configuration for Documents
You need to resolve the issue reported by the AR users from the finance department. What should you do?
A. Switch Blocked on the Customer Card to Yes.
B. Switch Direct Posting on the G/L Account Card to Yes.
C. Switch Blocked on the G/L Account Card to Yes
D. Switch Direct Posting on the G/L Account Card to No
Explanation:
This question addresses an issue where AR (Accounts Receivable) users are encountering problems with general ledger accounts. When a G/L account allows direct posting, users can post transactions directly to that account, bypassing sub-ledgers like Accounts Receivable. This can cause reconciliation issues between the AR sub-ledger and the general ledger.
Correct Option: D. Switch Direct Posting on the G/L Account Card to No
Explanation:
Setting Direct Posting to No on G/L account cards that are part of the Accounts Receivable posting group ensures that all AR transactions must come through the customer ledger and proper sub-ledger processes. This prevents users from accidentally posting directly to AR control accounts, which would cause discrepancies between the detailed customer entries and the general ledger balance. When direct posting is disabled, only system-generated entries from posted customer documents can update these accounts, maintaining data integrity and simplifying reconciliation for the finance department.
Incorrect Options:
A. Switch Blocked on the Customer Card to Yes.
Blocking a customer prevents new transactions for that specific customer. This does not resolve a systemic AR posting issue affecting multiple customers. It is a customer-specific control, not an account-level configuration to prevent direct ledger postings.
B. Switch Direct Posting on the G/L Account Card to Yes.
This would make the problem worse. Setting Direct Posting to Yes allows users to post directly to the G/L account, bypassing AR sub-ledger controls entirely. This would increase reconciliation issues rather than resolve them.
C. Switch Blocked on the G/L Account Card to Yes.
Blocking a G/L account prevents any posting to that account at all. This would stop AR users from posting customer transactions completely, disrupting business operations rather than fixing the underlying issue of direct postings.
Reference:
Microsoft Learn: Understanding General Ledger Accounts
Microsoft Learn: Set Up G/L Accounts
Microsoft Official MB-800 Study Guide: Accounts Receivable Configuration
| Page 6 out of 24 Pages |