Topic 5: Misc. Questions
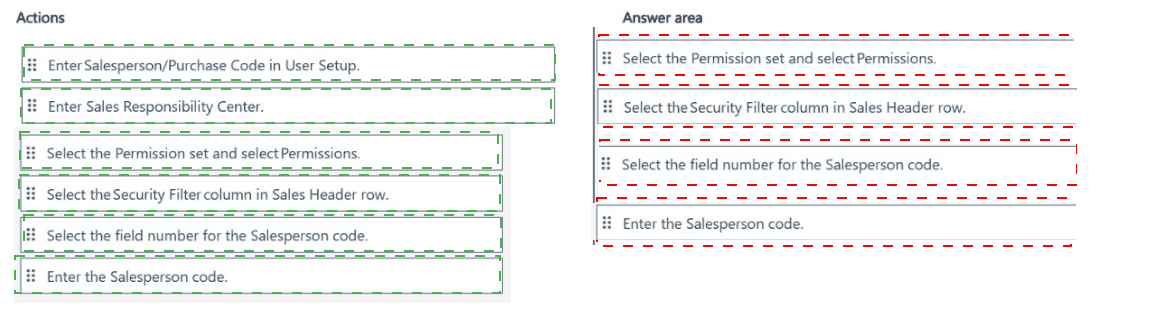
A company uses Dynamics 365 Business Central. You group salespeople into teams and assign each team a Salesperson code.
A salesperson reports that they can see the sales orders for other sales team members.
You need to ensure that sales team members can only see sales orders that they create.
Which four actions should you perform in sequence? To answer, move the appropriate actions from the list of actions to the answer area and arrange them in the correct order.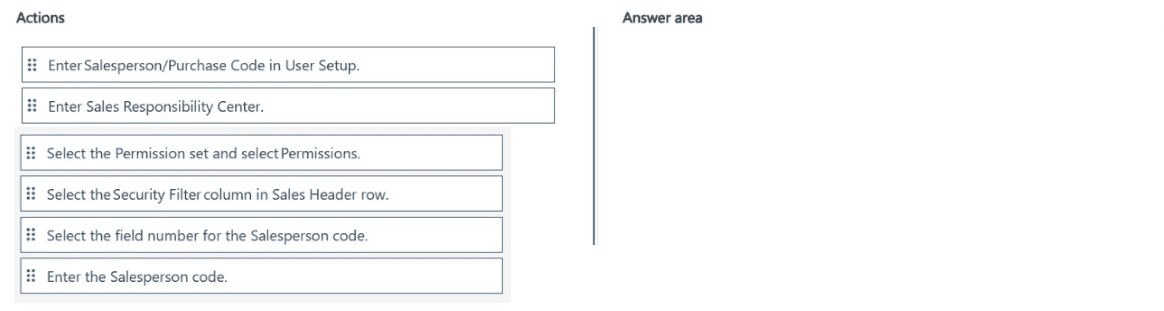
Explanation of the Sequence:
Step 1 – Select the Permission set and select Permissions:
Navigate to the relevant permission set (e.g., a custom or existing set assigned to the sales team). Open its Permissions page to define table-level security filters.
Step 2 – Select the Security Filter column in Sales Header row:
Locate the Sales Header table (table ID 36) in the permissions list. In the Security Filter column, click to open the filter editor. This is where you restrict record access based on field values.
Step 3 – Select the field number for the Salesperson Code:
In the security filter editor, select the Salesperson Code field (usually field number 5 or similar in Sales Header). This identifies which field will be used to filter records.
Step 4 – Enter the Salesperson code:
Enter the specific Salesperson code (e.g., the user’s assigned code or a filter like =USERID or the actual code). This ensures the user only sees sales orders where the Salesperson Code field matches the entered value.
Note: In modern Business Central, you can also use Record-level security filtering via the Security Filter column directly, entering syntax such as Salesperson Code = 'PS' or WHERE (Salesperson Code = FIELD(USERID)).
Why Other Actions Are Incorrect or Out of Order:
Enter Salesperson/Purchase Code in User Setup: This assigns default codes but does not restrict visibility via security filters. This is a separate setup, not part of the security filtering sequence.
Enter Sales Responsibility Center: Irrelevant to sales order visibility based on Salesperson code. Responsibility centers affect reporting, not record-level security.
Enter the data of salesperson (repeated entries): Vague action not applicable to the security filtering workflow.
Reference:
Microsoft Learn – "Security Filters in Business Central" and "Record-Level Security" – Restricting access to Sales Header based on Salesperson Code.
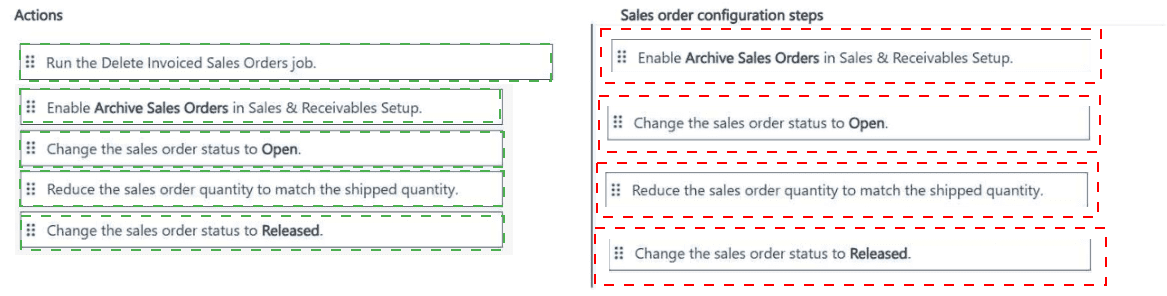
A company uses Dynamics 365 Business Central.
The accounting manager wants partially shipped and invoiced sales orders that will not be fulfilled to not be displayed on the active page (Open Sales Order list). Deleted sales orders must be available for reporting of ordered and delivered quantities.
You need to configure sales orders.
Which four actions should you perform in sequence? To answer, move the appropriate actions from the list of actions to the answer area and arrange them in the correct order.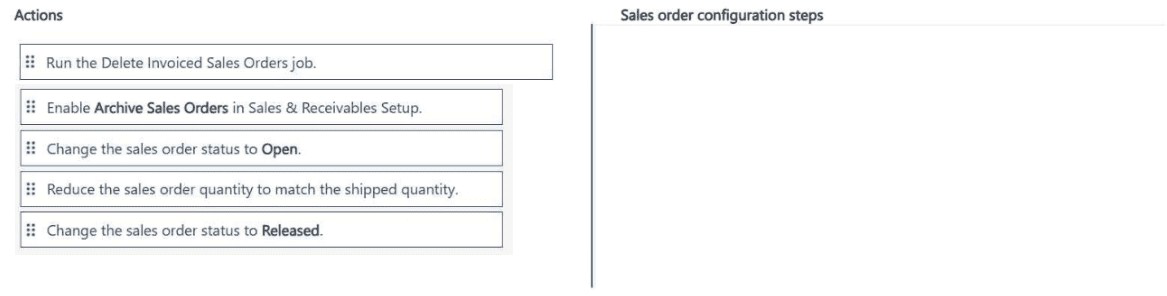
Explanation of the Sequence:
Step 1 – Enable Archive Sales Orders in Sales & Receivables Setup:
Archiving must be enabled first. This ensures that when an order is deleted, it is moved to the Archived Sales Orders page instead of being permanently removed. Archiving preserves ordered and delivered quantities for reporting, which meets the requirement.
Step 2 – Change the sales order status to Released:
Only Released sales orders can be processed further (ship, invoice, or delete). An order that is still Open cannot be reduced in quantity or deleted via the deletion job. Changing status to Released is a prerequisite.
Step 3 – Reduce the sales order quantity to match the shipped quantity:
If an order is partially shipped and the remaining quantity will never be fulfilled, you must reduce the outstanding quantity on the line to match what has already been shipped. This ensures that when the order is deleted, no open quantity remains to confuse reporting.
Step 4 – Run the Delete Invoiced Sales Orders job:
This batch job removes sales orders that are fully shipped and invoiced (or reduced to zero open quantity). Because archiving is enabled, deleted orders are moved to the archive. They will no longer appear on the Open Sales Orders list but remain available for historical reporting.
Why Other Actions Are Incorrect or Out of Sequence:
Change the sales order status to Open: Changing status to Open would reverse the process. Orders must be Released to be deleted or reduced. This action is not part of the correct sequence.
Reduce sales order quantity without enabling archiving first: You can reduce quantity at any time, but without archiving enabled, deleted orders would be permanently lost. The sequence requires archiving before deletion.
Reference:
Microsoft Learn – "Archive Sales Orders" and "Delete Invoiced Sales Orders Batch Job" in Dynamics 365 Business Central documentation.
A company uses Dynamics 365 Business Central.
Users in the purchasing and accounts payable departments require the following information about vendors and vendor ledger entries:
• Balance (LCY) for vendor
• Remaining amount for ledger entry
• Amount for application entry
You need to retrieve the vendor and vendor ledger entry information.
Where should you navigate to find the information? To answer, drag the appropriate locations to the correct requirements. Each location may be used once, more than once, or not at all You may need to drag the split bar between panes or scroll to view content.
NOTE: Each correct selection is worth one point.
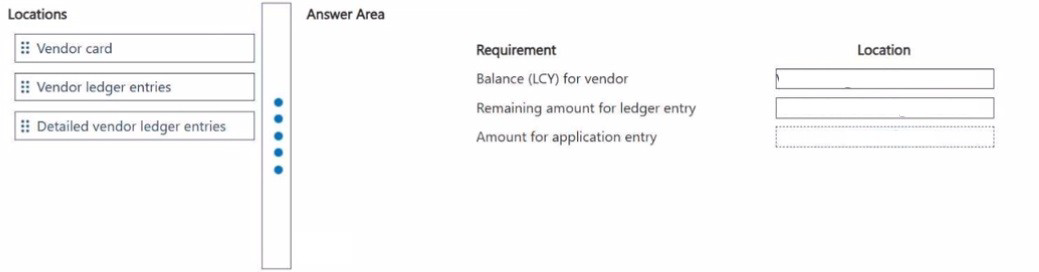
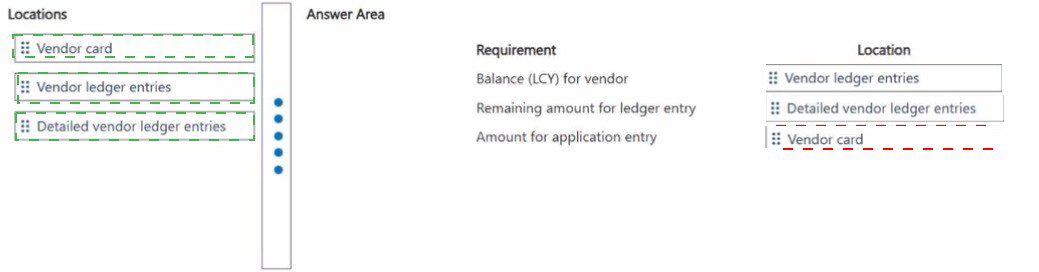
Requirement 1: Balance (LCY) for vendor
Correct Location: Vendor card
Explanation: The vendor card displays the Balance (LCY) field on the Invoicing FastTab. This is a calculated field that shows the vendor's total outstanding balance in local currency. It is the first place a user checks for a vendor's current financial standing without opening entry lists.
Incorrect Locations:
Vendor ledger entries: Shows individual entries but not a single summary balance field.
Detailed vendor ledger entries: Shows applied/unapplied details but not a rolled-up balance.
Reference: Microsoft Learn – "Vendors Overview" – Vendor Card Balance Field
Requirement 2: Remaining amount for ledger entry
Correct Location: Vendor ledger entries
Explanation: On the Vendor Ledger Entries page, each entry has a Remaining Amount field. This shows the unpaid portion of an invoice or the unapplied portion of a credit memo after partial payments or applications. This is a standard column available on the list page.
Incorrect Locations:
Vendor card: Shows total balance only, not remaining amount per individual ledger entry.
Detailed vendor ledger entries: Shows application-level details but the remaining amount is visible at the parent entry level in standard vendor ledger entries.
Reference: Microsoft Learn – "Vendor Ledger Entries" – Remaining Amount Field
Requirement 3: Amount for application entry
Correct Location: Detailed vendor ledger entries
Explanation: The Detailed Vendor Ledger Entries page displays individual application entries, including the Amount field that shows how much of a payment was applied to a specific invoice. This is used to trace exact applied amounts between entries, which is not visible in the standard vendor ledger entries view.
Incorrect Locations:
Vendor card: No application entry-level detail.
Vendor ledger entries: Shows entry-level remaining amounts but not the granular breakdown of each application between entries.
Reference: Microsoft Learn – "Detailed Vendor Ledger Entries" – Application Entries
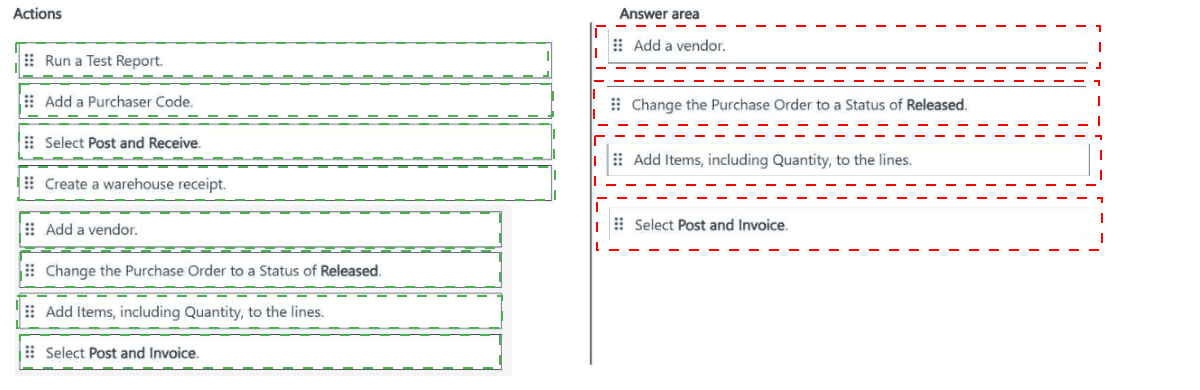
You need to advise a company how to process a purchase order in the system for a company.
Which four actions should you perform in sequence? To answer, move the appropriate actions from the list of actions to the answer area and arrange them in the correct order.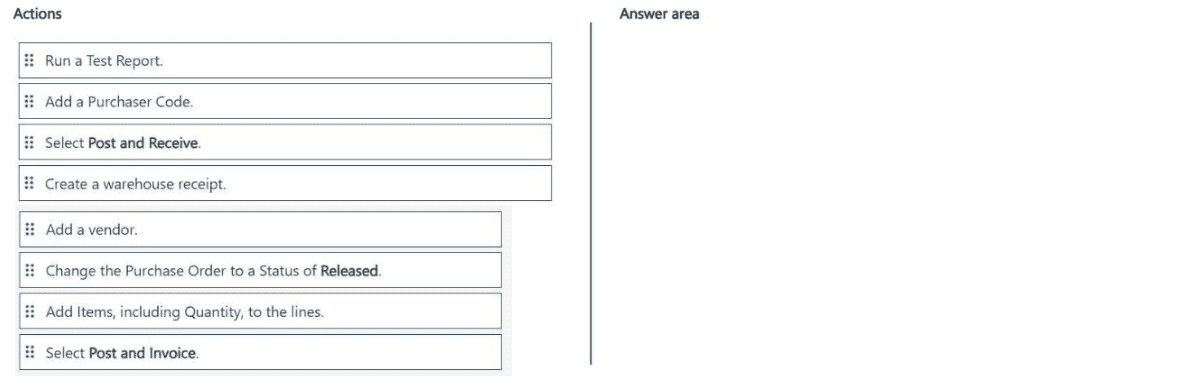
Explanation of the Sequence:
Step 1 – Add Items, including Quantity, to the lines:
Before any posting can occur, the purchase order must have line details. You add the items being purchased along with their quantities. This defines what is being received and invoiced.
Step 2 – Change the Purchase Order to a Status of Released:
Releasing the purchase order makes it available for warehouse processing and posting. A purchase order cannot be posted (received or invoiced) unless its status is set to Released.
Step 3 – Select Post and Receive:
This action registers the physical receipt of goods into inventory. It updates item ledger entries and increases on-hand quantity. This step can be done before or separately from invoicing depending on business process.
Step 4 – Select Post and Invoice:
This action creates the vendor invoice and updates the general ledger accounts. It finalizes the financial side of the purchase. If both receipt and invoice are ready at the same time, users typically select Post and Receive & Invoice (combined). However, when listed separately as here, Post and Invoice is the final step after receipt.
Why Other Actions Are Incorrect or Out of Sequence:
Add a vendor: Must be done before creating the purchase order, not during the four-action sequence for processing an existing PO.
Create a warehouse receipt: Only needed if advanced warehouse functionality (directed put-away/pick) is enabled. Not a core action for standard purchase order processing.
Run a Test Report: Optional preview action, not a required step for processing the order.
Add a Purchaser Code: Setup action, not part of daily purchase order processing sequence.
Reference:
Microsoft Learn – "Create Purchase Orders" and "Post Purchases" in Dynamics 365 Business Central documentation.
You are configuring Business Central for a client.
The client has the following requirements to process documents in the system:
• Invoke amounts in the local currency must never be rounded.
• Details for general ledger (G/L) entries must be displayed in Preview Posting.
• During data entry, users must receive an alert about issues in documents and journals to prevent users from posting.
You need to configure General Ledger Setup options to complete the configuration.
Which configuration options should you use for each requirement? To answer, drag the appropriate configuration options to the correct requirements. Each configuration option may be used once, more than once, or not at all. You may need to drag the split bar between panes or scroll to view content.
NOTE: Each correct selection is worth one point.


Requirement 1: Invoice amounts in the local currency must never be rounded.
Correct Option: Inv. Rounding Precision (LCY)
Explanation: This field controls the rounding precision for invoice amounts in the local currency. Setting this to a value such as “0” (or the smallest currency unit) ensures no rounding occurs, meeting the requirement that amounts are never rounded.
Incorrect Options:
LCY Code: Defines the local currency symbol/code (e.g., USD, EUR), not rounding behavior.
Enable Data Check: Validates data integrity but doesn’t control rounding precision.
Posting Preview Type: Controls preview details in posting, not rounding of invoice amounts.
Reference: Microsoft Learn – “Set Up General Ledger” (Inv. Rounding Precision field)
Requirement 2: Details for G/L entries must be displayed in Preview Posting.
Correct Option: Posting Preview Type
Explanation: This option determines what information users see in the posting preview before posting a document or journal. Selecting a value like “Detailed” or “G/L Entries” ensures that general ledger entry details are displayed during the preview step.
Incorrect Options:
LCY Code: Unrelated to posting preview content.
Enable Data Check: Validates data but doesn’t affect preview display details.
Inv. Rounding Precision (LCY): Only affects rounding of invoice amounts.
Reference: Microsoft Learn – “Posting Preview Type Field in General Ledger Setup”
Requirement 3: During data entry, users must receive an alert about issues to prevent posting.
Correct Option: Enable Data Check
Explanation: When enabled, this feature validates data while the user is typing (e.g., in journals or documents) and raises alerts about issues immediately. This prevents users from continuing with incorrect or incomplete data that would later block posting.
Incorrect Options:
LCY Code: No relation to real-time data validation or alerts.
Posting Preview Type: Shows preview before posting, but does not alert during data entry.
Inv. Rounding Precision (LCY): Only affects rounding, not data validation.
Reference: Microsoft Learn – “Enable Data Check in General Ledger Setup”
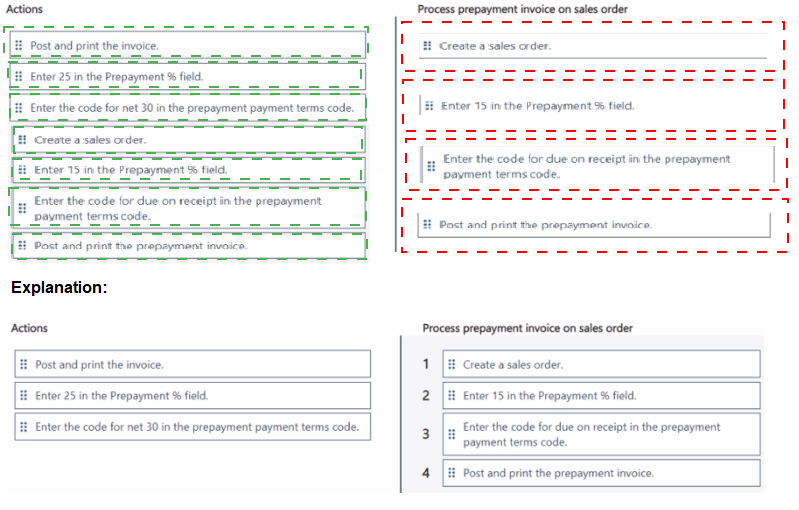
You need to train users on how to process a special order for an established customer.
Which four actions should you perform in sequence? To answer, move the appropriate actions from the list of actions to the answer area and arrange them in the correct order.
NOTE More than one order of answer choices is correct. You will receive credit for any of
the correct orders you select.
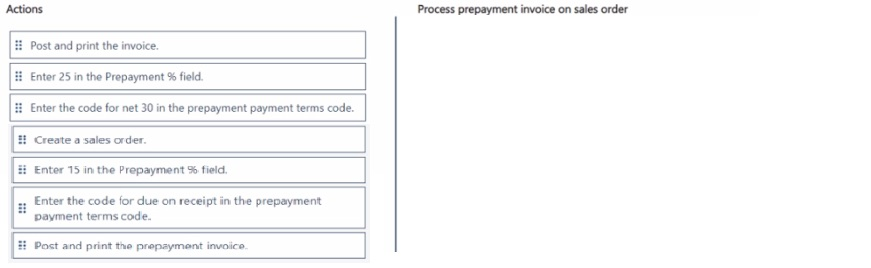
Explanation:
When processing a special order that requires a prepayment, the user must first create the sales order. The next step is to specify the prepayment percentage and the specific payment terms that apply to that prepayment. Once the sales order is correctly configured with these details, the system can generate and post the prepayment invoice to send to the customer.
Correct Sequence:
Create a sales order.
Enter 25 in the Prepayment % field.
Enter the code for due on receipt in the prepayment payment terms code.
Post and print the prepayment invoice.
Explanation of Correct Options:
Create a sales order: This is the foundational step. All transactions, including special orders and prepayments, must begin with a sales order document that records the customer, items, and quantities.
Enter 25 in the Prepayment % field: Once the sales order is created, the user must define the amount the customer needs to pay upfront. In this case, a 25% prepayment is required, so this percentage must be entered on the sales order.
Enter the code for due on receipt in the prepayment payment terms code: Prepayments typically require immediate payment. Setting the prepayment payment terms to "due on receipt" ensures the invoice generated will require payment right away, which is standard for a deposit.
Post and print the prepayment invoice: The final step in this part of the process is to generate the formal invoice for the prepayment amount. Posting it makes it a financial transaction, and printing it provides a document to send to the customer.
Why other actions are incorrect for this sequence:
Post and print the invoice: This action would post the final sales invoice for the entire order. This is done much later in the process, only after the items have been shipped and the prepayment has been applied.
Enter 15 in the Prepayment % field: This is an alternative percentage. The scenario specifically requires a 25% prepayment, so entering 15% would be incorrect.
Enter the code for net 30 in the prepayment payment terms code: "Net 30" means the customer has 30 days to pay. This is not appropriate for a prepayment, which is required before the goods are shipped or the service is fully delivered.
Reference:
Microsoft Learn: Set Up Prepayments
Microsoft Learn: Create Prepayment Invoices
You need to recommend integration solutions to fulfill the company requirements.
Which Microsoft integration aligns with each requirement? To answer, select the appropriate options in the answer area.
NOTE: Each correct selection is worth one point.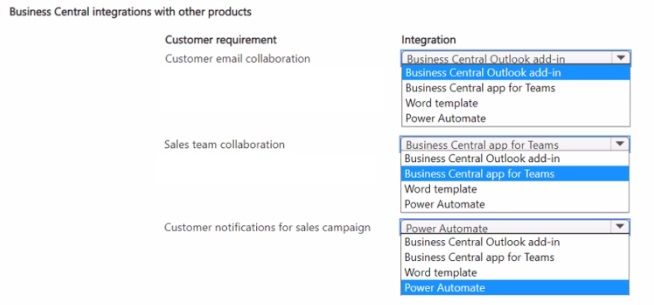
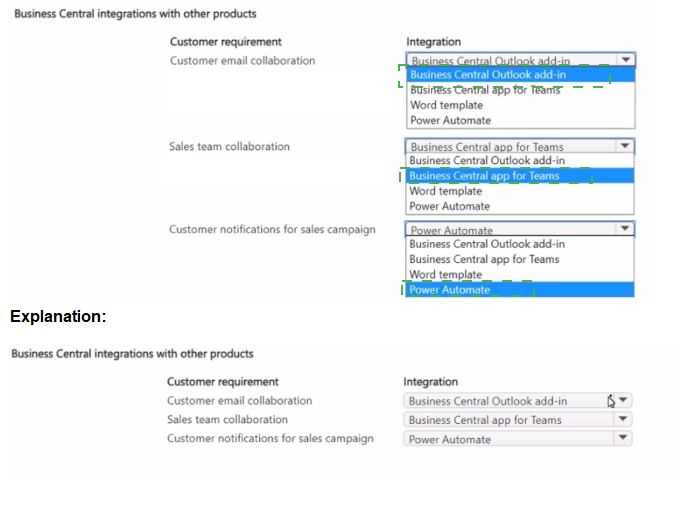
Explanation:
This question tests your knowledge of which Microsoft integration tools connect with Business Central to fulfill specific business requirements. Each requirement maps to a specific integration that provides the most efficient and native solution for that particular business need.
Customer Requirement 1: Customer email collaboration
Correct Option: Business Central Outlook add-in
Explanation:
The Business Central Outlook add-in allows users to work with Business Central data directly from their email. For customer email collaboration, this integration enables salespeople to view customer details, convert emails to opportunities, and send quotes without leaving Outlook, streamlining communication and data entry.
Incorrect Options:
Business Central app for Teams: While useful for collaboration, it's more focused on chat-based sharing and approvals rather than direct email management.
Word template: Used for document formatting, not email collaboration.
Power Automate: Can automate workflows but isn't the primary tool for direct email collaboration with customers.
Customer Requirement 2: Sales team collaboration
Correct Option: Business Central app for Teams
Explanation:
The Business Central app for Microsoft Teams enables sales teams to share, review, and edit Business Central data within Teams conversations. Team members can collaborate on customer records, sales documents, and approvals in real-time without switching applications, making it ideal for sales team collaboration.
Incorrect Options:
Business Central Outlook add-in: Primarily for individual email management, not team-based collaboration.
Word template: Used for document creation, not team collaboration.
Power Automate: Automates processes but doesn't facilitate real-time team collaboration.
Customer Requirement 3: Customer notifications for sales campaign
Correct Option: Power Automate
Explanation:
Power Automate (formerly Microsoft Flow) connects Business Central to various communication channels. For sales campaign notifications, it can automate sending personalized emails, SMS, or Teams messages to customers based on campaign triggers, ensuring timely and consistent outreach without manual effort.
Incorrect Options:
Business Central Outlook add-in: Requires manual action within email, not automated campaign notifications.
Business Central app for Teams: Used for internal collaboration, not automated customer communications.
Word template: Used for document formatting, not sending notifications.
Reference:
Microsoft Learn: Business Central and Outlook Integration
Microsoft Learn: Business Central App for Teams
Microsoft Learn: Using Power Automate with Business Central
| Page 4 out of 24 Pages |