Topic 5: Misc. Questions
A company uses Dynamics 365 Business Central.
A vendor delivers items within one week after the company orders the items. The vendor ships the items by using a train.
You need to configure the vendor card.
A. Location code
B. Shipment method code
C. Lead time calculation
D. Base calendar code
Explanation:
The requirement is to allow receipt of quantities greater than the ordered quantity (over-receipt). In Business Central, over-receipt is enabled by assigning an Over-Receipt Code that defines the tolerance (percentage or fixed amount). This code can be set on the Item Card (affecting all purchases of that item) or on the Vendor Card (affecting all items purchased from that vendor). Both are valid, complete solutions depending on whether the rule is item-specific or vendor-specific.
Correct Options (C, D):
C. Set up and select an over-receipt code in the item record:
On the Item Card, you assign an over-receipt code (e.g., "10%"). This allows over-receipt for that specific item from any vendor. This is a complete solution when the over-receipt tolerance is tied to the item itself.
D. Set up and select an over-receipt code in the vendor record:
On the Vendor Card, you can assign an over-receipt code. This allows over-receipt for all items purchased from that specific vendor. This is a complete solution when the tolerance is vendor-dependent (e.g., a trusted supplier who frequently ships extra).
Incorrect Options (A, B):
A. Configure a maximum order quantity for the item:
Maximum order quantity limits how much can be ordered, not how much can be received over the ordered amount. This prevents over-receipt rather than enabling it.
B. Configure a maximum inventory level for the item:
Maximum inventory level controls inventory planning (reorder points and quantities), not receipt tolerance. It does not allow over-receipt on purchase orders.
Reference:
Microsoft Learn – "Allow Over-Receipt of Items" – Over-receipt codes can be set on Item Card or Vendor Card.
You need to configure Dynamics 365 Business Central to allow for receipt of quantities of items greater than the quantity ordered.
What are two possible ways to achieve the goal? Each correct answer presents a complete solution.
NOTE: Each correct selection is worth one point.
A. Configure a maximum order quantity for the item
B. Configure a maximum inventory level for the item
C. Set up and select an over-receipt code in the item record
D. Set up and select an over-receipt code in the vendor record
Explanation:
The requirement is to allow receipt of quantities greater than the ordered quantity (over-receipt). In Business Central, over-receipt is enabled by assigning an Over-Receipt Code that defines the tolerance (percentage or fixed amount). This code can be set on the Item Card (affecting all purchases of that item) or on the Vendor Card (affecting all items purchased from that vendor). Both are valid, complete solutions depending on whether the rule is item-specific or vendor-specific.
Correct Options (C, D):
C. Set up and select an over-receipt code in the item record:
On the Item Card, you assign an over-receipt code (e.g., "10%"). This allows over-receipt for that specific item from any vendor. This is a complete solution when the over-receipt tolerance is tied to the item itself.
D. Set up and select an over-receipt code in the vendor record:
On the Vendor Card, you can assign an over-receipt code. This allows over-receipt for all items purchased from that specific vendor. This is a complete solution when the tolerance is vendor-dependent (e.g., a trusted supplier who frequently ships extra).
Incorrect Options (A, B):
A. Configure a maximum order quantity for the item:
Maximum order quantity limits how much can be ordered, not how much can be received over the ordered amount. This prevents over-receipt rather than enabling it.
B. Configure a maximum inventory level for the item:
Maximum inventory level controls inventory planning (reorder points and quantities), not receipt tolerance. It does not allow over-receipt on purchase orders.
Reference:
Microsoft Learn – "Allow Over-Receipt of Items" – Over-receipt codes can be set on Item Card or Vendor Card.
You are implementing Dynamics 365 Business Central for a company.
The company needs to receive more items than they ordered from a vendor.
You need to configure over-receipt functionality on the items purchased.
In which two places should you configure the over-receipt functionality? Each correct answer presents part of the solution.
NOTE: Each correct selection is worth one point.
A. Item card
B. Vendor card
C. Stockkeeping Unit card
D. Over-Receipt code list
Explanation:
Over-receipt functionality allows a company to receive more items than originally ordered. In Business Central, this requires two configurations: enabling over-receipt on the Item Card (or Stockkeeping Unit) and defining the Over-Receipt Code that specifies the allowed percentage or quantity. The Over-Receipt Code is selected from a predefined list (Over-Receipt Code list) and then assigned to the item.
Correct Options (A, D):
A. Item card:
On the Item Card, under the Receipt FastTab, you can assign an Over-Receipt Code. This enables the item to be received in quantities exceeding the purchase order line quantity, subject to the rules defined by the over-receipt code.
D. Over-Receipt code list:
The Over-Receipt Code List is where you define the over-receipt tolerance (e.g., 10% or a fixed quantity). You create codes such as "OVR10" with specific percentages or amounts. These codes are then selected on item cards to apply the rule.
Incorrect Options (B, C):
B. Vendor card:
Over-receipt is controlled by the item, not the vendor. A vendor card does not contain over-receipt settings. While a vendor might have shipping or delivery rules, over-receipt configuration is item-specific.
C. Stockkeeping Unit card:
A Stockkeeping Unit (SKU) can also have an over-receipt code (similar to the item card), but the question asks for two places to configure the functionality. The primary places are the Item Card and the Over-Receipt Code List. SKU is an alternative to Item Card for location-specific settings, but the standard exam answer pair is Item Card + Over-Receipt Code List.
Reference:
Microsoft Learn – "Allow Over-Receipt of Items" – Over-Receipt Codes defined in list and assigned on Item Card.
You have a Microsoft Excel file that includes journal entry data that must be imported into Dynamics 365 Business Central. This file was previously imported into a General Journal batch.
You receive an updated version of the file that includes corrections, deletions, and new journal entries.
Which three actions can you perform by using the Edit in Excel feature? Each correct answer presents a complete solution.
NOTE: Each correct selection is worth one point.
A. Modify an existing line in a General Journal batch
B. Insert a new line in a General Journal batch
C. Post one or more lines in a General Journal batch
D. Request Approval for one or more lines in a General Journal batch
E. Delete an existing line from a General Journal batch
B. Insert a new line in a General Journal batch
E. Delete an existing line from a General Journal batch
Explanation:
The Edit in Excel feature in Business Central allows users to export journal lines to Excel, edit them offline, and publish changes back. This feature supports adding, modifying, and deleting lines in an open (unposted) general journal batch. However, actions that require system processing—such as posting or requesting approval—cannot be performed directly within the Excel workbook because they involve workflow validation and database updates.
Correct Options (A, B, E):
A. Modify an existing line in a General Journal batch:
You can change field values (e.g., amount, account number, description) for existing lines in Excel, then publish the changes back to Business Central. The modified data updates the corresponding journal lines.
B. Insert a new line in a General Journal batch:
By adding a new row in the Excel worksheet (following the required column structure) and publishing, a new line is inserted into the journal batch. This is fully supported.
E. Delete an existing line from a General Journal batch:
Removing a row from the Excel worksheet and publishing will delete that corresponding line from the journal batch. This is a supported action.
Incorrect Options (C, D):
C. Post one or more lines in a General Journal batch:
Posting requires the Business Central posting engine to validate and update ledgers. This cannot be initiated from within Excel. Posting must be done from the journal page after publishing changes.
D. Request Approval for one or more lines in a General Journal batch:
Approval requests are workflow actions that require Business Central’s workflow engine. This cannot be triggered via Excel editing; it must be performed from the journal page.
Reference:
Microsoft Learn – "Edit in Excel" – Supported actions include insert, update, and delete of journal lines; posting and approval are not supported.
You must streamline monthly invoicing by automating repetitive entries for monthly charges when managing subscriptions. You need to add default general ledger (GL) accounts to a Customer Card.
Solution: Apply a Microsoft Word template on the Customer Card. Does the solution meet the goal?
A. Yes
B. No
Explanation:
The goal is to automate repetitive monthly subscription charges by adding default GL accounts to a Customer Card. A Microsoft Word template is used for document layout and formatting (e.g., invoice design, report appearance), not for storing default GL accounts or automating line entries. Word templates have no functionality to populate transaction lines or default accounts.
Correct Option (B. No):
Microsoft Word templates in Business Central are attached to report layouts (e.g., Sales Invoice report) to customize the visual appearance of printed or emailed documents. They do not affect data entry, default GL accounts, or recurring line automation. To add default GL accounts to a Customer Card, you would use Standard Sales Lines or Customer Posting Groups, not Word templates.
Incorrect Option (A. Yes):
Selecting "Yes" would incorrectly imply that Word templates can store or apply default GL accounts. Word templates are purely presentation-layer tools and have no impact on financial posting defaults or transaction line generation.
Reference:
Microsoft Learn – "Manage Report Layouts" – Word templates are for document formatting, not default account configuration.
A manufacturer is implementing Dynamics 365 Business Central as a new financial system. The manufacturer requires financial reports to match reports produced by the current financial system. You need to create account categories and subcategories to align with historical financial reports. What ate two possible ways to achieve this goal? Each correct answer presents part of the solution. NOTE: Each correct selection is worth one point.
A. Add a subcategory to the general ledger account and update the equivalent account schedule.
B. Create or delete account subcategories.
C. Create top-level account categories
D. Rename top-level account categories.
B. Create or delete account subcategories.
Explanation:
The goal is to align new financial reports with historical reports by creating account categories and subcategories. In Business Central, the Chart of Accounts uses Account Categories (top-level groupings like Assets, Liabilities) and Account Subcategories (detailed groupings like Cash, Accounts Receivable). To match historical reports, you can add subcategories to G/L accounts and update the account schedule, or create/delete subcategories as needed.
Correct Options:
A. Add a subcategory to the general ledger account and update the equivalent account schedule.
Each G/L account can be assigned an Account Subcategory. After assigning subcategories, you must update the related Account Schedule (financial report) to reflect the new grouping or subtotals. This ensures reports match historical formats.
B. Create or delete account subcategories.
You can manage Account Subcategories directly (e.g., create new ones like "Domestic Sales" or delete unused ones). This allows you to tailor the financial reporting structure precisely to match the legacy system's report layout.
Incorrect Options:
C. Create top-level account categories.
Top-level categories (e.g., Assets, Liabilities, Income) are typically fixed and should not be created arbitrarily. The standard top-level categories already align with standard financial reporting. Creating new top-level categories is rarely needed and does not help match a legacy report structure at the detailed level.
D. Rename top-level account categories.
Renaming top-level categories (e.g., changing "Assets" to "Resources") could break standard financial reporting logic and is not a recommended or necessary action for matching historical reports. Subcategories, not top-level names, provide the needed granularity.
Reference:
Microsoft Learn – "Account Categories and Subcategories" – Using subcategories to customize financial reports and account schedules.
A company uses Dynamics 365 Business Central.
An accountant must post sales services in a journal by using a predefined alphanumeric sequence. The accountant is using multiple general journal batches.
You need to configure invoice numbers for the journal.
Which two fields should you populate? Each correct answer presents part of the solution.
NOTE: Each correct selection is worth one point.
A. Posting No Series field in General Journal Templates
B. No. Series field in General Journal Batches
C. Posting No. Series field in General Journal Batches
D. No Series field in General Journal Templates
C. Posting No. Series field in General Journal Batches
Explanation:
The requirement is to post sales services using a predefined alphanumeric sequence for invoice numbers across multiple journal batches. In Business Central, invoice numbers (document numbers) in general journals are controlled by the Posting No. Series, not the regular No. Series. The Posting No Series must be defined at the General Journal Template level, and then each General Journal Batch can reference it (or override it) via the Posting No. Series field on the batch.
Correct Options:
A. Posting No Series field in General Journal Templates:
This field defines the default number series that will be used for posting document numbers (e.g., invoice numbers) for all batches under that template. It must be populated to enable alphanumeric sequential invoice numbering.
C. Posting No. Series field in General Journal Batches:
This field on the individual journal batch determines which posting number series is actually used when posting from that specific batch. If populated, it overrides the template-level setting, allowing different batches to use different alphanumeric sequences.
Incorrect Options:
B. No. Series field in General Journal Batches:
This field controls the line number series for journal lines (e.g., entry numbers within the journal), not the posting/invoice number assigned to the resulting posted document. It does not affect invoice numbers.
D. No Series field in General Journal Templates:
Similar to option B, this controls the default line numbering series for journal lines in the template, not the posting document number sequence.
Reference:
Microsoft Learn – "Use Number Series in General Journals" – Difference between No. Series (line numbers) and Posting No. Series (document numbers).
You must streamline monthly invoicing by automating repetitive entries for monthly charges when managing subscriptions. You need to add default general ledger (GL) accounts to a Customer Card.
Solution: Configure the Standard Sales Lines Card and assign it to the Customer Card.
Does the solution meet the goal?
A. Yes
B. No
Explanation:
The goal is to automate repetitive monthly charges for subscriptions by adding default GL accounts to a Customer Card. The Standard Sales Lines Card (also known as Standard Sales Code or Standard Customer Sales Code) allows you to predefine sales lines (including item, G/L account, quantity, and unit price). Assigning this card to a customer enables automatic population of those lines on sales documents, streamlining monthly invoicing for recurring charges.
Correct Option (A. Yes):
The Standard Sales Lines Card stores templates of recurring sales lines. When you assign a standard sales code to a customer (on the Customer Card under Invoicing FastTab → Standard Sales Code), any new sales invoice or order for that customer can retrieve those predefined lines. This automates the entry of GL accounts, items, and amounts, perfectly meeting the requirement for repetitive monthly subscription invoicing.
Incorrect Option (B. No):
Selecting "No" would incorrectly suggest that standard sales lines cannot provide default GL accounts for recurring monthly charges. In fact, this is the intended functionality in Business Central for recurring billing scenarios, such as subscriptions, rent, or service fees.
Reference:
Microsoft Learn – "Create Recurring Sales Lines" – Standard Sales Lines Card assigned to Customer Card.
You set up a new company for a customer.
The customer requires that two global dimensions be automatically checked at transaction when income statement accounts are used.
You need to set up the requirements for all income statement accounts at once.
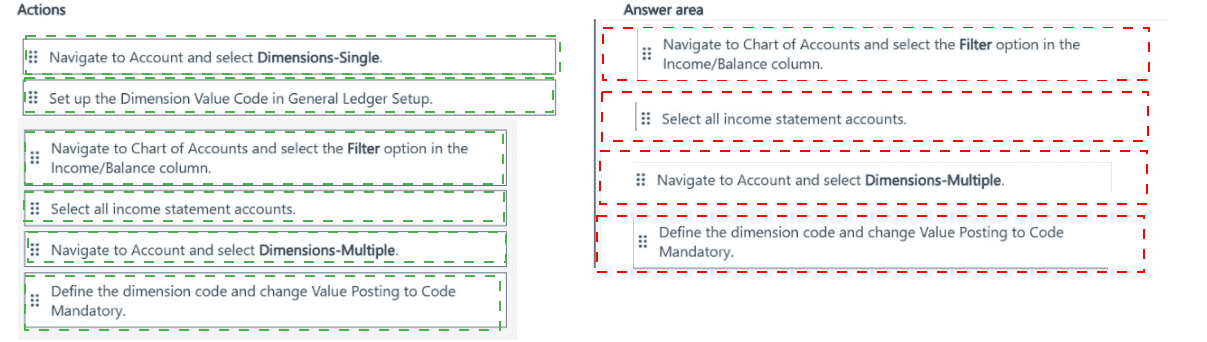
Which four actions should you perform in sequence? To answer, move the appropriate actions from the list of actions to the answer area and arrange them in the correct order.

Explanation of the Sequence:
Step 1 – Navigate to Chart of Accounts and select the Filter option in the Income/Balance column:
Open the Chart of Accounts page. Use the filter option on the Income/Balance column to filter for Income Statement accounts (as opposed to Balance Sheet accounts). This isolates only the accounts that require the dimension checking.
Step 2 – Select all income statement accounts:
After filtering, select all filtered income statement accounts. You can use Select All (Ctrl+Click or Shift+Click) or the system's multi-select feature. This allows you to apply dimension settings to multiple accounts at once rather than one by one.
Step 3 – Navigate to Account and select Dimensions-Multiple:
With all income statement accounts selected, go to the Account menu and choose Dimensions – Multiple. This opens the Dimension Multiple page, where you can assign dimension settings to all selected accounts simultaneously.
Step 4 – Define the dimension code and change Value Posting to Code Mandatory:
For each global dimension (e.g., DEPARTMENT, PROJECT), set the Value Posting field to Code Mandatory. This ensures that every transaction using these income statement accounts requires a dimension value to be entered before posting. Repeat for the second global dimension.
Why Other Actions Are Incorrect or Out of Sequence:
Navigate to Account and select Dimensions-Single: This applies dimension settings to one account at a time, not to all income statement accounts at once. The requirement specifies "all at once."
Set up the Dimension Value Code in General Ledger Setup: This defines global dimensions at the system level but does not apply mandatory checking to specific income statement accounts.
Define the dimension code and change Value Posting to Code Mandatory (without selecting accounts first): This action alone would apply to no specific accounts. The sequence requires selecting accounts before defining mandatory settings.
Reference:
Microsoft Learn – "Set Up Dimensions" – Applying dimension requirements to multiple accounts using Dimensions-Multiple and Code Mandatory setting.
A company plans to set up an approval process for purchase orders in Business Centra
The approval process must automatically send out an approval request as soon as a purchase order is created. Purchase orders that require approval must be for an amount of $600 or more.
You need to configure the approval workflows.
Which areas should you configure for each use case? To answer, drag the appropriate areas to the correct use cases. Each area may be used once, more than once, or not at all.
You may need to drag the split bar between panes or scroll to view content
NOTE: Each correct selection is worth one point.

Use Case 1: Activate the notification to be sent when a new purchase order is created
Correct Area: Workflow Notification Setup
Explanation: The Workflow Notification Setup page defines which notifications are enabled, what triggers them (e.g., purchase order creation), who receives them, and the message template. This is where you activate a specific notification for a workflow step, such as sending an approval request when a purchase order is created.
Incorrect Areas:
Approval User Setup: Defines approval limits and approvers, not notification activation.
Workflow User Group: Groups users for workflow assignments, not notification configuration.
Notification Schedule: Controls timing (immediate/digest), not which notifications are activated.
Reference: Microsoft Learn – "Workflow Notification Setup" – Enabling notifications for workflow steps
Use Case 2: Configure the approval limit for purchase orders
Correct Area: Approval User Setup
Explanation: The Approval User Setup page is where you define approval limits for each user (e.g., "Max. Purchase Amount" or "Sales Amount Approval Limit"). For purchase orders, you set the maximum amount a user can approve. Amounts exceeding the limit go to a higher-level approver.
Incorrect Areas:
Workflow Notification Setup: Handles notifications only, not approval limits.
Workflow User Group: Groups users for workflow steps but does not set financial limits.
Notification Schedule: Controls notification timing, not approval amounts.
Reference: Microsoft Learn – "Approval User Setup" – Setting approval limits for purchase orders
Use Case 3: Allow the user to receive notifications immediately
Correct Area: Notification Schedule
Explanation: The Notification Schedule page (or the schedule option within user notification settings) allows you to specify whether notifications are sent immediately or as a daily digest. To receive notifications as soon as a workflow event occurs (e.g., purchase order created), you set the schedule to "Immediate."
Incorrect Areas:
Approval User Setup: No notification timing controls.
Workflow Notification Setup: Activates notifications but does not control immediate vs. batched delivery.
Workflow User Group: No scheduling capability.
Reference: Microsoft Learn – "Notification Schedule" – Setting immediate notification delivery.
| Page 2 out of 24 Pages |