Topic 4: Mix Questions Set
You need to ensure that an Azure web app named az400-9940427-main supports rolling
upgrades. The solution must ensure that only 10 percent of users who connect to az400-
9940427-main use update versions of the app.
The solution must minimize administrative effort.
To complete this task, sign in to the Microsoft Azure portal.
Answer: See solution below.
Explanation:
Set up staging environments in Azure App Service
1. Open Microsoft Azure Portal
2. Log into your Azure account, select your app's resource page, in the left pane, select
Deployment slots > Add Slot.
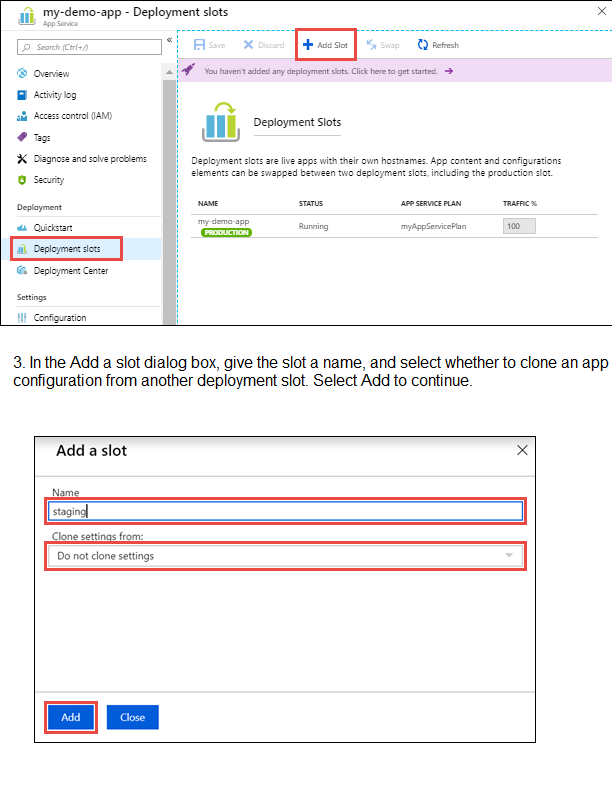
4. After the slot is added, select Close to close the dialog box. The new slot is now shown
on the Deployment slots page. By default, Traffic % is set to 0 for the new slot, with all
customer traffic routed to the production slot.
5. Select the new deployment slot to open that slot's resource page.

6. Change TRAFFIC % to 10
Step-by-Step Instructions to Configure in Azure Portal:
Sign in to the Azure Portal.
Navigate to your App Service: az400-9940427-main.
Create a Deployment Slot:
In the left menu, under Deployment, select Deployment slots.
Click Add Slot.
Give it a name (e.g., staging or v2).
Select Clone settings from your production slot (az400-9940427-main) to copy existing configurations.
Click Add.
Deploy your Update:
Deploy your new application version to the newly created staging slot (via FTP, Git, DevOps, etc.). The production slot remains untouched with the stable version.
Configure Traffic Routing (The Key Step):
Still in the Deployment slots blade, click on Traffic % at the top.
You will see your production slot and your new staging slot.
In the Traffic % column for the staging slot, enter 10.
Click Save.
How this meets your requirements:
Rolling Upgrades: Azure handles this automatically. It doesn't cut off all users at once.
10% User Traffic: By setting the traffic percentage to 10%, Azure Application Gateway Routing ensures that approximately 10% of new user sessions are routed to the staging slot (which has the update), while 90% continue to use the production slot.
Minimal Administrative Effort: This is a configuration change in the portal, requiring no custom code or complex load balancer setup.
Verification:
After saving, you can monitor the traffic distribution in the Deployment slots overview. When you are satisfied that the new version is stable, you can either:
Swap the slots to send 100% of traffic to the new version.
Increase the traffic percentage gradually.
You manage a website that uses an Azure SQL Database named db1 in a resource group
named RG1lod11566895.
You need to modify the SQL database to protect against SQL injection.
To complete this task, sign in to the Microsoft Azure portal.
Answer: See solution below.
Explanation:
Set up Advanced Threat Protection in the Azure portal
1. Sign into the Azure portal.
2. Navigate to the configuration page of the server you want to protect. In the security
settings, select Advanced Data Security.
3. On the Advanced Data Security configuration page:
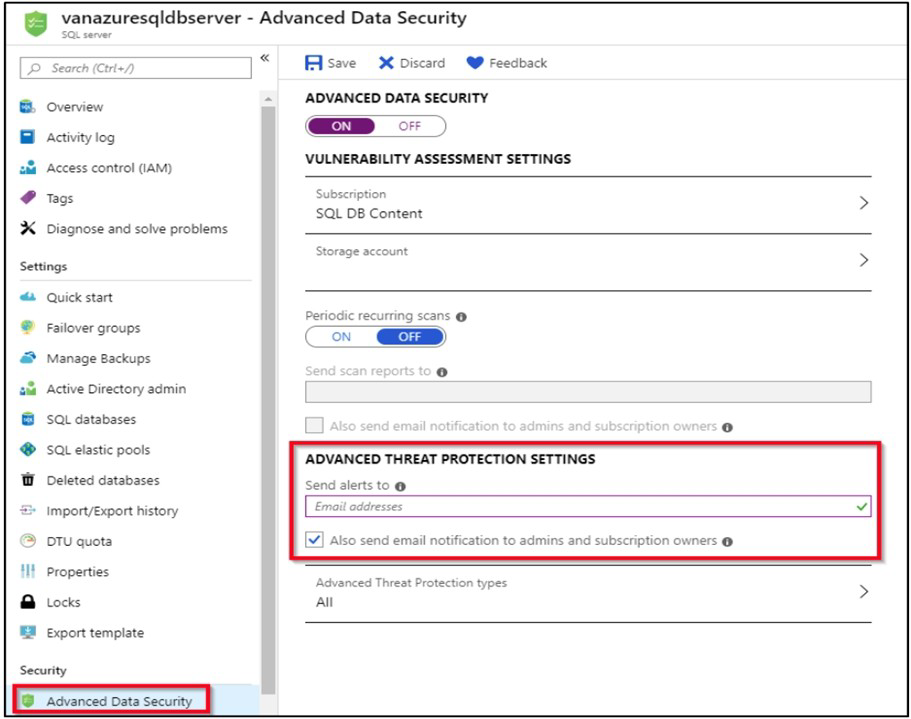
4. Enable Advanced Data Security on the server.
Note: Advanced Threat Protection for Azure SQL Database detects anomalous activities
indicating unusual and potentially harmful attempts to access or exploit databases.
Advanced Threat Protection can identify Potential SQL injection, Access from unusual
location or data center, Access from unfamiliar principal or potentially harmful application, and Brute force SQL credentials
Step-by-Step Instructions to Configure SQL Injection Protection:
Sign in to the Azure Portal.
Navigate to your SQL Database:
In the search bar at the top, type db1.
Select your database from the list. It should be under the resource group RG1lod11566895.
Enable Microsoft Defender for SQL:
In the left menu for your SQL database, under the Security section, select Microsoft Defender for Cloud.
If it's not already enabled, click Enable Microsoft Defender for SQL.
This enables advanced security features, including threat detection for anomalous activities (like SQL injection attempts).
Configure Vulnerability Assessment:
While still in Microsoft Defender for Cloud, click the Vulnerability Assessment settings.
Configure a storage account to store the scan results (you can create a new one if needed).
Click Save.
Then click Scan to run an initial vulnerability scan. This will check for database misconfigurations and vulnerabilities that could lead to SQL injection.
Review and Configure Threat Detection (Optional but Recommended):
In Microsoft Defender for Cloud, click on Firewalls and virtual networks.
Ensure that "Allow Azure services and resources to access this server" is checked (if needed by your website).
In Microsoft Defender for Cloud, you can also configure email alerts to notify administrators when suspicious events (like SQL injection attempts) are detected.
How this protects against SQL Injection:
Microsoft Defender for SQL continuously monitors database activity and uses machine learning to detect anomalous patterns, including SQL injection attempts.
Vulnerability Assessment scans for database misconfigurations, excessive permissions, and unprotected sensitive data that could be exploited for SQL injection.
Threat Detection provides alerts when potential SQL injection attacks are detected, allowing you to respond quickly.
Additional Best Practices (Code-Level):
While Azure provides these protections, also ensure your application code uses:
Parameterized queries or stored procedures
Input validation
An ORM like Entity Framework
You have an Azure DevOps pipeline that is used to deploy a Node.js app.
You need to ensure that the dependencies are cached between builds.
How should you configure the deployment YAML? To answer, drag the appropriate values
to the correct targets. Each value may be used once, more than once, or not at all. You
may need to drag the split bar between panes or scroll to view content.
NOTE Each correct selection is worth one point.
Explanation:
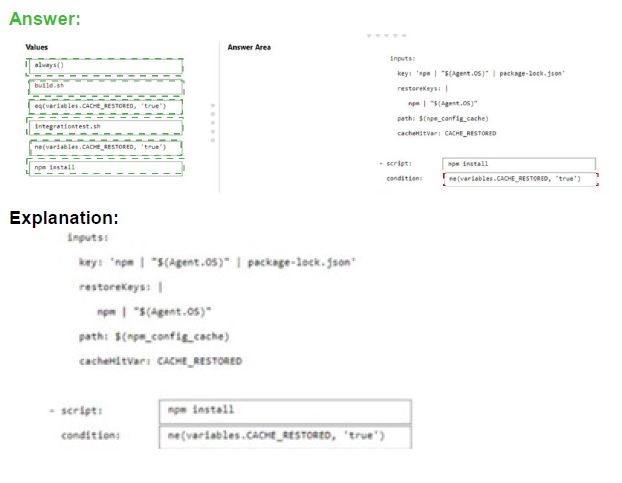
The Cache task in Azure Pipelines helps speed up builds by restoring dependencies from a cache when possible. When configuring caching for Node.js dependencies, you need to run the restore command (npm install) only when the cache wasn't restored. The condition should check if the cache was restored successfully.
Correct Option:
First script value: npm install
The npm install command installs Node.js dependencies. This should only run if the dependencies weren't successfully restored from the cache. It's the command that actually installs packages when needed.
First condition value: ne(variables.CACHE_RESTORED, 'true')
This condition means "run the script if CACHE_RESTORED is NOT equal to true." When the cache is successfully restored, CACHE_RESTORED is set to true, and this condition prevents npm install from running, saving build time.
Second script value: build.sh
The build.sh script runs after dependencies are installed (whether from cache or fresh install). This script builds the application and should run unconditionally regardless of cache status.
Second condition value: always()
The always() function ensures the build script runs even if previous steps failed. For a build step, you typically want it to run if dependencies are available, and always() with appropriate dependency settings ensures this.
Incorrect Option:
integrationtest.sh: This would be for running integration tests, not for dependency installation or building.
eq(variables.CACHE_RESTORED, 'true'): This would run the script only when cache was restored, which is opposite of what's needed for npm install.
Using incorrect condition for build.sh: The build should run regardless of cache status, so always() is appropriate.
Reference:
Microsoft Learn: Cache tasks in Azure Pipelines
Microsoft Learn: Specify conditions in Azure Pipelines
Microsoft Learn: Build and test Node.js apps
You have an Azure Repos repository named repo1.
You need to clone repo1. The solution must clone only a directory named src/web.
How should you complete the script? To answer, drag the appropriate values to the correct
targets,Each value may be used once, more than once, or not at all. You may need to drag
the spirt bar between panes or scroll to view content.
NOTE: Each correct selection is worth one point


Explanation:
To clone only a specific directory from a Git repository, you can use scalar clone with sparse-checkout. This technique reduces download size by fetching only the files and folders you need. The process involves cloning with sparse-checkout enabled, then configuring which directory paths to include.
Correct Option:
First blank (scalar clone Value): https://dev.azure.com/organization/project/_git/repo1
This is the HTTPS clone URL for the Azure Repos repository. Scalar clone requires the full repository URL to perform the initial clone operation with sparse-checkout support enabled.
Second blank (cd Value): repo1
After cloning, you need to change directory into the cloned repository folder. The folder name will match the repository name "repo1", which is where Git configuration commands like sparse-checkout are executed.
Third blank (git sparse-checkout set Value): src/web
The sparse-checkout set command specifies which directories to include in your working directory. By setting this to "src/web", only that specific directory and its contents will be present after the sparse-checkout is applied.
Incorrect Option:
git@ssh.dev.azure.com:v3/organization/project/repo1: This SSH URL would work for regular cloning, but scalar clone typically works with HTTPS URLs in Azure Repos scenarios.
repo1/src: This would include more than needed, potentially pulling the entire src directory including subdirectories other than web.
src: This would pull all contents of the src directory, not just the web subdirectory.
web: This path is relative but doesn't include the parent directory structure needed for sparse-checkout to locate the correct folder.
repo1/src/web: This includes the repository name which is not needed in the sparse-checkout path as you're already inside the repo1 directory.
Reference:
Microsoft Learn: Clone a Git repository
Microsoft Learn: Sparse checkout in Git
Git Docs: Scalar clone and sparse-checkout
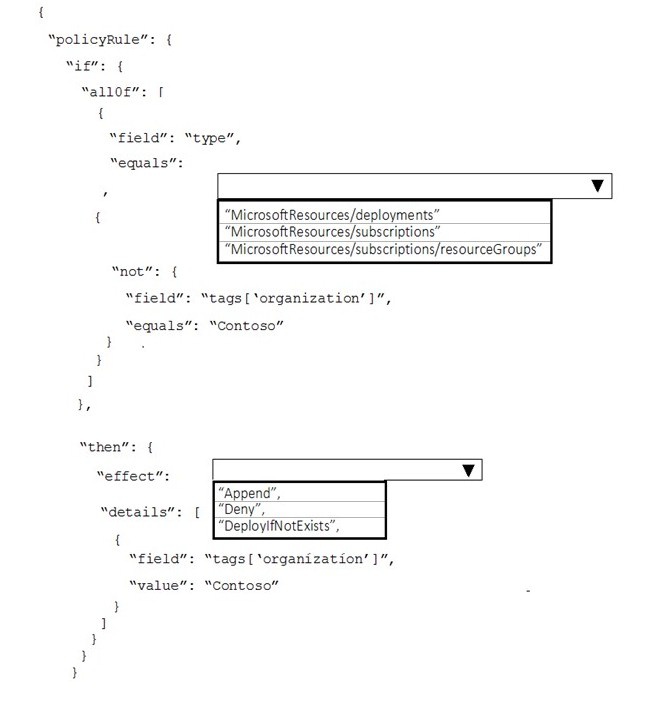
Your company has an Azure subscription.
The company requires that all resource group in the subscription have a tag named
organization set to a value of Contoso.
You need to implement a policy to meet the tagging requirement.
How should you complete the policy? To answer, select the appropriate options in the
answer area.
NOTE: Each correct selection is worth one point.
Explanation:
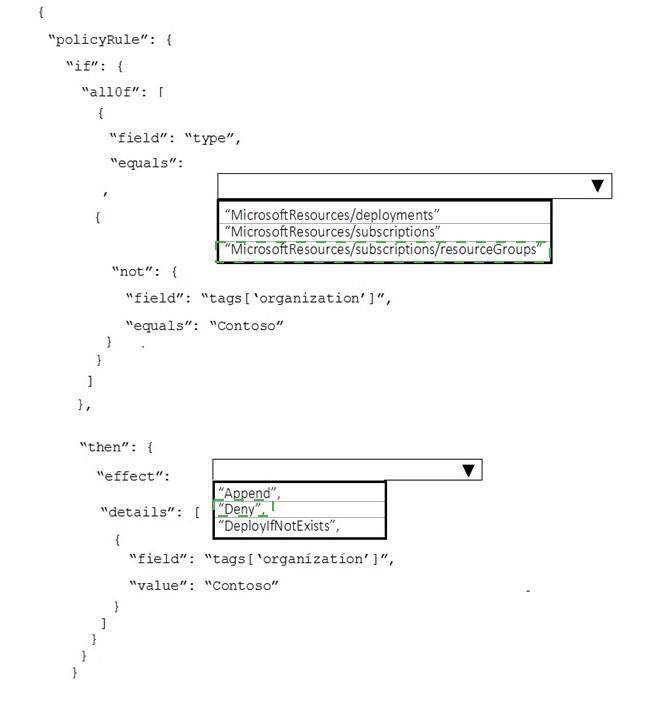
This Azure Policy is designed to enforce that all resource groups have a specific tag with a specific value. The policy needs to identify resource groups that don't have the required tag, and then either deny their creation or add the missing tag. Based on the JSON structure shown, this is a modify effect policy that adds the missing tag.
Correct Option:
First blank (field equals): Microsoft.Resources/subscriptions/resourceGroups
The policy needs to target resource groups specifically. The type field for resource groups in Azure Policy is "Microsoft.Resources/subscriptions/resourceGroups". This ensures the policy only applies to resource groups and not other resource types.
Second blank (effect): modify
The JSON structure shows "details" with field and value configurations, which is characteristic of the modify effect. Modify effects can add or change tags on existing resources, which matches the requirement to ensure all resource groups have the organization tag.
Incorrect Option:
Microsoft.Resources/resourceGroups: This is not the correct type syntax for resource groups in Azure Policy. The full path including "subscriptions" is required.
Microsoft.Compute/virtualMachines: This would target VMs instead of resource groups.
Microsoft.Storage/storageAccounts: This would target storage accounts, not resource groups.
deny: A deny effect would block creation of resource groups without the tag but wouldn't fix existing ones. The JSON structure shows a modify effect with field/value details.
audit: Audit would report non-compliant resources but wouldn't remediate them.
append: Append can add tags but the JSON structure shows a modify effect configuration with operation details.
Reference:
Microsoft Learn: Azure Policy definition structure
Microsoft Learn: Resource group types in Azure Policy
Microsoft Learn: Modify effect in Azure Policy
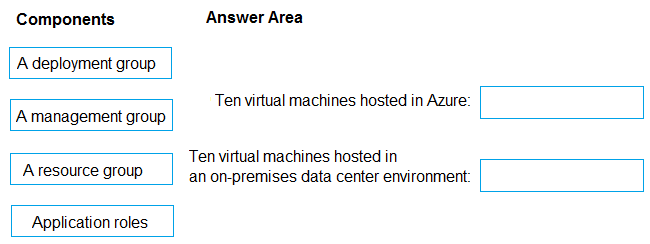
Your company plans to deploy an application to the following endpoints:
Ten virtual machines hosted in Azure
Ten virtual machines hosted in an on-premises data center environment
All the virtual machines have the Azure Pipelines agent.
You need to implement a release strategy for deploying the application to the endpoints.
What should you recommend using to deploy the application to the endpoints? To answer,
drag the appropriate components to the correct endpoints. Each component may be used
once, more than once, or not at all. You may need to drag the split bar between panes or
scroll to view content.
NOTE: Each correct selection is worth one point.
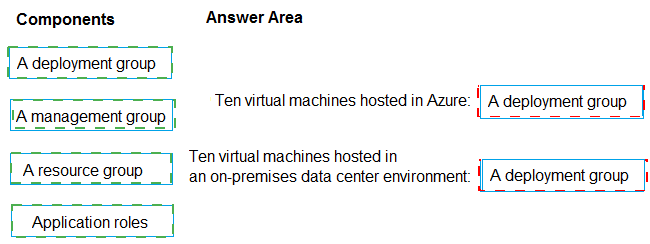
Box 1: A deployment group
When authoring an Azure Pipelines or TFS Release pipeline, you can specify the
deployment targets for a job using a deployment group.
If the target machines are Azure VMs, you can quickly and easily prepare them by installing
the Azure Pipelines Agent Azure VM extension on each of the VMs, or by using the Azure
Resource Group Deployment task in your release pipeline to create a deployment group
dynamically.
Box 2: A deployment group
Explanation:
Azure Pipelines provides deployment groups for targeting multiple machines in a structured way. Deployment groups are logical sets of target machines with installed agents that can receive application deployments. They work consistently whether machines are in Azure or on-premises, as long as the Azure Pipelines agent is installed.
Correct Option:
Ten virtual machines hosted in Azure: A deployment group
Deployment groups in Azure Pipelines are designed to target multiple machines for application deployment. The ten Azure VMs with the Azure Pipelines agent installed can be organized into a deployment group, allowing you to deploy to them simultaneously or in a rolling fashion.
Ten virtual machines hosted in an on-premises data center environment: A deployment group
Deployment groups work identically for on-premises machines as long as the Azure Pipelines agent is installed. You can create a separate deployment group for the on-premises VMs or include them in the same group, depending on your deployment strategy requirements.
Incorrect Option:
A management group:
This is an Azure governance container for managing access, policy, and compliance across multiple subscriptions. It is not used for application deployments to virtual machines.
A resource group:
This is a logical container in Azure for managing related Azure resources. While the Azure VMs are in a resource group, the resource group itself cannot be targeted for application deployment in Azure Pipelines.
Application roles:
These define permissions and access levels within an application, not deployment targets for virtual machines.
Reference:
Microsoft Learn: Deployment groups in Azure Pipelines
Microsoft Learn: Deploy to Windows VMs using a deployment group
Microsoft Learn: Provision agents for deployment groups
You have an Azure Resource Manager (ARM) template that contains the following
expression.
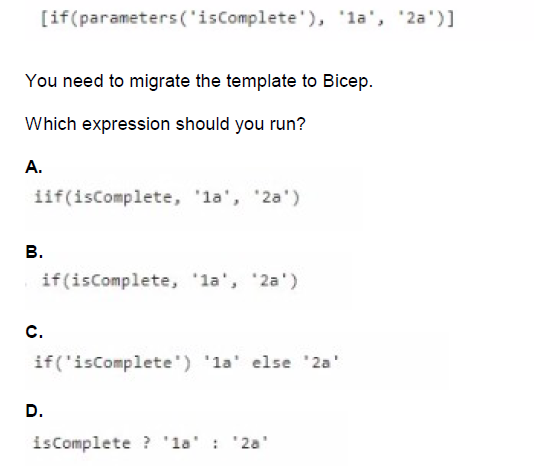
A. Option A
B. Option B
C. Option C
D. Option D
Explanation:
When migrating from ARM templates to Bicep, the syntax for conditional expressions changes. ARM templates use the if() function within brackets, while Bicep uses the ternary operator syntax common in many programming languages. Understanding this syntax difference is essential for correctly converting ARM templates to Bicep.
Correct Option:
D. isComplete ? '1a' : '2a'
Bicep uses the ternary operator syntax condition ? true-value : false-value for conditional expressions. This is the correct Bicep equivalent of the ARM template if() function. The parameter isComplete is referenced directly by name, and the ternary operator returns '1a' when true and '2a' when false, exactly matching the original ARM template logic.
Incorrect Option:
A. if(isComplete, '1a', '2a') and B. if(isComplete, '1a', '2a')
Both options A and B show identical incorrect syntax. While this resembles the ARM template if() function, Bicep does not use this function syntax. Using this would result in a compilation error in Bicep.
C. if('isComplete') '1a' else '2a'
This syntax is not valid in Bicep. It incorrectly places quotes around the parameter name, making it a string literal instead of referencing the parameter. Additionally, Bicep does not use this if-else statement format for inline conditional expressions.
Reference:
Microsoft Learn: Conditional expressions in Bicep
Microsoft Learn: Migrate ARM templates to Bicep
Microsoft Learn: Parameters in Bicep
You are creating a NuGet package.
You plan to distribute the package to your development team privately.
You need to share the package and test that the package can be consumed.
Which four actions should you perform in sequence? To answer, move the appropriate
actions from the list of actions to the answer area and arrange them in the correct order.
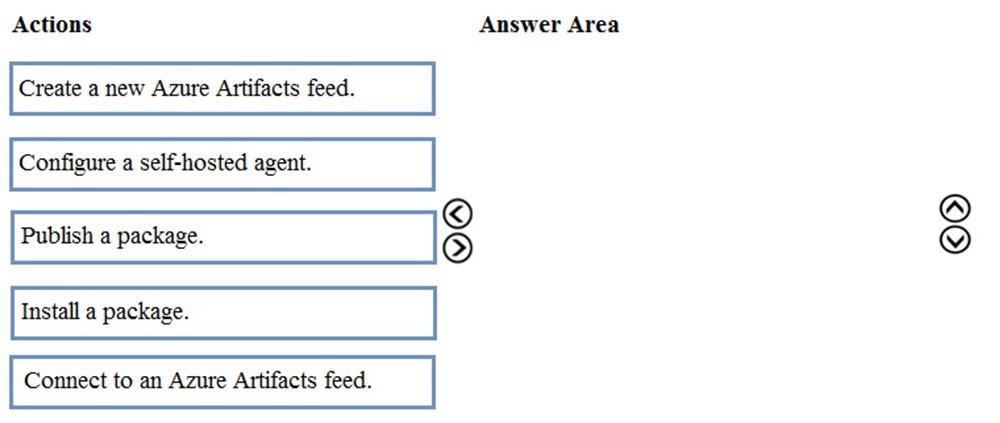
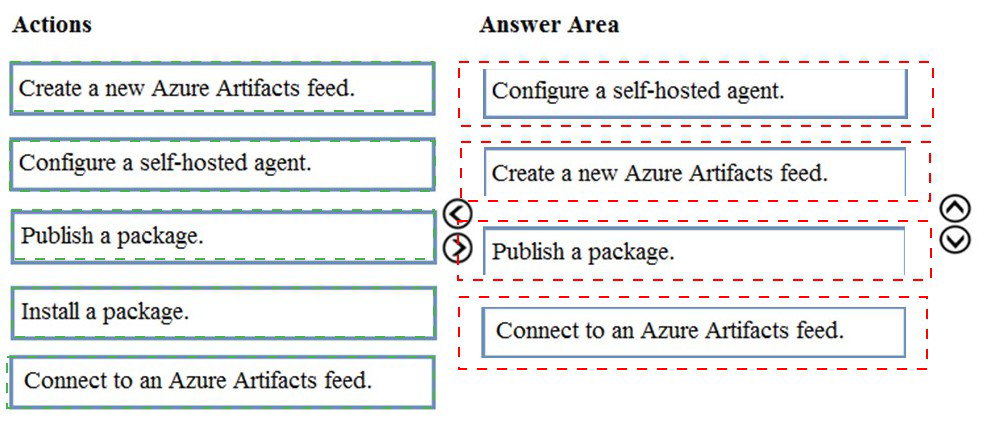
Step 1: Configure a self-hosted agent.
The build will run on a Microsoft hosted agent.
Step 2: Create a new Azure Artifacts feed
Microsoft offers an official extension for publishing and managing your private NuGet feeds.
Step 3: Publish the package.
Publish, pack and push the built project to your NuGet feed.
Step 4: Connect to an Azure Artifacts feed.
With the package now available, you can point Visual Studio to the feed, and download the
newly published package
Explanation:
To privately share a NuGet package with a development team using Azure Artifacts, you need to establish a private feed, connect to it, publish your package, and then verify it can be consumed. This sequence ensures the package is properly hosted and accessible before team members attempt to use it.
Correct Option:
First action: Create a new Azure Artifacts feed
The first step is creating a private Azure Artifacts feed. This feed will serve as the private repository where your NuGet package will be stored and from which your development team can access it.
Second action: Connect to an Azure Artifacts feed
After creating the feed, you need to configure your local environment to connect to it. This involves setting up the appropriate source in your NuGet configuration so that you can publish to and later install from this feed.
Third action: Publish a package
With the feed created and connection configured, you can now publish your NuGet package to the private Azure Artifacts feed. This makes the package available for your development team to consume.
Fourth action: Install a package
Finally, to test that the package can be consumed successfully, you should install it from the feed into a test project. This validates that the package is accessible and functions as expected when referenced by other applications.
Incorrect Option:
Configure a self-hosted agent: This is related to Azure Pipelines build agents and is not required for simply sharing and testing a NuGet package through Azure Artifacts.
Reference:
Microsoft Learn: Create a private NuGet feed using Azure Artifacts
Microsoft Learn: Publish and restore NuGet packages from Azure Artifacts
Microsoft Learn: Connect to Azure Artifacts feeds
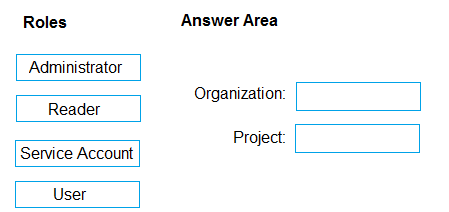
You need to configure access to Azure DevOps Agent pools to meet the forwarding
requirements:
• Use a project agent pool when authoring build release pipelines.
• View the agent pool and agents of the organization.
• Use the principle of least privilege.
Which role memberships are required for the Azure 0e%Oos organization and the project?
To answer, drag the appropriate role membership to the correct targets. Each role
membership may be used once, more than once, or not at all. You may need to drag the
split bar between panes or scroll to content
NOTE: Each correct selection is worth one point.
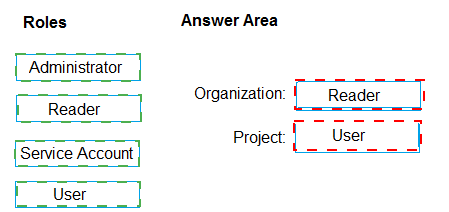
Explanation:
Azure DevOps uses role-based access control for agent pools at both organization and project levels. Different roles grant specific permissions for viewing, using, and managing agents. Following least privilege means assigning only the permissions needed: using project pools requires appropriate project-level access, while viewing organization pools requires reader access at the organization level.
Correct Option:
Organization: Reader
The Reader role at the organization level allows users to view agent pools and agents across the organization without being able to modify them. This satisfies the requirement to "view the agent pool and agents of the organization" while adhering to least privilege by not granting unnecessary administrative permissions.
Project: User
The User role at the project level allows team members to use project agent pools when authoring build and release pipelines. This provides the necessary permission to consume agents for pipeline execution without granting broader administrative rights over the agent pools.
Incorrect Option:
Administrator: This role has full control over agent pools including creation, modification, and deletion. This exceeds the requirements and violates least privilege.
Service Account: This is not a standard Azure DevOps role for agent pool access. Service accounts are typically used for automated processes, not for user access.
Project-level Reader: This would only allow viewing project pools, not using them for pipelines.
Organization-level User: This role doesn't exist at organization level for agent pools; organization-level access focuses on administrative and viewer permissions.
Organization-level Administrator: This would grant excessive permissions to modify organization-wide agent pools.
Reference:
Microsoft Learn: Agent pool roles in Azure DevOps
Microsoft Learn: Security and permission management for agent pools
Microsoft Learn: Manage agent pools in Azure DevOps
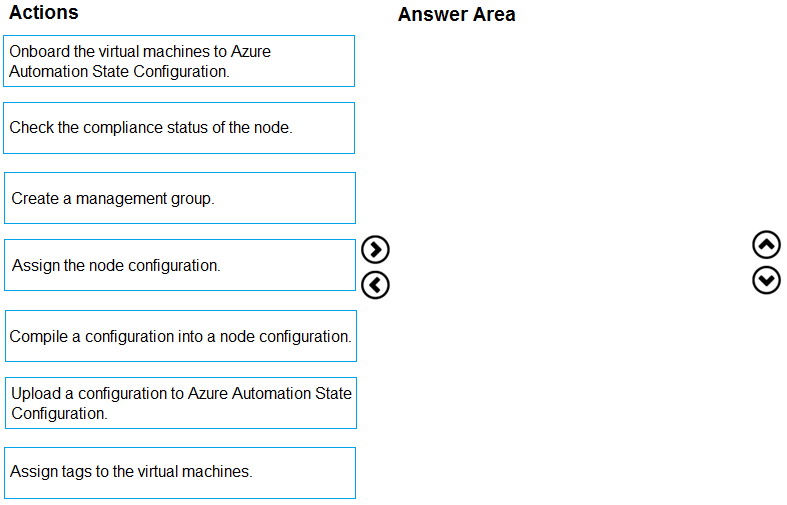
You need to use Azure Automation Sure Configuration to manage the ongoing consistency
of virtual machine configurations.
Which five actions should you perform in sequence? To answer, move the appropriate
actions from the list of actions to the answer area and arrange them in the correct order.
NOTE: More than one order of answer choices in correct. You writ receive credit for any of
the orders you select.
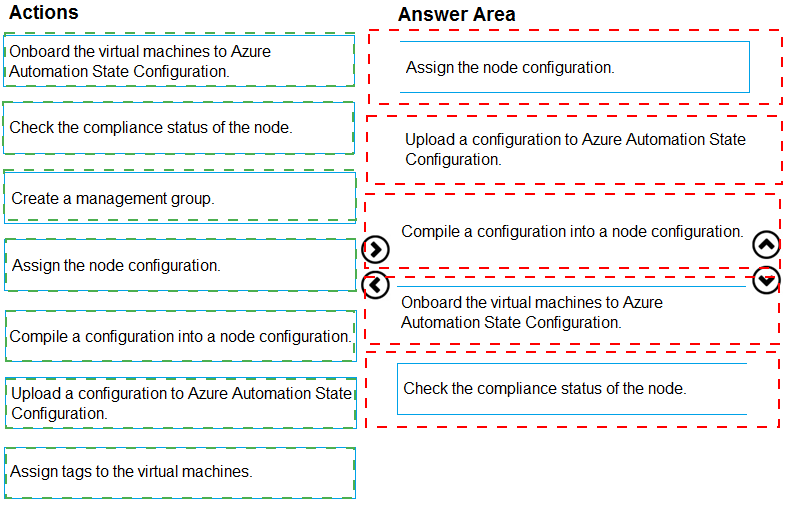
Explanation:
Azure Automation State Configuration (formerly DSC) enables managing VM configurations through a pull model. The process involves creating a configuration, compiling it into a node configuration, uploading to Azure Automation, onboarding VMs, and assigning the configuration to ensure ongoing consistency. Two sequences are valid depending on whether you onboard first or assign first.
Correct Option (Sequence 1):
First: Upload a configuration to Azure Automation State Configuration
The PowerShell DSC configuration script must be uploaded to Azure Automation as the source definition for desired state.
Second: Compile a configuration into a node configuration
The uploaded configuration is compiled into a MOF file (node configuration) that VMs can pull and apply.
Third: Onboard the virtual machines to Azure Automation State Configuration
Register the target VMs with Azure Automation to enable state configuration management.
Fourth: Assign the node configuration
Assign the compiled node configuration to the onboarded VMs so they know which configuration to pull.
Fifth: Check the compliance status of the node
Verify that VMs are applying the configuration correctly and are compliant with the desired state.
Correct Option (Sequence 2):
First: Upload a configuration to Azure Automation State Configuration
Second: Compile a configuration into a node configuration
Third: Assign the node configuration
The node configuration can be assigned before onboarding, creating an assignment that takes effect when VMs are onboarded.
Fourth: Onboard the virtual machines to Azure Automation State Configuration
VMs are registered and immediately receive their assigned configuration.
Fifth: Check the compliance status of the node
Incorrect Option:
Create a management group: This is for organizing subscriptions in Azure governance, not for DSC configuration management.
Assign tags to the virtual machines: Tags are for resource organization and cost tracking, not related to DSC configuration.
Reference:
Microsoft Learn: Azure Automation State Configuration overview
Microsoft Learn: Onboarding machines for management
Microsoft Learn: Compiling DSC configurations
| Page 3 out of 49 Pages |