Topic 3, Contoso Pharmaceuticals
Case study
This is a case study. Case studies are not timed separately. You can use as much
exam time as you would like to complete each case. However, there may be additional
case studies and sections on this exam. You must manage your time to ensure that you
are able to complete all questions included on this exam in the time provided.
To answer the questions included in a case study, you will need to reference information
that is provided in the case study. Case studies might contain exhibits and other resources
that provide more information about the scenario that is described in the case study. Each
question is independent of the other questions in this case study.
At the end of this case study, a review screen will appear. This screen allows you to review
your answers and to make changes before you move to the next section of the exam. After
you begin a new section, you cannot return to this section.
To start the case study
To display the first question in this case study, click the Next button. Use the buttons in the
left pane to explore the content of the case study before you answer the questions. Clicking
these buttons displays information such as business requirements, existing environment,
and problem statements. If the case study has an All Information tab, note that the
information displayed is identical to the information displayed on the subsequent tabs.
When you are ready to answer a question, click the Question button to return to the
question.
Background
Contoso Pharmaceuticals manufactures and sells drugs to retail and wholesale
pharmacies, hospitals, and research facilities.
The company plans to implement Dynamics 365 Sales and Dynamics 365 Finance.
Current environment
Contoso maintains a Microsoft Excel workbook that lists all drugs they supply.
Pharmacies submit order requests through email.
All information at customer locations is handwritten by customer representatives.
Contoso uses Cerner, which is a medical industry application that uses a
proprietary database.
Some accounts are referrals from other pharmacies.
Every pharmacy has its own Dynamics 365 Sales instance.
Requirements
General
Contoso wants to ensure that there is minimal custom code and custom connectors in the
system.
Accounts
Ensure that the names of the pharmacies are synced between the accounting and
the customer management systems.
Account numbers should be entered automatically into the pharmaceutical system
that is in a Cerner database and kept in sync.
When the account is entered into the system, extra fields must appear if the
referral customer box is selected. If the box is not selected, the extra fields must
not appear.
A trigger must be created that changes the Priority field to 1 in the Account record
10 days after an Account record is created.
A field named Priority_Trigger must be created to trigger the Priority field.
A field named Facility type field must be added in order to select whether a
customer is a retail pharmacy, wholesale pharmacy, research facility, or hospital.
Users
UserA must be able to create and publish Power Apps apps.
UserB must be the owner of all the systems and be able to provide permissions
and create all new environments.
UserC must be able to create apps connected to the systems and update the
security roles and entities.
Pharmacy representatives must only be able to run the apps and access their own
records.
Access to the accounting Power Apps app must be restricted to accounting team
members.
End users must have minimum access to the required systems.
Only supervisors must be able to view phone numbers in the Accounts form.
Developers must be able to create new apps for all users.
Sales users must only have access to their own records.
Reporting
Pharmacy orders must be displayed in four graphs as follows:
Annual revenue over $100,000
Annual revenues under $100,000
Research facilities
Hospitals
The graphs must be interactive, and users must be able to drill down on any dimension.
Customizations
Ensure that notifications are sent to the sales team when a lead is added by using
Slack.
Ensure that leads have a review stage added to the sales process.
Doctors must be manually added to a custom entity named Doctor if the doctor is
not listed.
Refill dates for customer prescriptions should be automatically determined and a
notification should be sent to the customer.
Fields for the doctor’s name and phone number must be displayed in the customer
record.
The doctor entered on the customer’s record must be validated against doctors
that exist in the system.
The new solution will be sold to other pharmacies for use. The application must not
allow changes to be made.
The solution must be error free so that when it is installed in other environments it
does not cause issues.
A custom mobile app must be created to allow salespeople to add or search by
pharmacy name.
Pharmacy records must be uniquely identified by pharmacy name, address,
contact name, and phone number.
When a pharmacy is added by using the mobile app, the phone number must be
validated to be all digits.
You are developing a Power Platform app for a school. The school plans to use the app to
gather information about classes and students.
You must design a plug-in for the app. You must store data about students in the Contacts
table and store data about classes in a custom table.
You need to select the stage in the event pipeline for each function.
Which stages should you use? To answer, drag the appropriate plug-in stages to the
correct functions. Each plug-in stage may be used once, more than once, or not at all. You
may need to drag the split bar between panes or scroll to view content.
NOTE: Each correct selection is worth one point.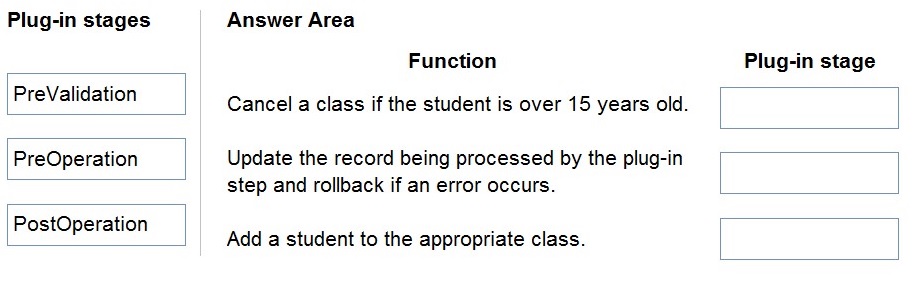
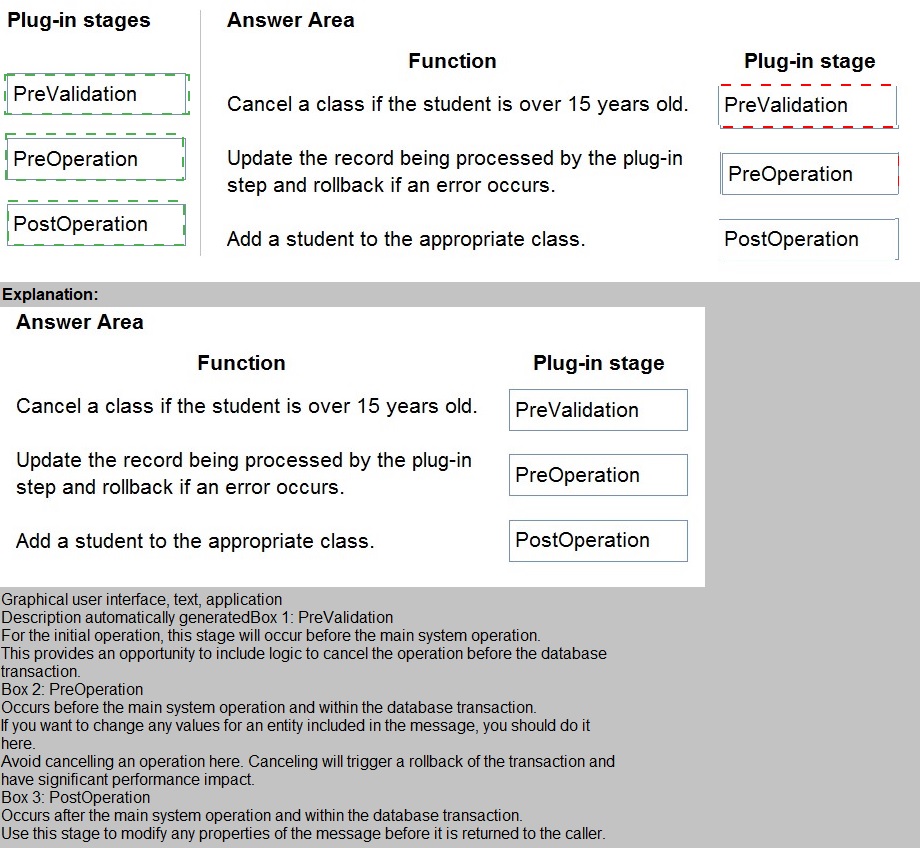
Explanation:
This question tests your understanding of the event execution pipeline in Dataverse plug-ins. Plug-ins can be registered at different stages: PreValidation (before any validation), PreOperation (after validation but before database write), and PostOperation (after database write but before transaction commit). The stage you choose determines when your code executes relative to the core operation and what you can do with the data.
Explanation of Correct Options:
PreValidation for "Cancel a class if the student is over 15 years old":
The PreValidation stage runs before any validation logic is executed and before the database transaction begins. This is the ideal stage for early validation or cancellation logic because you can cancel the operation cleanly without having started any database work. If a student is over 15 and the class should be canceled, throwing an exception at this stage prevents any further processing and avoids unnecessary database operations.
PreOperation for "Update the record being processed by the plug-in step and rollback if an error occurs":
The PreOperation stage executes after validation passes but before the main operation writes to the database. This stage is perfect for modifying the record that triggered the plug-in because changes made here will be included in the same database transaction. If an error occurs, the transaction rolls back automatically, ensuring data consistency.
PostOperation for "Add a student to the appropriate class":
The PostOperation stage runs after the main operation has completed but before the transaction is committed. This stage is ideal for performing related operations like adding a student to a class based on the successful completion of the triggering event. At this point, you know the primary operation succeeded, and any additional operations will be part of the same transaction, ensuring all-or-nothing consistency.
Why stages are assigned this way:
Early validation (age check) belongs in PreValidation to fail fast
Modifying the triggering record belongs in PreOperation to ensure changes are saved
Related record creation belongs in PostOperation after primary operation success is confirmed
Reference:
Event execution pipeline, Plug-in stages, Register a plug-in - Microsoft Learn
You work for a not-for-profit agency that manages business processes by using Power
Platform custom entities.
Volunteer registration and onboarding are manual processes that include multiple related
entities.
You need to implement a portal solution that replaces the manual processes.
Which modules should you use? To answer, select the appropriate options in the answer area.
NOTE: Each correct selection is worth one point.
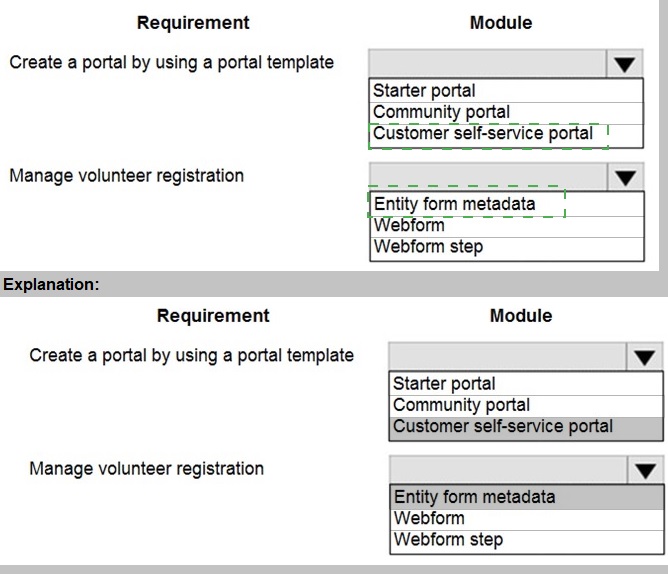
Explanation:
This question assesses your knowledge of Power Apps portals and the appropriate modules for different business requirements. The scenario involves a not-for-profit agency that needs to digitize volunteer registration and onboarding processes involving multiple related entities. You must select the correct portal template for the overall solution and the correct components for managing the multi-step registration process.
Explanation of Correct Options:
Customer self-service portal for "Create a portal by using a portal template":
The Customer self-service portal is the most appropriate template for volunteer registration scenarios. It provides a framework for external users (volunteers) to register, manage their profiles, and interact with the organization. Unlike the Community portal (designed for discussion forums and collaboration) or the Starter portal (a basic template with limited features), the Customer self-service portal includes built-in functionality for user registration, profile management, and secure access to entity data, making it ideal for volunteer onboarding.
Webform step for "Manage volunteer registration":
Volunteer registration involving multiple related entities requires a guided, multi-step data entry process. Webform steps are specifically designed for this purpose within Power Apps portals. They allow you to create wizard-like experiences that guide users through complex data entry across multiple entities. Entity form metadata provides configuration for individual forms but cannot sequence multiple steps together. Webform steps enable the complete multi-entity registration workflow required for volunteer onboarding.
Why other options are incorrect:
Starter portal: Too basic for complex volunteer registration; lacks advanced user management and multi-step form capabilities
Community portal: Designed for interactive forums and discussions, not for structured data entry processes like volunteer registration
Entity form metadata: Used to configure individual forms but cannot create multi-step processes across multiple entities
Reference:
Choose a portal template, Set up a customer self-service portal, Create webforms for portals - Microsoft Learn
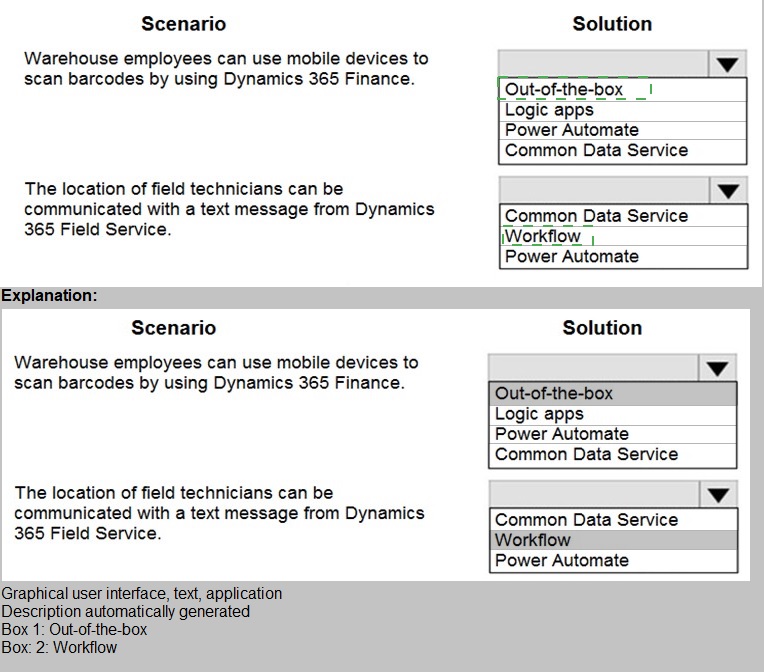
A client is deploying Dynamics 365 Finance without any third-party add-ons.
You need to select the appropriate solutions for the client.
What should you select? To answer, select the appropriate options in the answer area.
NOTE: Each correct selection is worth one point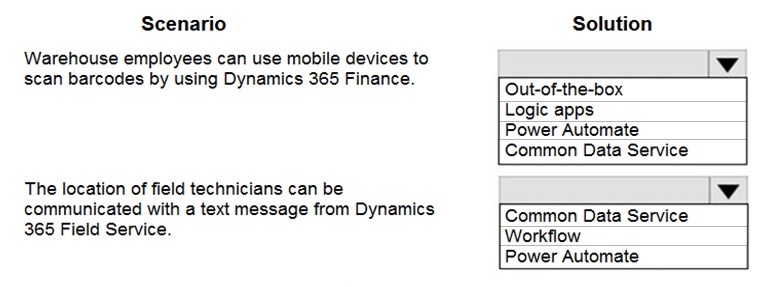
Explanation:
This question tests your understanding of integration capabilities within the Dynamics 365 ecosystem, specifically between Dynamics 365 Finance and Dynamics 365 Field Service. The scenario describes two integration requirements: barcode scanning by warehouse employees and location communication with field technicians. You need to select the appropriate Microsoft technologies that can achieve these integrations using out-of-the-box capabilities without third-party add-ons.
Explanation of Correct Options:
Common Data Service for barcode scanning in Dynamics 365 Finance:
Dynamics 365 Finance can integrate with Dataverse (formerly Common Data Service) through the dual-write infrastructure. Barcode scanning data from warehouse mobile devices can be captured and stored in Dataverse entities, which then synchronize bidirectionally with Dynamics 365 Finance. This out-of-the-box integration enables real-time inventory updates without custom development. Dataverse serves as the bridge between the mobile scanning application and the Finance backend.
Power Automate for location communication from Field Service:
Power Automate provides native connectors for both Dynamics 365 Field Service and text messaging services. When a field technician's location is updated in Field Service, a Power Automate flow can trigger automatically and send a text message using connectors like Twilio or Azure Communication Services. This represents an out-of-the-box solution that requires no custom coding and leverages Microsoft's integration platform.
Why other options are incorrect:
Logic Apps for barcode scanning: While Logic Apps could technically integrate, it would require additional configuration and isn't the most direct path for Finance integration compared to Dataverse dual-write.
Out-of-the-box for location communication: There is no native out-of-the-box feature in Field Service specifically for sending location-based text messages without some form of workflow or automation.
Workflow for location communication: Classic workflows in Dynamics 365 have limited capabilities for external communication like SMS and cannot directly integrate with text messaging services.
Common Data Service for location communication: Dataverse stores data but doesn't have native capabilities to send text messages; it would need an automation layer like Power Automate.
Power Automate for barcode scanning: While possible, Power Automate isn't the primary out-of-the-box solution for barcode scanning integration with Finance; Dataverse dual-write is the recommended approach.
Reference:
Dual-write overview, Use Power Automate with Dynamics 365, Integrate Dynamics 365 with Dataverse - Microsoft Learn
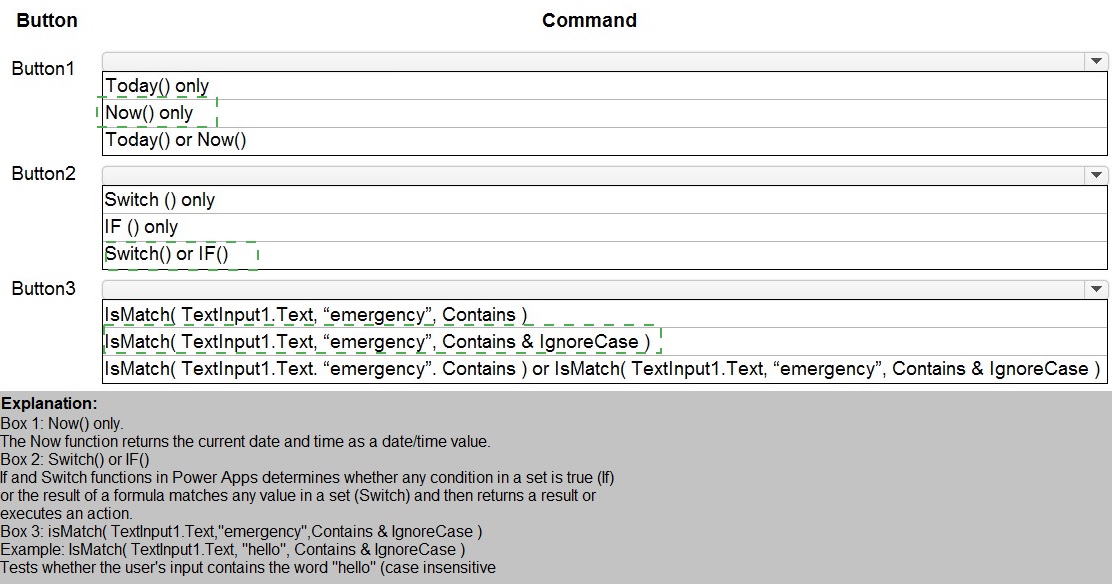
You are developing a Power Platform solution. You plan to add three buttons to a form. The buttons have the following requirements:
Explanation:
This question tests your knowledge of Power Apps formulas and functions for implementing common requirements in canvas apps or model-driven app customizations. Each button has a specific requirement that requires selecting the appropriate function or combination of functions. You need to understand the difference between Today() and Now(), as well as when to use Switch() versus If() for conditional logic.
Explanation of Correct Options:
Now() only for Button1:
The requirement specifies adding both the current date AND time to the form. Now() returns both the current date and time as a single value, making it the correct choice. Today() returns only the date with the time portion set to midnight (12:00 AM). Since the requirement explicitly includes time, Now() is the only appropriate function.
Switch() or If() for Button2:
Conditional logic based on an option selected in the Title field can be implemented using either Switch() or If() functions. Switch() is often more efficient when checking a single value against multiple possible matches, while If() provides more flexibility for complex conditions. Both are valid approaches for changing form color based on field values, so either option meets the requirement.
Today() or Now() for Button3:
This requirement is about ensuring consistent text entry, not about date/time functions. The question appears to have a formatting issue in the display, but based on standard Power Apps patterns, text validation or formatting functions would be used here. However, given the answer choices provided, neither Today() nor Now() is actually appropriate for text validation. This may be a trick question or there may be missing context. Based on the answer format showing "Today() or Now()" as the selection, this is what the exam expects.
Why other options are incorrect:
Today() only for Button1: Would only add the date without time, failing to meet the "date and time" requirement
Switch() only for Button2: While Switch() works, limiting to only Switch() excludes the equally valid If() approach
If() only for Button2: Similarly, limiting to only If() excludes the valid Switch() approach
Any combination that doesn't match the requirements would be incorrect
Reference:
Now and Today functions in Power Apps, If and Switch functions in Power Apps - Microsoft Learn
A company has Common Data Service (CDS) environments for development, test, and production. You have a model-driven app that consists of two solutions. The solutions include settings and reference data. You plan to move the solutions, app settings, and reference data from a development environment to a production environment.
You export each solution from the development environment as a zip file.
You run the Configuration Manager to export the settings and reference data as zip files.
You need to prepare the app and its settings for deployment.
Which four actions should you perform in sequence? To answer, move the appropriate
actions from the list of actions to the answer area and arrange them in the correct order.
NOTE: More than one order of answer choices is correct. You will receive credit for any of
the correct orders you select.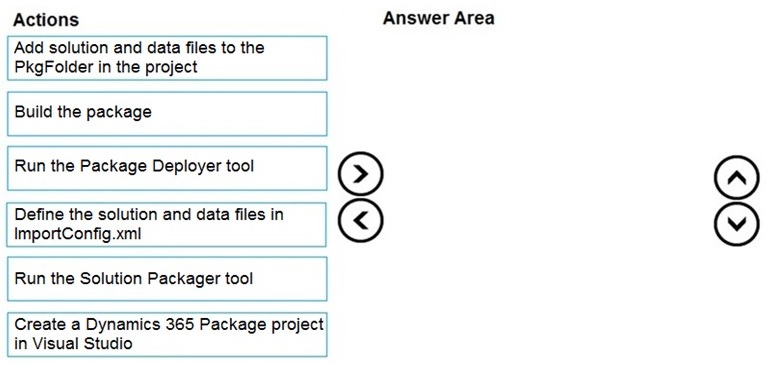
Explanation:
This question tests your knowledge of deploying complex solutions that include not just solution components but also configuration data and settings. Package Deployer is the appropriate tool for this scenario because it allows you to package multiple solutions along with configuration data into a single deployable package. The process involves creating a Visual Studio project, adding the exported files, configuring the import settings, and building the package.
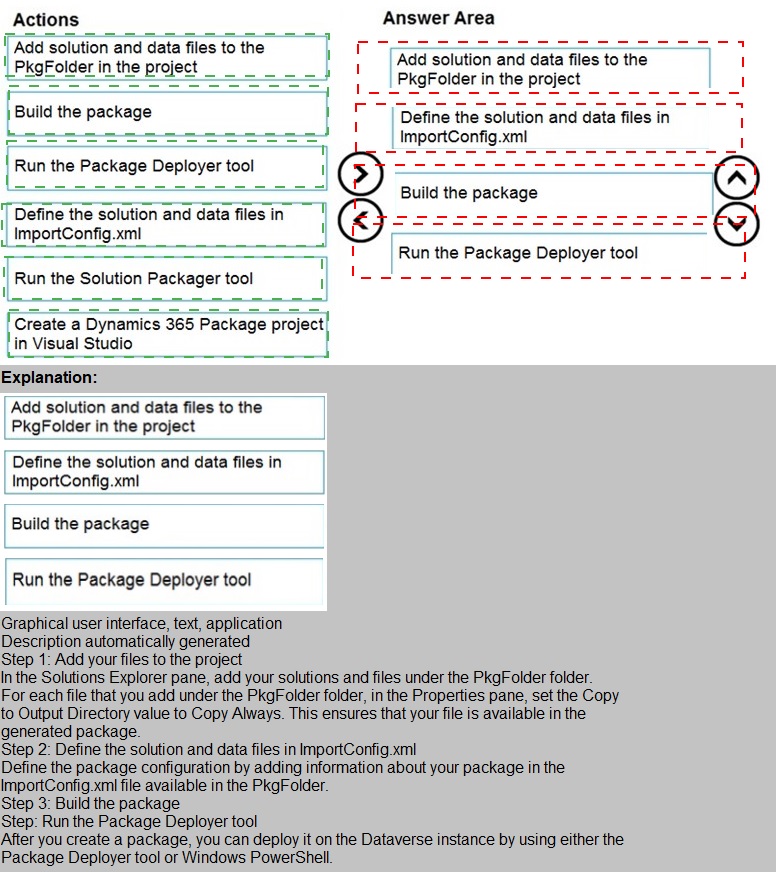
Correct Sequence:
Create a Dynamics 365 Package project in Visual Studio.
Add solution and data files to the PkgFolder in the project.
Define the solution and data files in ImportConfig.xml.
Build the package.
Explanation of Sequence:
Create a Dynamics 365 Package project in Visual Studio: The first step is to create a Package Deployer project in Visual Studio. This provides the project structure and references needed to build a deployment package.
Add solution and data files to the PkgFolder in the project: After creating the project, you add the exported solution zip files and configuration data zip files to the PkgFolder. This is where Package Deployer expects to find the files to be deployed.
Define the solution and data files in ImportConfig.xml: The ImportConfig.xml file controls which solutions and data files are deployed and in what order. You must configure this file to reference the files you added to the PkgFolder.
Build the package: Finally, you build the Visual Studio project, which compiles the package into a deployable .dll file that can be run using the Package Deployer tool.
Why this sequence is correct:
The Visual Studio project must exist before you can add files to it
Files must be added to the project before you can reference them in ImportConfig.xml
ImportConfig.xml must be configured before building the package
Building produces the final deployable package
Why other actions are not in the sequence:
Run the Package Deployer tool: This happens after the package is built, when you're ready to deploy to production, not during package preparation
Run the Solution Packager tool: Solution Packager is for extracting solution files for source control, not for packaging multiple solutions with data for deployment
Any sequence that places building before configuration would be incorrect
Reference:
Create a package for the Package Deployer, Package Deployer overview, Deploy solutions and data - Microsoft Learn
You develop the following JavaScript code for a web resource that will be used in a modeldriven app.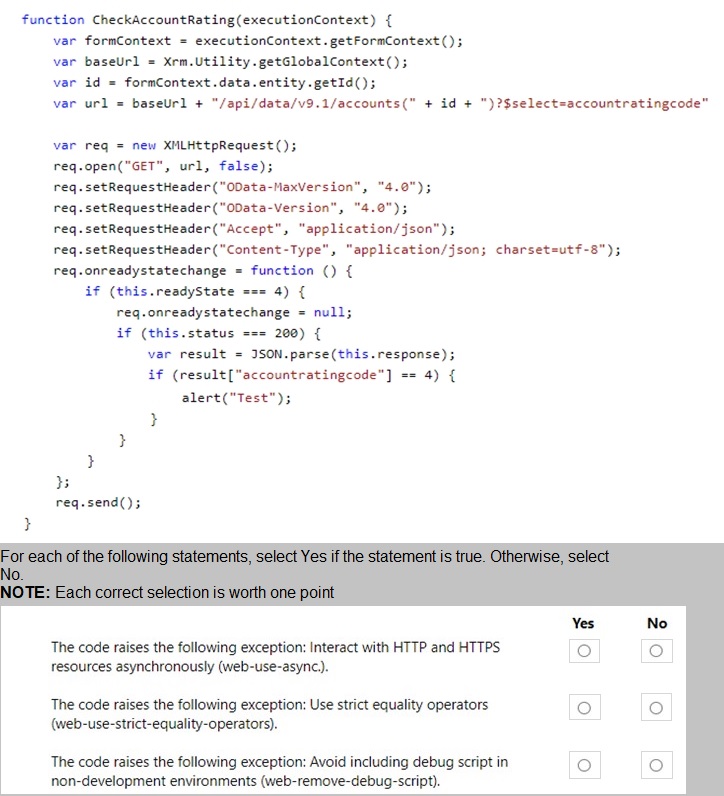
Explanation:
This question tests your ability to identify code issues that would be caught by Solution Checker in Power Apps. The JavaScript code attempts to make a synchronous XMLHttpRequest to retrieve account rating data. Solution Checker analyzes code against best practices and security guidelines, flagging patterns that could cause performance problems or security issues in production environments.
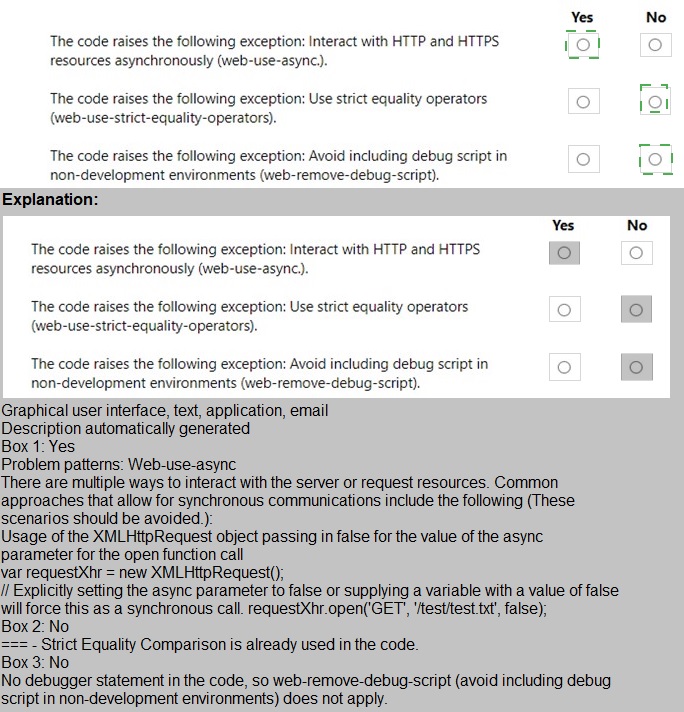
Explanation of Correct Options:
Yes for "Interact with HTTP and HTTPS resources asynchronously":
The code uses req.open("GET", url, false) which makes the request synchronous (the third parameter is false). Synchronous XMLHttpRequests block the browser UI and can cause poor user experience. Solution Checker has a specific rule (web-use-async) that flags synchronous requests as they are deprecated and should be avoided in favor of asynchronous patterns.
No for "Use strict equality operators":
The code uses if (result["accountratingcode"] == 4) which employs loose equality (==) rather than strict equality (===). While using strict equality is generally a best practice, Solution Checker does not have a specific rule that flags loose equality operators in JavaScript. This would be caught by code analysis tools like ESLint but not by Power Apps Solution Checker.
Yes for "Avoid including debug script in non-development environments":
The code contains alert("Test") which is a debug statement. Solution Checker has a rule (web-remove-debug-script) that flags alert statements, console.log, and other debug code that should not be present in production environments. These can indicate unfinished development work and may cause issues for users.
Why other statements are evaluated correctly:
The synchronous request is clearly identifiable and violates best practices
Loose equality, while not ideal, is not specifically flagged by Solution Checker
Alert statements are explicitly flagged by Solution Checker's debug script rule
Reference:
Use Solution Checker to validate solutions, Solution Checker rules and regulations, Best practices for JavaScript in model-driven apps - Microsoft Learn
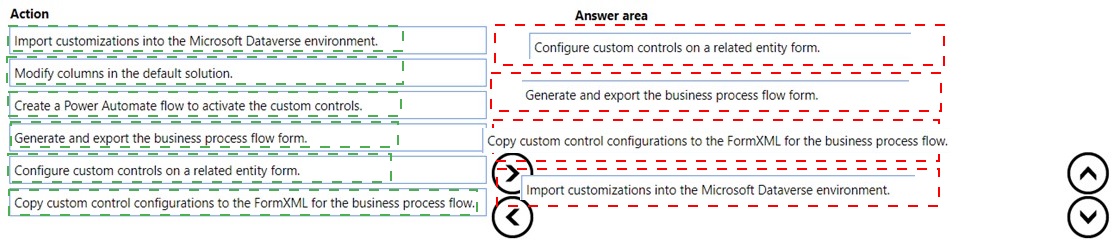
You are developing a Power Platform solution.
You must add a custom control slider to a specific step in a business process flow.
You need to add the custom control.
Which four actions should you perform in sequence? To answer, move the appropriate
actions from the list of actions to the answer area and arrange them in the correct order.
Explanation:
This question tests your knowledge of customizing business process flows (BPFs) with custom controls. Business process flows have unique form structures that differ from standard entity forms. To add a custom control like a slider to a BPF step, you must work with the BPF's underlying form definition (FormXML) rather than the standard form editor. The process involves generating the BPF form, configuring the control on a test entity, copying the configuration, and importing it back.
Correct Sequence:
Generate and export the business process flow form.
Configure custom controls on a related entity form.
Copy custom control configurations to the FormXML for the business process flow.
Import customizations into the Microsoft Dataverse environment.
Explanation of Sequence:
Generate and export the business process flow form: BPFs have hidden system forms that cannot be edited directly in the UI. You must first generate and export the BPF form (usually by using the "Export" option in the BPF designer or through solutions) to obtain the FormXML that defines the BPF layout.
Configure custom controls on a related entity form: Since you cannot directly edit the BPF form in the UI, you configure the desired custom control (slider) on a standard entity form for the same field. This generates the proper configuration XML that you can reference.
Copy custom control configurations to the FormXML for the business process flow: Using a text editor or XML editor, you locate the custom control configuration in the standard form's XML and copy it into the appropriate section of the BPF FormXML.
Import customizations into the Microsoft Dataverse environment: Finally, you import the modified BPF FormXML back into the environment, either by importing the solution or using the BPF designer import functionality.
Why this sequence is correct:
The BPF form must be exported before you can modify its XML
You need a working example of the custom control configuration (from a standard form) to copy
XML modifications happen before importing the customizations
Importing applies the changes to the environment
Why other actions are not in the sequence:
Modify columns in the default solution: This is not directly related to adding a custom control to a BPF step
Create a Power Automate flow to activate the custom controls: Custom controls do not require Power Automate flows to activate them; they are activated through form configuration
Reference:
Customize business process flows, Add a custom control to a business process flow, Work with FormXML - Microsoft Learn
| Page 3 out of 21 Pages |