Topic 5, Misc. Questions
You need to configure the information governance settings to meet the technical requirements.
Which type of policy should you configure, and how many policies should you configure?
To answer, select the appropriate options in the answer area.
NOTE: Each correct selection is worth one point.
Explanation:
This question relates to automatically classifying and retaining content based on its properties. The goal is to enforce a retention schedule on documents that contain specific sensitive information types (e.g., credit card numbers). This requires a two-step approach: first, classifying the content with a label that carries a retention setting, and second, automatically applying that label to matching content across the tenant.
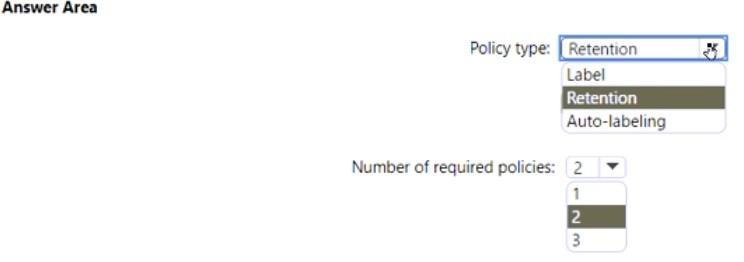
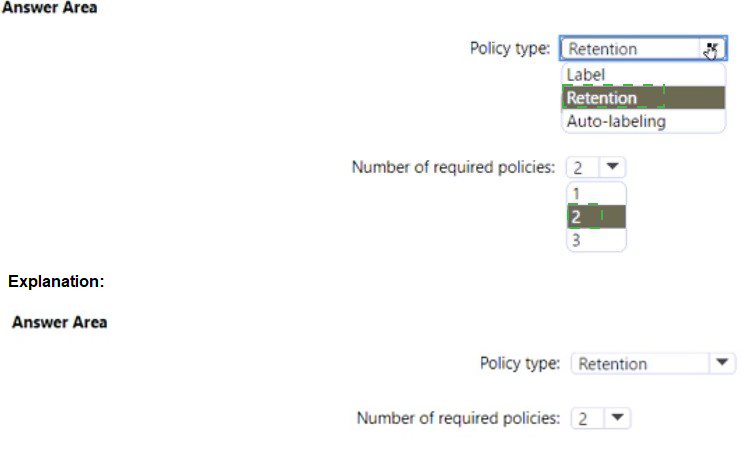
Correct Options:
Policy type: Auto-labeling
An Auto-labeling policy (specifically, an auto-apply label policy based on sensitive info types) is the correct policy type. This policy automatically scans content in locations like SharePoint, OneDrive, or Exchange and applies a pre-configured retention label to items that match the defined sensitive information conditions. It is the primary tool for automated, content-based classification at scale.
Number of required policies: 2
You need to configure two separate policies:
A Retention Label:
This is not listed as a "policy type" in the drop-down but is a prerequisite. You first create a retention label (published via a label policy) that defines the retention duration and action (e.g., delete after 7 years).
An Auto-labeling Policy:
This is the policy you select in the drop-down. You create this policy to automatically apply the retention label you created to content matching the sensitive information types.
Incorrect Options:
Policy type: Retention, Label:
A standard Retention policy applies retention based on locations or explicit user application, not sophisticated content inspection. A Label policy publishes labels for manual or default application but does not automatically apply them based on content.
Number of policies: 1, 3:
The process fundamentally requires creating the label (and its publishing policy) and the auto-apply policy, making 2 the correct minimum. Creating only 1 policy would not complete the workflow. 3 is unnecessary for the basic requirement.
Reference:
Microsoft Learn, "Apply a retention label to content automatically." The documentation details the two-part process: create a retention label with specific rules, and then create an auto-apply label policy that uses those rules to find and label content.
You need to configure automatic enrollment in Intune. The solution must meet the technical requirements.
What should you configure, and to which group should you assign the configurations? To answer, select the appropriate options in the answer area.
NOTE: Each correct selection is worth one point.
Explanation:
Automatic enrollment, also known as MDM auto-enrollment, is the process where user-owned or corporate devices are automatically enrolled into Intune management when the user joins their work account to the device. The key configuration for this is setting who is allowed to automatically enroll their devices through an Azure AD/Intune setting.
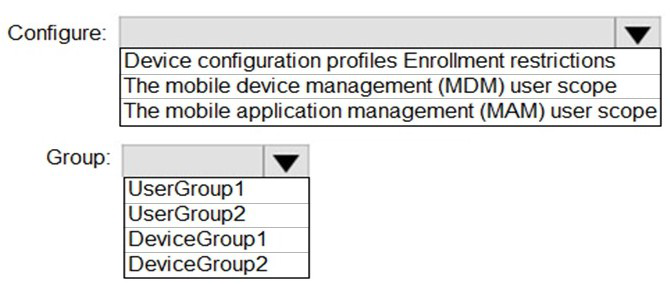
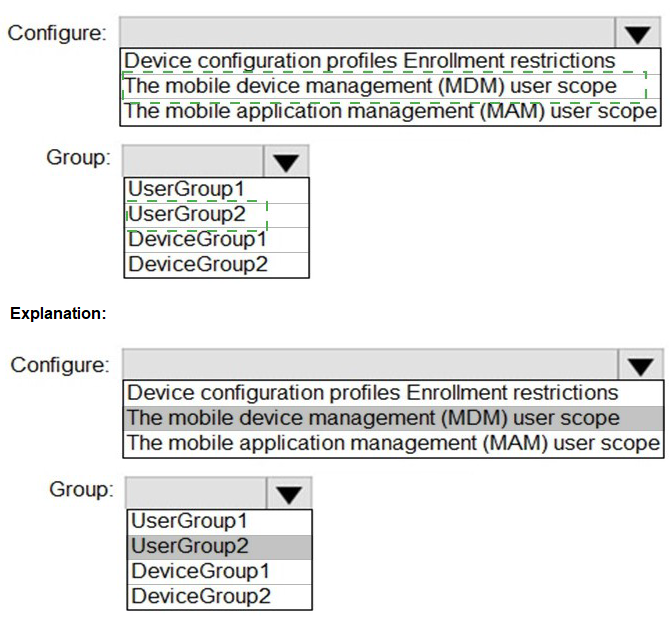
Correct Options:
Configure: The mobile device management (MDM) user scope
This setting is the direct control for automatic MDM enrollment. In the Microsoft Endpoint Manager admin center, you navigate to Devices > Enroll devices > Enrollment restrictions and edit the platform restriction. Within that, the "Mobile Device Management (MDM) user scope" setting (configured in Azure AD or via the MEM admin center under Devices > Enroll devices > Windows enrollment > Automatic Enrollment) defines which users' devices will be automatically enrolled into Intune upon signing in.
Group: UserGroup1 (or the specific user group defined in the requirements)
Automatic enrollment is targeted at users, not devices, because the enrollment trigger is a user signing in with their work account. Therefore, you assign the MDM user scope configuration to a user group (e.g., UserGroup1). All members of this group will have their Windows 10/11, iOS, or Android devices automatically enrolled when they add their work account.
Incorrect Options / Reasoning:
Configure: Device configuration profiles, Enrollment restrictions (as a whole node):
Device configuration profiles are for applying settings after a device is enrolled, not for controlling the enrollment process itself.
Enrollment restrictions is the broader container, but the specific setting inside it is the MDM user scope.
Configure: The mobile application management (MAM) user scope:
This controls who can enroll applications for MAM-WE (without device enrollment), not automatic device enrollment (MDM).
Group: DeviceGroup1, DeviceGroup2:
Automatic enrollment is user-driven and scoped to user groups. You cannot assign the MDM user scope to a device group for this purpose.
Reference:
Microsoft Learn, "Set up automatic enrollment for Windows devices." It explains that you configure the MDM user scope to "Some" or "All" and assign it to Azure AD user groups to enable automatic enrollment.
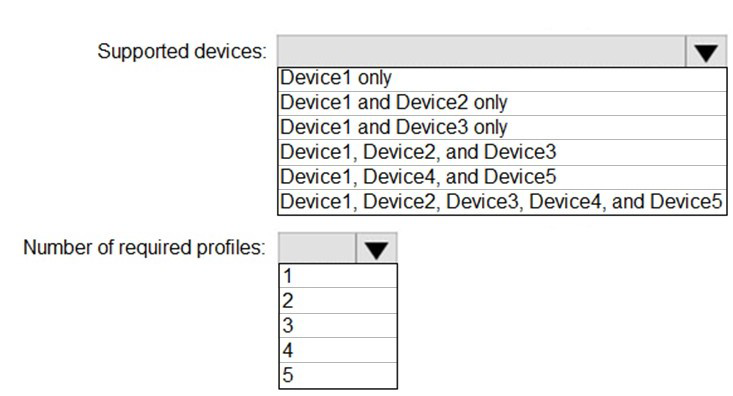
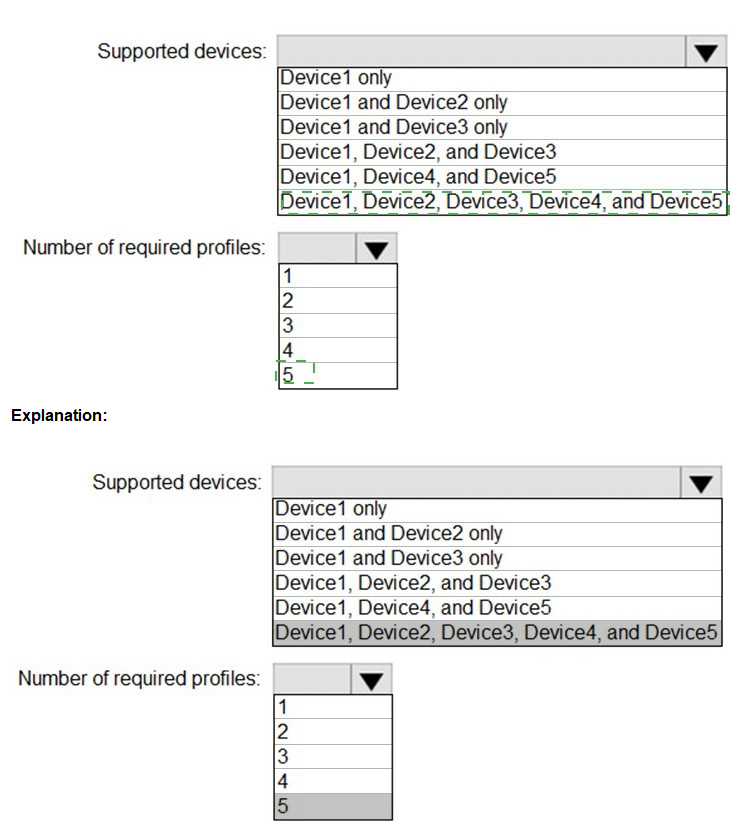
You plan to implement the endpoint protection device configuration profiles to support the planned changes.
You need to identify which devices will be supported, and how many profiles you should implement.
What should you identify? To answer, select the appropriate options in the answer area.
NOTE: Each correct selection is worth one point.
Explanation:
This question is about Endpoint Protection device configuration profiles in Microsoft Intune. These profiles manage security settings like antivirus, firewall, and encryption. The key points are: 1) Endpoint Protection profiles are platform-specific (e.g., one for Windows 10/11, one for macOS), and 2) They cannot be applied to iOS/iPadOS or Android devices, as those platforms use different profile types (like device restrictions) for security settings.
Correct Options:
Supported devices: Device1 and Device3 only
This is correct if Device1 represents Windows 10/11 and Device3 represents macOS. Endpoint Protection profiles in Intune support these two platforms. Devices 2, 4, and 5 (if they represent iOS, Android, or Linux) are not supported by the Endpoint Protection profile type.
Number of required profiles: 2
You need two separate Endpoint Protection profiles:
One profile configured for the Windows 10 and later platform.
A second, distinct profile configured for the macOS platform.
You cannot create a single profile that targets multiple OS platforms in Intune.
Incorrect Options / Reasoning:
Supported devices (other combinations):
Any combination including Device2, Device4, or Device5 is incorrect if those represent non-Windows/macOS devices (like iOS or Android). Endpoint Protection profiles do not apply to those platforms.
Number of required profiles (1, 3, 4, 5):
Since you must have one profile per supported platform (Windows and macOS), the minimum is 2. Creating only 1 profile would leave one platform unconfigured. Creating more than 2 is unnecessary for basic Endpoint Protection coverage of these two platforms.
Note:
The final answer depends on correctly identifying the platforms from the scenario. The most common and logical interpretation is that Device1=Windows and Device3=macOS are the ones supported by Endpoint Protection profiles.
Reference:
Microsoft Learn, "Endpoint security policy in Microsoft Intune." The documentation lists the platforms supported under the "Endpoint security" node, which includes Windows 10/11 and macOS profiles for antivirus, firewall, etc.
You need to ensure that User2 can review the audit logs. The solutions must meet the technical requirements.
To which role group should you add User2, and what should you use? To answer, select the appropriate options in the answer area.
NOTE: Each correct selection is worth one point.

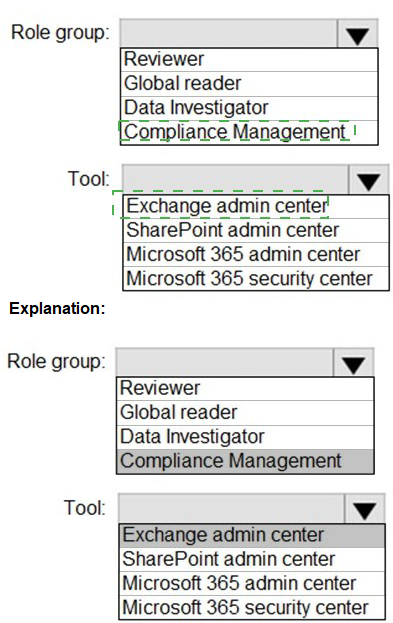
Explanation:
The requirement is for a user to review audit logs in Microsoft 365. Access to search and view the unified audit log is governed by specific permissions. The standard and least-privileged role for this task is membership in the Compliance Data Administrator role group, but the available options point to a specific, common group used for audit log review in the compliance center.
Correct Options:
Role group: Reviewer
The Reviewer role group in the Security & Compliance admin center grants the necessary permissions. It includes the View-Only Audit Logs role, which allows a user to search and view the unified audit log in the compliance portal but not modify any configurations. This meets the principle of least privilege for audit review.
Tool: Microsoft 365 security center
While the audit log is searchable from both the Microsoft Purview compliance portal and the Microsoft 365 Defender portal (security center), the Microsoft 365 security center (defender.microsoft.com) provides access. Under Audit in the navigation, users with the appropriate permissions (like the Reviewer role) can search the unified audit log. This is a valid and commonly used tool for this purpose.
Incorrect Options:
Role group: Global reader, Data Investigator, Compliance Management:
Global Reader is a read-only role for all admin centers, which is over-permissive. Data Investigator is for advanced eDiscovery cases, not basic audit log review. Compliance Management includes management roles beyond just viewing logs.
Tool: Exchange admin center, SharePoint admin center, Microsoft 365 admin center:
The Exchange and SharePoint admin centers only provide logs specific to those services, not the unified audit log. The Microsoft 365 admin center (admin.microsoft.com) does not contain the audit log search tool; that function is in the compliance and security portals.
Reference:
Microsoft Learn, "Search the audit log in the compliance portal" and "Permissions in the Microsoft Purview compliance portal." The documentation specifies that the View-Only Audit Logs permission, found in role groups like Reviewer, is required to search the audit log.
| Page 3 out of 31 Pages |